Saturday, October 31, 2015

Tapas for October.

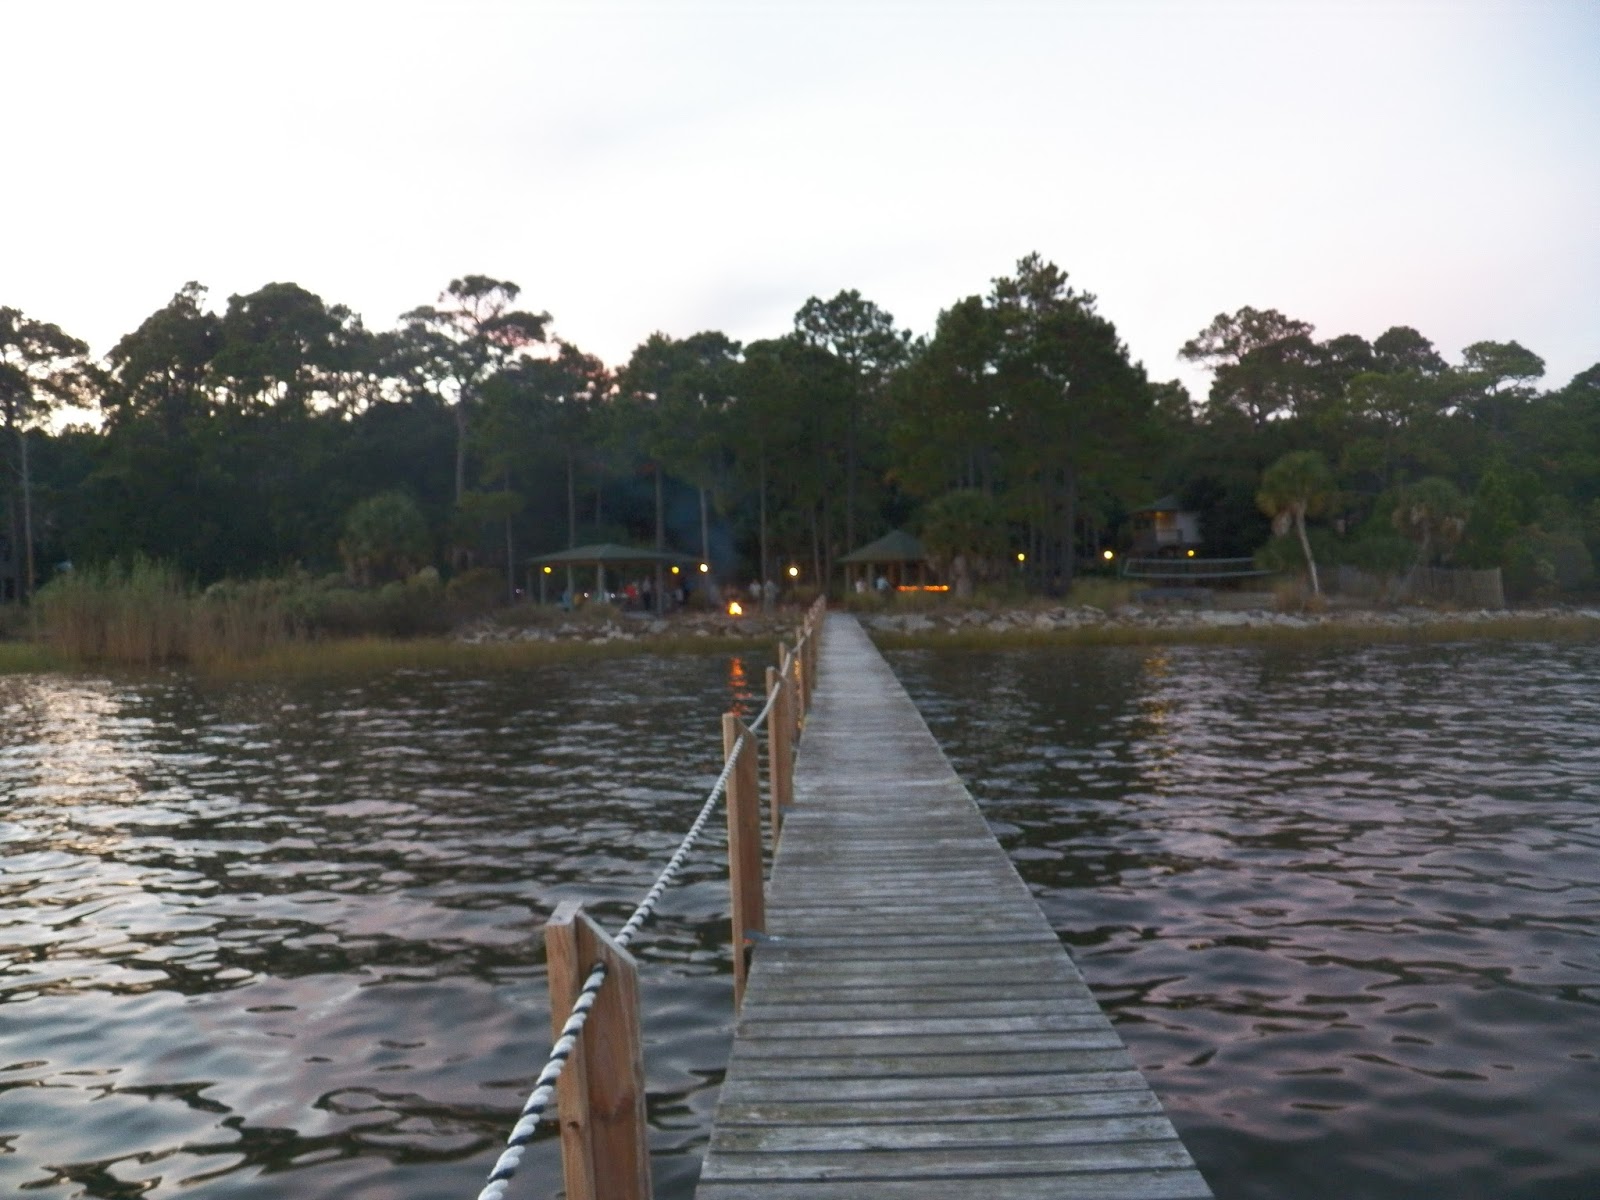
We broke tradition a little with Tapas this month.    It was hosted by a friend and held at an outdoor park.
The weather was perfect, the company was wonderful and as usual the food, well, it was outstanding.


The views were spectacular last night and I think just about everyone enjoyed themselves.
Apart from the fire ants that is.
sigh.  I have a few bites, gotta wear socks and shoes, but last night it was short sleeve weather and just about perfect.
Now for the food...
 There was a big pot of Chile, but this is the only shot I took that turned out.  The others were blurry.

The Chile was outstanding and it all got eaten. 


 We had a Tabbouleh, and yes, those are Pomegranate seeds on top.   I've really gotten to love Tabbouleh.  
 Caprese Bites.  Again, so pretty.
 Coriander and Cheese Puffs.  They were so, and pardon me but I have to use my Danish here, they were lækker, which is like delicious, but a step above.    There was not only Coriander in them, but also Cumin Seeds.  
 And then there were these, crackers topped with cheese and sausage and Pesto, broiled.
I never used to like Pesto, but I'm rapidly becoming a convert. 
 Lovely Potatoes and Onions, sauteed.
 And you really can't go wrong with Pizza, I know that, cause this got eaten fast.

And in the background are my Spicy Witchy Fingers. 
A fancy cheese cracker which actually went very well with the Chile. 
 We also had a lovely cheese plate, and crackers.
 Deviled Eggs, cause gee, what's a Halloween Tapas without something like a Deviled Egg.

I noticed that the platter got licked clean.

OK, so all the eggs disappeared in short order.
 Then there was this totally yummy Pumpkin Dip, which went so well with the apples and graham crackers.

It was light and airy and pumpkinny and good.
There were some Spicy Chicken Wings, and dip.

I'm such a sucker for wings, sigh.


And there was DESSERT.

Cause we all need a sugar fix or 5.

Eclair Cake.  Soo delectable.

And there was a Pecan Pie and some Eclairs there
as well, as some fudgy brownies to the right.

 Cupcakes!

Who doesn't love a cupcake or three?

 I made cookies.  Some Grand Slams, some Kitchen Sinks, and some Oatmeal with a chocolate bottom which are great for S'mores.  In fact they got dubbed S'more Bait.

You can see the Pecan Pie and the Eclairs in the background as well.
There was also these bars which I didn't get a taste of, but was told were really good.


And... there were some other desserts brought but I didn't get a shot a picture of them, I just enjoyed some of it. 

We also had a fire and a lovely sunset was enjoyed by all.  Or at least I assume some of us enjoyed it. 

Continue Reading
2 comments
Share:

Thursday, October 29, 2015

Limey Ideas...

  I love a nice G & T (gin and tonic)
with a couple of squeezes of fresh lime, and lime juice is a must in a lot of Mexican dishes as well.

So when a friend called me up and asked if I wanted some limes, I didn't hesitate at all and ran over and got some.

She gave me a bunch of limes a couple of years ago when her tree produced a lot of limes, and I had so much fun with them.  I froze some of the juice, made Lime Curd  and Lime Syrup  and had fun taste testing different brands of gin to see which one went best with the lime juice.

These are Rangpur Limes and are the prettiest pale peachy color inside.    They contrast so well with Lemons and regular Limes. 

This year though, I juiced the limes and zested them.  I've got plans for that juice.

Lots of plans...

For now though, I just zested madly away
and froze the zest, and have the juice in the freezer ready to use.

And all those seeds that were a happy byproduct of the juicing?
They found a home in some dirt, in my yard.

Just think, in about 10 years I'll have my own limes to process and share but in the meantime, I won't say no if someone's generous enough to give me a bunch.

But gotta go, the ice is melting in my G & T...

It is 5 o'clock somewhere, isn't it?


Continue Reading
No comments
Share:

Tuesday, October 27, 2015

Frosting tips... And not for hair either.

I would like to share where I got this tip, but honestly I don't remember, I think it was on Facebook though.  

 All I know is this, I had to try it.

And managed to screw it up the first time I did it.

Cause I use the Press and Seal aka peel and stick wrap, and if you do this sticky side out, it sticks really well to the piping bag.

And it's not easy to get that out, cause it STICKS!!!! 

But if you use regular old cling wrap, or, umm, the peel and stick, turn the sticky side in, this works.

I love decorating cakes, just hate trying to get the frosting into the piping bag to begin with.
I've learned a few tricks over the years, but despite my best efforts, I still managed to wear my fair share of frosting.
And since I made a Chococcino Cake this past week, I got to try it out. 

However...

This has got to be the slickest ever trick.

Take a sheet of cling wrap, plop a big old spoonful of frosting in the middle, then fold the wrap over the frosting, pick up the ends of the wrap with the frosting in the middle, twirl it a couple of times and set aside while you get the piping bag ready.
Place whichever tip you like on it, then feed that little frosting bundle down through the piping bag, with one end of the closely twisted cling wrap going through the tip.
Cut off the tip of the plastic wrap, then proceed to pipe as you normally would.
When you're finished, pull out that little bag of used up frosting, and discard.
Voila!!!
All you need to do is clean the frosting tip.

And if you have any frosting left in the little baggie you made, you can squeeze it out onto that little side cake you made.
Best of all, clean up was the easiest I've ever had.

I think I need to go make a couple more cakes so I can practice frosting them using this new tip.

What do you think? 


Continue Reading
No comments
Share:

Sunday, October 25, 2015

Chococcino Cake

Have you ever seen a recipe for a cake and said, OOH I can make that.

I did that a few months ago.  Well, I looked at a picture of a cake and thought, that sounds so good, next chance I get to make a fancy cake, I'm going to try that.

Mine doesn't look anything like the other cake.

and...

I had adventures in the kitchen.
Actually I had adventures the entire day.  None of which were all that great.

For starters...
I read the instructions on the cake, checked to make sure I had all the ingredients, and then started.  Well, I had all the ingredients but the Baileys Irish Cream, since I don't care for it all that well, I subbed in some Coffee Liqueur.

I have a scale so I could weigh my ingredients, I have the right measuring cups so I know exactly how much 100 ml is.
But, I think an American 8 inch cake pan is not quite the same as a British 8 inch cake pan.  I could have, should have divided the batter into two pans, or used my new 8 inch springform pan.  As it is, I did put some batter into a small spring form pan which just happened to be handy. (and I've since found out that a British 8 inch cake pan is deeper than an American 8 inch cake pan). 

Also my stove is not level, which usually doesn't make a whole of lot of difference but, when the cake starts expanding and cascading over the edge, kinda like a "I Love Lucy" episode, well, it really does make a difference.  sigh.

Luckily for me I used a cake pan I bought many, many, many years ago, and it has this really neat feature, that you use to cut under the cake so it comes out great.


Also, I upped the quantities on a couple of the ingredients, and if I make this again, I'll tweak it some more.
The original recipe called for a scant 4 teaspoons cocoa powder, total, and I ended up using tablespoons instead of teaspoons, and it still needed more.  I do have a scale and weighed out all the ingredients.
Recipe:
  • 8 oz. + 3 oz. butter
  • 8 oz. Superfine Sugar
  • 2+1+1 Tablespoons Cocoa Powder
  • 3 Tablespoons Vanilla Extract (next time I'll use my Coffee Liqueur instead) *
  • 10 oz. Self Rising flour  (2 1/2 cups flour)
  • 2 teaspoons Coffee Liqueur
  • 100 ml Double Cream ( 3 1/2 oz.  heavy whipping cream)**
  • 250 grams Full Fat Cream Cheese (8 oz.)
  • 150 grams Melted Chocolate (about 6 oz.)
  • 2 Tablespoons + 10 oz. Confectioner Sugar
  • 2 oz. Cream or milk

Cake:

Preheat the oven to 315 degrees.  Grease or butter a deep 8 inch Springform pan and line with some parchment paper.
Cream the 8 oz. sugar and 8 oz. butter together until pale and creamy and the sugar has dissolved or broken down.   Add the eggs, one at a time, and continue to beat until each egg has totally incorporated.  At this point the batter will look a little broken. Add one teaspoon of the coffee liqueur  Sift together the self rising flour and half the cocoa powder and add to the batter a spoonful at a time, making sure each addition is incorporated.   Pour into the pan(s) and bake for about 45 minutes or until it can pass the toothpick test.  In other words, stick a toothpick in and if it comes out clean, the cake is done. 
Let cool while you make the cream cheese filling.

Filling: ***
Melt the chocolate, set aside to cool. (I'll tell you about my adventures a little later on. )
Cream together the cream cheese, the heavy cream, 2 tablespoons or more of confectioners sugar.   Then  whip in the cooled, melted chocolate.  Set aside.

Cut the cake into two layers.   (or three if you are coordinated enough)  then spread the cream cheese mixture onto the cake. 
Put the top on. And as you can see, it was not very even. 
Frosting: ****
3 oz. butter, creamed
10 oz. confectioners sugar
1 Tablespoon Cocoa Powder
2 tablespoons Coffee Liqueur
2 oz. milk or cream (as needed)
Using an electric mixer, cream the butter, Coffee Liqueur, Cocoa Powder and confectioners sugar together. 
If it's too thick, drizzle in a little of the cream or milk to thin it out. 

Use a piping bag to decorate the cake.   I have a neat trick for getting the frosting into the piping bag, but that will require another post. 

Decorate however you like.

* I would ditch the Vanilla Extract completely and just use the Coffee Liqueur.
** For the Double Cream, I actually added 2 tablespoons full fat Sour Cream to the heavy whipping cream to make a fake Double Cream.
*** For the Filling.  I would add more confectioners sugar, would also melt the chocolate with the some cream to make a proper Ganache before adding it to the cream cheese.  I think that would add richness and better mouth-feel.   
**** I ended up making a double batch of frosting, and next time will do it a little differently.  I would make it more of a Mocha by using some instant coffee powder along with the cocoa powder.

And now for the adventures, sigh.
I ended up with a bowlful of chocolate that had seized up.  Somehow a drop or two of water must have gotten into it.  But I didn't want to throw it out, so I used a fork to break it up a little, making it into a kind of chocolate dust, put that in the fridge and I'll use it to garnish a chocolate dessert at a later date.
I also felt as if this cake needed more chocolate all the way around, and next time, and I will be making this again, I will increase the amount of chocolate I put in.  I will also make a simple ganache and whip it into the frosting as well.
Here's a couple of pictures of the miniature cake I made.

  Which is gone now, but you can see the layer of cream cheese filling and the general pale color of the cake.  
The crumb was actually very nice on the cake, not heavy at all.


Continue Reading
No comments
Share:

Thursday, October 22, 2015

Pizza Hummus

I love playing with my food.  And I love coming up with or trying new versions of Hummus.

I know I can buy hummus and the Sabra brand is good, but there is just something about making it myself that, well, gee, makes me get out the food processor and go to town.

I'm a member of the Secret Recipe Club and a year or two ago I had The Bitchin' Kitchen as an assignment.  Ellie made the big leap and got her own blog, The Hobo Kitchen and transferred her recipes over to that.    I made some Johnny Cake for my post that month for the Secret Recipe Club, but I'd also bookmarked a few more recipes I wanted to try.    One of which was this Pizza Hummus.
Pizza Hummus

So, since I've been craving Hummus, again, I decided to make me some.   And even better, I had all the ingredients in house.

I love it when that happens.

I do 'peel' my chickpeas, cause I like the texture better in my hummus, but feel free to leave them on there.  And I used fresh oregano for this, cause I could.
 Heat the olive oil in a small pan over medium-high heat.   Add the tomato paste, oregano, basil, red pepper flakes and one garlic clove and saute for about a minute or so. 
Some ingredients for Pizza Hummus http://www.sidsseapalmcooking.com/2015/10/pizza-hummus.html
Remove from heat.
Place the (peeled) chickpeas, the other garlic, tahini, and lemon juice into the food processor.
Chick Peas and Tahini
Process until smooth, adding the reserved chickpea liquid if needed. (forget to add the other garlic clove, but it tasted just fine)
Ellie also added salt and cayenne pepper but I choose not to do so. I used some Red Pepper flakes and added them to the pan)
Serve with Pita if you have it, or do like me, just crisp up some Naan, and eat it together.
Pizza Hummus with Naan


I had to keep taking pictures, it looked so pretty, especially with the fresh oregano on it.
http://www.sidsseapalmcooking.com/2015/10/pizza-hummus.html
And I ate it all gone...
Pizza Hummus with Naan
It was so good.  I'm so going to make this again, and next time, I'll even share it.
maybe.
I wonder how it would taste with some breadsticks?
Or pita or on some veggies, or...


Yield: 6 + servings

Pizza Hummus

http://www.sidsseapalmcooking.com/2015/10/pizza-hummus.html

prep time: 10 MINScook time: 10 MINStotal time: 20 mins
This Hummus is amazing, it tastes like Pizza, and is so good on toasted Naan, or Pita or even a Pizza crust.

INGREDIENTS:


  • 2 Tablespoon extra virgin olive oil
  • 1/4 cup tomato paste (I always have a tube in the fridge)
  • 1 tsp. fresh oregano, chopped fine
  • 1 tsp. dried basil
  • 2 large cloves garlic, chopped or grated on a Microplane
  • 1 15 oz. can Chickpeas, drained, reserving 1/2 cup of liquid
  • 1/4 cup tahini
  • 1/4 cup lemon juice
  • 1/4 tsp Red Pepper Flakes, crushed a little more.
  • 1/2 -1 tsp. salt (optional I didn't use any)

INSTRUCTIONS:


  1. Heat the olive oil in a small pan over medium-high heat. Add the tomato paste, oregano, basil, red pepper flakes and one garlic clove and saute for about a minute or so. Place the (peeled) chickpeas, the other garlic, tahini, and lemon juice into the food processor. Process until smooth, adding the reserved chickpea liquid if needed. Serve with toasted Pita Bread, or Naan or even a pizza crust.
  2. BTW: Did you know you can freeze fresh lemon juice and just keep it on hand in the freezer and add the frozen cube of juice into the food processor when processing the chickpeas. 
Created using The Recipes Generator

Continue Reading
2 comments
Share: