Thursday, December 31, 2020

Roundup of recipes from 2020

 I want to wish everyone a Happy New Year, and all possible best in 2021.  

What a year, huh?  2020 is definitely going down in the history books. 

Not a great year for so many, but for the most part most of us managed.  

 I can't say it was my greatest year ever, but I had some great moments.

Roundup of Recipes from 2020

I had fun cooking at a local restaurant.  Hard, hard work, but so enjoyable.   My body however, decided that at my age, it was better off not working that hard, and gave me a swift boot in the butt in the form of a bad attack of sciatica.  I've never had such pain, nor do I want to ever experience that again.   So I had to hang up my apron there. 

I still did some cooking, experimenting in the kitchen.   Being on a virtual lockdown does sometimes have its benefits although I did cook so much food that was tried and true, can make it with my eyes closed and the brain on pause.  I need new recipes. 

I took a look at my blog today and found out that one of the most viewed recipes on here was my homemade Créme Fräiche.  I've made it so many times so far this year. In fact I made some just the other day.  I've dolloped it on potatoes, taco's, nacho's and even swirled it into soups, added it to recipes, and eaten it by the spoonful, naked.  The Créme Fräiche was naked, BTW,  not me.  

Créme Fräiche.

February must have been a good month, cause I also cracked the code on Bacon Jam.   It was so good, I've made it for myself a couple times so far this year.  I did share some early on this year when we were still able to gather together and shared it then.
Bacon Jam

There were a couple more standouts this year, at least according to the stats.  

I made some Banana Oatmeal muffins back in June, which were pretty tasty, even if I do say so myself.  

Banana Oatmeal Muffins

And my Toaster Oven Cornbread was also a hit.  I started with a mix and added my own homemade Créme Fräiche in it.  

Toaster Oven Cornbread

I've actually made a few versions of that cornbread this year.   I do live in the south, after all.  And cornbread is a must make and serve alongside many meals.

 These were perfect to make, especially when it was hot outside, and I still wanted a good tasty dinner roll.   My little toaster oven came through for these Toaster Oven No Knead Rolls.  

Toaster Oven No Knead Rolls


My little toaster oven has gotten a bit of a workout this year, and will probably continue to be used, a lot.  


All recipes and their respective images are either original or adapted and credited, and are all the sole property of Sid's Sea Palm Cooking © 2011-2021, with all rights reserved thereof.

Check out my cookbooks on Amazon.  

All are available as paperbacks or as a downloadable e-book.  

All the ebooks are currently on sale.
 Simple Shrimp Recipes - 25 + Appetizer, Entree and Dipping Sauces.
 Nibbles and Bites - A Compilation of Appetizers, Canapes and Finger Foods
  Hygge - Danish Food and Recipes

Continue Reading
No comments
Share:

Sunday, December 27, 2020

Cheater Collards and Ham

 Please do not throw the stale cornbread at me for posting about my Cheater Collards.    

I can duck. 

Why am I showing this today?  Well, I'm part of a group called Sunday Funday, and we are assigned a theme and post about it, every Sunday.  I don't always participate, but this time I did.  This time the theme was "Let's Ring in the New Year 2021 With Your Special Dish.   Our guest hostess is Sneha from Sneha's Recipe. I almost forgot to add that. sigh.  

We actually have rotating hostesses for this as well.  I knew I'd forgotten something when I wrote this in my post Christmas madness.   And I need to make it up to them.  I'll tell you all about them in a separate post though.

Here in the South, the New Year is begun with Greens and Blackeyed Peas, to bring you luck in the New Year. 

I didn't do any Blackeyed Peas today, cause I'll be doing a Danish meal on New Years, but I might make some more of this for lunch that day. 
I love Collards.

'Cheater' Collards and Ham


Let me explain about my cheater Collards and Ham.   I love Collards and Ham, but it can take a little while to get it nicely simmered down, and ready to eat.   

I get impatient, I do.   Especially waiting for the deliciousness of the collards to cook down.  

A few weeks ago, I found some canned Collards in the store, and bought a can, ate it and then bought several more to keep on hand.  

I also write the use by date on the front of my cans, cause I don't always want to try and find my glasses to see the teeny tiny print that is hidden on the bottom of the can. I want to be able to look and see at a glance, the use by date.  This also helps me to rotate stuff.  I put the newest purchases in the back and the oldest at the front so I can use them up in a timely fashion.

Canned Collards


Of course, I didn't just open a can and dump it into a pot and heat it.   I added some good chicken stock and some ham to it, let it simmer for a little bit, made some cornbread and feasted on it all. 

My mouth did a happy dance, in fact I'm not sure but that it did a whole cotillion's worth of dances in there.  

I even made a riff on my Skillet Top Cornbread.  I didn't have any hush puppy mix, but I did have some chives in the garden so I chopped some up and added it to the cornbread.   I'd thought of making some  Toaster Oven Cornbread, and  I even toyed with making some Cornbread with Smaltz, but didn't have any smaltz left.  I did have some leftover glazed carrots from dinner the other night and used some of it in the cornbread as well.   

I  also had lots of ham left from our meal on Christmas Day, and used some of it, OK, I used a lot.  


'Cheater' Collards and Ham


'Cheater' Collards and Ham

'Cheater' Collards and Ham

Yield: 2 Servings
Author: Sid's Sea Palm Cooking
Prep time: 5 MinCook time: 30 MinTotal time: 35 Min
This is a quick and easy and delicious way to make quick Collards and Ham for New Years or any time.

Ingredients

  • 1 Can Seasoned Collard Greens
  • 1 cup Chicken Stock
  • 1/2 -1 cup diced Ham

Instructions

  1. Simmer the can of Collard Greens, and Ham in the Chicken Stock for 30 minutes and serve with some Cornbread, or Cornbread Muffins.


All recipes and their respective images are either original or adapted and credited, and are all the sole property of Sid's Sea Palm Cooking © 2011-2021, with all rights reserved thereof.

Check out my cookbooks on Amazon.  

All are available as paperbacks or as a downloadable e-book.  

All the ebooks are currently on sale.
 Simple Shrimp Recipes - 25 + Appetizer, Entree and Dipping Sauces.
 Nibbles and Bites - A Compilation of Appetizers, Canapes and Finger Foods
  Hygge - Danish Food and Recipes

Continue Reading
6 comments
Share:

Friday, December 18, 2020

Crab Bites

 It's time for Fish Friday Foodies.  

Crab Bites

This month our hostess is Camilla of Culinary Adventures with Camilla.   Camilla has access to all kinds of great ingredients and uses them in so many different dishes.  I admit to drooling over a lot of it, and being envious that her family is adventurous in their eating.  

Camilla set the theme this month - Let's make some diminutive seafood bites. Amuse-bouche are single, bite-sized hors d'œuvre. Get creative with a seafood-based amuse-bouche and we can all have a virtual #FishFridayFoodies holiday party.  

Well gee, I love appetizers and especially ones that are one and two bite sized.  That way you can try a variety of appetizers without filling up.  

Back when we could still gather safely, in numbers, without masks, I used to host an event once a month called Tapas.  

I'd have so much fun playing with different recipes, and our guests usually brought really interesting and fun foods to try as well. 

But since there's just my palate to worry about, at the moment, I decided to have fun with an idea that's been ping ponging around in my brain for awhile.   

And boy, am I glad I did.   I had the loveliest lunch, although I did make these two bite size.  

Crab Bites

However, you can make them much smaller and they'll still be delicious.  

I froze some of them for later on.   

Is it later yet?  

I have to tell you, these were so good, I inhaled 6 of them right off the bat, and looked longingly, very longingly at the remainder, but I restrained myself.  And hurried up and froze them. 

Crab Bites


Crab Bites

Crab Bites

Yield: 18-36 bite size appetizers
Author: Sid's Sea Palm Cooking
Prep time: 10 MinCook time: 15 MinTotal time: 25 Min
These little nuggets of delicousness will have people returning for just one more.

Ingredients

  • 6 oz. Crab Meat
  • 12 Clubhouse crackers - crushed up
  • 1 egg
  • 1 tablespoon mayonnaise
  • 1 1/2 teaspoon Green Curry Paste (add more if desired)
  • For Coating the bites
  • 6 Clubhouse crackers - finely crushed (use more if needed)
  • 1/4 cup almond flour
  • Butter
Dipping Sauce
  • 1 tsp. Fresh Lime Juice
  • 2 tablespoons Mayonnaise
  • 2 teaspoons Sweet Hot Chile Sauce

Instructions

For the Bites
  1.  Crush up 16 Clubhouse crackers, leaving small chunks, place in bowl.
  2. Lightly whisk together the egg, mayonnaise and green curry paste.  Add to the crushed crackers and mix.  Set aside for a few minutes to allow the crackers to hydrate a little.
  3. Break the crab up a little, then add to the cracker/egg mixture.  Mix together with your hands, gently, trying not to break up the crab too much. 
  4. Using a small spoon or scoop, form into balls. Approximately just over a tablespoon each.  
  5. Roll the balls in the reserved cracker/almond flour combo until coated evenly.  Place in a greased shallow baking pan and top with a little butter.
  6. Bake at 375 degrees for 15 minutes. 
  7. Serve hot with the dipping sauce.
Dipping sauce
  1. Whisk the lime juice and mayonnaise together and then add the Sweet Hot Chile sauce. 
  2. Serve a dollop on each Crab Bite.

You can bake these straight out of the freezer, just add an extra 5-7 minutes to the cooking time.  They're great to grab out of the freezer for a last minute appetizer.  

Created using The Recipes Generator
  •  
  • An Amusing Mouthful: Grilled Prawns with Caviar Lime by Culinary Adventures with Camilla
  • Crab Bites by Sid's Sea Palm Cooking
  • Drunken Shrimp by A Day in the Life on the Farm
  • Egg and Tapenade Toasts with Anchovies by Karen's Kitchen Stories
  • Goat Cheese Shrimp Puffs by Food Lust People Love
  • Scallop Rumaki by Palatable Pastime
  • Smoked Salmon Deviled Eggs by Making Miracles
  • Wasabi Prawn On Air Fryer Sweet Potato Roundles by Sneha's Recipe
  • Continue Reading
    8 comments
    Share:

    Monday, December 14, 2020

    Savory Crackers

     It's time for Baking Bloggers again.  Can you believe it's been a month? Well, it's actually been two months for me, cause I totally blanked on it last month. sigh
     

     Sue of Palatable Pastime is our hostess and here is her suggestion. 
     

    Let's bake up some party appetizers that are perfect for any December holiday. Remember some part of it needs to be baked, so if you have a cheese spread, maybe some baked crackers to go with it.

    I read 'baked crackers' and that was all she wrote.  

    All that I wrote, that is.   

    Savory Crackers

    I love making crackers, even if my back likes to remind me I'm not that young anymore and rolling out dough, hurts.  

    I made these Savory Crackers.  The inspiration came to me in the middle of the night, and when I was given a bag of Sour Cream and Onion chips, I knew exactly which direction to go in.  

    I do have to admit though it was lacking, something.  Although it did taste pretty good with some Havarti Cheese on top.   

    Savory Crackers


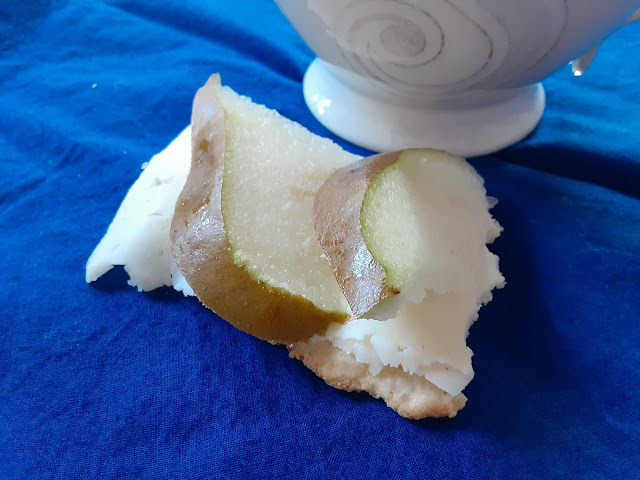
      And then I played. I topped a cracker with some Havarti cheese and some sliced Bosc Pear, enjoyed it as a mid afternoon snack alongside some tea flavored with Cardamom. 

    Savory Crackers

     However, I still had some dough left, and added a few more things. 

    My original thought (at 3am), was to incorporate some dried tomato in the crackers, but I didn't want to open a new jar of dried tomatoes in oil, so I dried a Roma tomato in the oven, chopped it up, and worked it into the dough.  I looked at the red and though Christmas, so I grabbed a little frozen kale out of the freezer, crumbled it while it was still frozen and added it along with a tablespoon of herb butter.  

    And it helped with the flavor, a lot.  It's still lacking something, but I think I'm onto a good idea here. 

    I would serve these with some highly flavored cream cheese spread, like maybe my Smoked Salmon Spread or some Bacon Jam on top of some cream cheese or some Shrimp Butter?

    In the meantime, here is my offering for Baking Bloggers for this month.

    Savory Crackers


    Savory Crackers
    Print

    Savory Crackers

    Yield: 2-3 dozen
    Author: Sid's Sea Palm Cooking
    Prep time: 10 MinCook time: 8 Mininactive time: 1 HourTotal time: 1 H & 18 M
    These light crisp crackers are a fun way to not only use up leftover potato chips, but they also taste amazing topped with some good cheese as well.

    Ingredients

    • 1 cup self rising flour
    • 1/2 cup bread flour
    • 1/2 cup crushed and processed flavored potato chips, (I used some Sour Cream and Onion flavor chips)
    • 1/4 cup instant potato flakes,  any flavor
    • 2-4 tablespoons chopped dried tomato ( I used one whole dried Roma Tomato)
    • 2-4 tablespoons finely chopped kale 
    • 2 tablespoons herb butter
    • 1/2 cup water + extra if needed
    • 1/4 cup browned butter

    Instructions

    1. Process the crushed leftover potato chips in a small food processor until they are crumbs.  Set aside.
    2. Melt the butter and let it brown a little, set aside to cool for a minute.
    3. In a mixing bowl, combine the self rising flour, the bread flour, potato chips, instant potato flakes. Add remaining ingredients and mix together.   Add the browned butter, and a half cup of water.  Mix until it comes together like a pie dough.  I use my hands to press it into a ball. Add more water if needed, this needs to be moister than pie dough.  Form into a ball and cover with plastic wrap and let it rest for at least an hour. 
    4. Preheat oven to 375 degrees and get out a cookie sheet. 
    5. Divide dough up into quarters and roll out each piece, 1/4 inch thick.   Using a small round biscuit cutter, cut rounds out.  Take each round and roll it out even thinner, to about 1/8th, this will elongate the cracker. 
    6. Place on ungreased cookie sheet and bake for 6-9 minutes or until a light brown.
    7. Serve with a good cheese, I liked my Havarti on top. 
    Created using The Recipes Generator

    Baking Blogger December 2020:

    Baked Holiday Party Appetizers

    Continue Reading
    13 comments
    Share:

    Sunday, November 29, 2020

    Turkey 'Meatloaf'

     I cooked a huge turkey this year.  

    13.8 lbs. is huge when you think it was only going to feed two people, one of whom only eats the white meat.

    But the bargain hunter, moi, can't pass up a great deal and that part of me had to buy it.   

    Hey, it was on sale for 38 cents a lb.   Usually I figure I done good to get one at 59 or so cents a pound, but this was 38 cents a lb. which meant I got a huge turkey for $5.21 total.

    I roasted it, and it was good.  We ate our fill.  I'm the dark meat lover in the family, so I got a whole drumstick, all to myself, and ate the wings for lunches.  Froze the remainder of the breast meat, for future meals.

    Then it hit me. I had lots and lots of dark meat left.  And pardon me, but I really do not like the thighs.   I don't like chicken thighs and turkey thighs are right up there.  I'd already taken the meat off the bones, cause HELLO!!!! I make turkey stock out of the carcass and any remaining bones end up in there. 

    Which meant I had a lot of thigh meat.  I ate some on sandwiches, but that grew old, fast.  

    Then I got an idea! 

    Turkey 'Meatloaf'

    I still had some of my Wild Rice stuffing, half of a Hasselback sweet potato and some incredible Cranberry Strawberry Jam. 

    I chunked up the remaining turkey, threw it into the food processor and broke it up a little more.  Dumped it into a large bowl, added the leftover stuffing, diced up the remaining sweet potato and mixed it together with 2 eggs.  

    I divided it among 4 mini loaf pans, spooned some of the Cranberry Strawberry Jam I'd made on top, and baked them for 30 minutes at 350 degrees.  I needed to make sure the eggs had time to cook.  

    Turkey 'Meatloaf'

    After I'd pulled them out of the oven, I didn't let the first loaf rest very long before I cut into it.  Which meant it 'crumbled' a little. I had to taste test it.  And it made my mouth very happy.  Very. 

    Turkey 'Meatloaf'


    OMG, this was the best tasting 'meatloaf' I think I've had in years.  The perfect bite of turkey, stuffing, and sauce in one bite.  

    The remainder of the loaves have been wrapped and are now residing in the freezer for future meals.  


    Turkey 'Meatloaf'
    Print

    Turkey 'Meatloaf'

    Yield: 5-10 servings
    Author: Sid's Sea Palm Cooking
    Prep time: 10 MinCook time: 35 MinTotal time: 45 Min
    This is a fun way to use up leftover turkey from Thanksgiving or anytime you cook too much turkey.

    Ingredients

    • 5 cups chopped up, cooked turkey
    • 1-2 cups leftover stuffing
    • 1/2 - 1 whole sweet potato- diced
    • 2-3 eggs
    • 1 cup cranberry sauce, canned or home made (use more if desired)
    • Optional : 1-2 cups prepared turkey gravy

    Instructions

    1. Chop the cooked turkey up in a food processor, dump into a bowl.
    2. Add the crumbled up leftover stuffing, chopped sweet potato, 2-3 eggs.  Mix together. 
    3. I like to put a glove on and mix it my hand here. 
    4. Divide into 4-5 greased mini loaf tins. 
    5. Spread the cranberry sauce evenly over top and bake at 350 degrees for a minimum of 30 minutes. 
    6. Pull out of oven and let sit for 5-10 minutes to finish setting, then slice and serve.
    7. Can be served with some turkey gravy or more cranberry sauce.

    NOTE:  If you have more turkey or more stuffing, use it.  I used two eggs, and it maybe could have used a third egg. It's all optional and up to the cook.  Just have fun with it. 

    Created using The Recipes Generator

    Continue Reading
    No comments
    Share:

    Tuesday, November 24, 2020

    Pierogi's

     A few years back, we were living full time in an RV,  a fifth wheel to be exact.   We were staying in a campground and had made quite a few friends there.  

    One of those friends was of Slavic descent, and one day she offered to show us how to make Pierogi's, but we needed room to do it in.  So I offered her my kitchen, to play in. 

    Pierogi

    I don't remember how many of us there were that day, but I think we had 4 or 5 women in there, in rapt attention as Marge made the dough.   

    I had my Kitchenaid stand mixer out on the counter and we made use of it. 

    I'm not too sure how many potatoes we ended up peeling and cooking but it was a few, and as I seem to recall, one of the group had to run over to her RV and grab some more potatoes, for the filling and the dough.

    I  only made a small batch, but a small batch is still a lot.  

    Especially when you are the only one in the family who eats Pierogi's.   But they do freeze, amazingly well.  

    I personally love filling them with mashed potatoes, cheese and onions, but feel free to play with the fillings, adding or deleting any part of them.  

    Pierogi
    Be aware though, they do tend to shrink a little after being cut.

    Pierogi

    However you do it, having one of these little presses, does make it a little easier.  I would cut them out a little bit larger than the diameter of the press.  They do tend to shrink a little but they still work. 

    Pierogi


    Fill them with whatever you like. 


    Pierogi
    Pierogi


    Yield: Makes about 4 doz.
    Author: Sid's Sea Palm Cooking - adapted from several recipes
    Prep time: 30 MinCook time: 10 Mininactive time: 30 MinTotal time: 1 H & 10 M
    You can make a quick and hearty meal when you keep a few dozen in the freezer.

    Ingredients

    Dough
    • 3 1/2 cups flour mixture of AP flour and Bread Flour (add more if needed) + more flour for rolling out.
    • 1 large potato- cooked and riced
    • 3/4-1 cup potato water (from the boiled potatoes)
    • 1 egg
    • 1 1/2 tsp. salt
    Filling
    • 1 Cup Cooked mashed potatoes, with no added butter or milk
    • 1/2 cup grated Cheddar cheese
    • 1 small onion, finely chopped and sauteed in 1 teaspoon butter (optional)

    Instructions

    Dough
    1. Cook the potatoes, in salted water until done. Drain the potatoes, but keep the potato water. Set aside til cool. Rice up one potato, and place into the bowl of a stand mixer, add the flour and 3/4 cups of the cooled reserved potato water, salt and the egg. Mix together for a few minutes. If it looks too dry, add more water, 1 tablespoon at a time, or if it looks too sticky, add more flour, 1 tablespoon at a time. The dough will be sticky. Let mix for a couple of minutes and turn out onto a piece of plastic wrap. Wrap well to keep from drying out and let rest for a few minutes while you prepare the filling.
    2. ake a small portion of the dough and roll out on a well floured surface. The dough will be sticky to handle. Keep the remaining dough covered. Cut out circles with a floured glass or cookie cutter, which ever size you like. I used a 3 inch wide cutter. Add a teaspoon of the prepared filling to the center of the circle of dough and fold over to make a pocket, squeezing out the excess air, and making sure that the edges are pressed down firmly to seal. Use a fork here if you like, or if you have dumpling press, use that. I did. It was easier. Do not overfill. You will probably only use a teaspoon of filling per perogi. I used a melon baller to dip out the correct amount.
    3. When rolling out the dough, you need to get it thin, about 1/8th thick. If you tear it, just moosh it back up and re-roll the dough.
    4. When you've used up all the dough or filling, place the filled perogies in a single layer on a freezer safe cookie sheet or stiff cutting board and freeze. When frozen place the perogies into a plastic bag and put back out into the freezer until ready to use.
    5. You can cook some up fresh, or wait til later.
    6. When cooking perogies, fresh or frozen. add to gently simmering water and cook them just until the perogies float to the top. Serve with some fresh butter and sour cream.
    7. You can also brown them in a pan after cooking, and serve with more butter, sauteed onions and of course sour cream or Créme Fräiche.. I like using my own homemade Créme Fräiche. and some homemade butter.
    Filling
    1. Saute onions, grate cheddar cheese and add to the cooled, riced mashed potatoes. Mix well and set aside.
    Created using The Recipes Generator

    Continue Reading
    No comments
    Share:

    Sunday, November 22, 2020

    Ginger Shrimp Cups

     I joined a new blogging group called Sunday Funday.  We're posting on Sundays and we do have themes.  I like themes, cause it forces my brain to think, and come up with new ideas and for me, that's fun.  Even though we aren't entertaining like we used to. 

    I miss that.   Who knows when we may eventually be able to gather again and party again. 

    Or at least have more than a couple of friends in, for proper socially distanced entertaining.  

    I recreated a 'Shrimp Turkey Centerpiece for Fish Friday Foodies, but was left with a lot of shrimp left over. 
    So I played with a couple of ideas.

    I came up with this, Gingered Shrimp Cups.  

    The shrimp was already cooked, and cooled properly and I knew I could just dunk them into my home made cocktail sauce, but I wanted something, more. I'd made some Ginger syrup out of some fresh ginger earlier in the week, and had been enjoying it in a cup of tea.  I wondered how the ginger syrup would taste with the shrimp, and decided it was amazing.  

    I presented it in a pretty glass I have, which I call a shrimp cocktail server. 

    I don't really know if it is, but that's what I use it for.  

    Ginger Shrimp Cup
    I'd poached the shrimp with some candied ginger for the Shrimp Turkey Centerpiece already, so when it came time to assemble this, I just dipped the shrimp into the Ginger Syrup and poured a little of the syrup into the cup and dipped the shrimp into the syrup as I ate them all. 

    I have to say, my mouth did a happy dance and it didn't even miss the cocktail sauce I usually serve with shrimp.  

    Ginger Shrimp Cups

    I'll be sharing how to make the Ginger Syrup at a later date, but here's the quickie.  Basically simmer peeled raw ginger with equal amounts of water and sugar for at least 45 minutes, strain out the ginger and save it for making your own crystalized ginger.  
    The syrup keeps well in the fridge and makes an awesome addition to tea or shrimp.

    Check out some more fun stuff here.


    Sunday Funday: That Holiday Feeling!

    Continue Reading
    12 comments
    Share:

    Saturday, November 21, 2020

    Danish Potato Soup for #SoupSaturdaySwappers

     It's time for Soup Saturday Swappers again.  

    Can't believe it's been a month already.  Here is what Camilla posted for this month's event.

     Let's showcase a soup made with roots! For this event, use roots, taproots, bulb, tubers...be as creative as you want. Hosted by Culinary Adventures with Camilla / Camilla Mann

    I brought some Danish Potato Soup (Dansk Dansk kartoffelsuppe) as my contribution.

    Danish Potato Soup (Dansk kartoffelsuppe)
     

    I have a story to go with this soup. I'd been cooking the soup, and had to transfer it into a bigger pot cause I'd totally misjudged the size of the pot in relation to how much I was trying to put in it. 

    Got it transferred and cooking away.


    It was ready to be processed when I got caught up on a very long phone call with my cell phone provider.  So, by the time I got off the phone almost an hour later, without having my issue resolved, the soup had cooled down. I'd processed it with the immersion blender and had tasted it while it was still hot, but by the time I was able to sit down to enjoy a bowlful, it had cooled down.  A lot. 

    Well, as a food blogger, I knew that it didn't matter if the soup was hot or cold when it came to taking pictures, so I staged it and took a few shots.  Then I tasted it, and it was just as good at room temp as it was when it was hot.    I tried it chilled as well, but I didn't care for that.  

    Anyway, this was a great tasting soup, hot and at room temperature.  It came together quickly, and was a perfect meal.   

    While not totally Danish, I'm thinking you could add some crisp bacon pieces on top, maybe some caramelized onions, some cheese?  

    I just an idea, how about topping it with bacon and onions and call it Burning Love Soup?  

    One of my favorite meals, is a pile of mashed potatoes, topped with bacon and caramelized onions called Brændende kærlighed or Burning Love.  

    OK, so I went ahead and did it.  

    Danish Potato Soup (Dansk kartoffelsuppe)


    And it was good, but nothing like I thought it would be.  However, it struck me that if you have leftover bacon or sausage, you can just add it to the soup.  

    I this this soup is great as is, but it's also very hospitable to being dressed up as well.  


    Potato Soup

    Yield: 6 Servings
    Author: Sid's Sea Palm Cooking -
    Prep time: 10 MinCook time: 30 MinTotal time: 40 Min
    This is a great tasting soup that can be enjoyed hot or at room temperature.

    Ingredients

    Danish Potato Soup
    • 3 large potatoes - cut into pieces
    • 2 cups leeks, washed and cut into thin rings
    • 1 quart chicken, turkey or ham stock
    • 125 ml. Whipping Cream or milk ( 1/2 cup) 
    • One grind of white or black pepper
    • Chives to decorate

    Instructions

    1. Cook potatoes and leek rings in stock until potatoes are cooked through, about 20 minutes.
    2. Puree with an immersion blender, then return to pot. Remove from heat and add the cream or milk, and white pepper. Serve garnished with some chopped chives if desired.
    3. This may be served warm or cold.
    4. Note:  Some recipes call for a stock made of a ham bone, but I used some of the turkey stock I've been making and stocking up on in my freezer. Get it? Stocking up on stock?
    Created using The Recipes Generator

    Here's some more great recipes.


    Continue Reading
    12 comments
    Share: