Monday, August 29, 2011

Chicken Tortilla Soup

I mentioned that I was going to make some Chicken Tortilla soup with some of the chicken breasts I'd poached last week, and I did make it the other night and it was good.

My niece was actually the one who introduced this to us during a camping trip a few years back and it was an immediate hit with us.   She said that the recipe made a lot, and brought the soup out for us to try. It just so happened that we'd been munching on some nacho's with cheese sauce so we just ladled the soup over that and it was OMG good.   A big hit with everyone and this soup is one I've made on a regular basis ever since.  This is also one of those recipes that you can make straight out of the pantry if need be.  And have it on the table in a very little time.   Heidi actually got the original recipe from Weight Watchers, but she modified it, and of course I changed it a little as well, and ...
Chicken Tortilla Soup

Continue Reading
No comments
Share:

Saturday, August 27, 2011

Lagkage (Danish Layer Cake)

It's my birthday and I can bake if I want to, bake if I want to, bake if I want to...
OK so that's not the right words to the song, but it's how I feel.     And I did bake. 
Danish Lagkage with Strawberries

     
My birthday also happened to fall on Boat Club Monday as well.   How fortuitous was that?    Not only did I get to bake, but I was also able to share it with friends without having to have them over and having to clean house first.   Just kidding.  As you may have surmised by now, I like having people over, and quite frankly look at any excuse to have company in.  
Lagkage (Danish Layer Cake)

This cake is the one my Mom would make for us for our birthdays and also other special occasions.    A Danish Layer Cake in all of its whipped cream and custard glory.    Not too sweet, not too rich, just right.   My favorite version of the cake was when Mom made it with apricots for the filling, but it's also very traditional to have a very thin layer of Raspberry preserves in there as well.  You can also put a thin layer of Marzipan between each layer and also around the outside.   But I'm going to keep it simple and just make the version I like.  

To begin with you need to bake the layers, (if I was in Denmark I could just go and pick these up already baked)   They are called Lagekagebund, you can even find them in good Scandinavian deli's in the US.   I was going to use a recipe I found in my mother's handwriting, written on the back of a receipt dated from the 1920's, so I knew it was a good one, but part of it was obscured by a greasespot, (which is how I knew it must have been one she'd used), but then decided to go through her other recipes, and got totally confused.  She had over a dozen written down, and each one was just a little different.    I got curious at this point and I decided to do some research on Lagkage's (Layer Cakes) in some of the old cookbooks I have.   And found that there are so many variations of the recipe for a layer cake base as to totally dumfound and astound me.   One recipe book has recipes for an 'everyday' layer cake, plus versions for special occasions, eight different recipes in all.   They all hinge on a couple of simple practices.   Beat the eggs and sugar until they are white in color, and the sugar has totally dissolved within the eggs.   Then add the flour/potato starch gradually, beating between each addition.   (and at this point, you will be very grateful for modern conveniences like electric beaters or Kitchenaid Mixers trust me on this one).   

Some of the recipes call for just beating the egg yolks with the sugar and folding in beaten egg whites alternating them with the flour/cornstarch/potato starch.   A couple of recipes add butter, and there are all kinds of suggestions for baking pans.   It got a little on the confusing side to be honest.    However, I persevered and made the cake and it was good.    The only thing that would have made it better is more custard between the layers and actually making it the night before so that the whipping cream could have soaked into the cake a little better.  
I also did some research on line as well, and that's when I got really confused.  Just kidding, but there were as many variations out there as there were in my cookbooks.

Begin by measuring your sugar,and eggs into a mixing bowl, turn it on and let it go.

Check it from time to time, you want the sugar to be totally dissolved into the eggs.   Scrape down the sides while you're checking, that way you don't get any stray sugar grains in there.   You'll be able to see the egg/sugar mixture becoming whiter and whiter, the more it mixes.
Sift the flour/potato starch and baking powder together.    Set aside while you create your totally fun baking pans.  
While this is going on you'll need to get out your parchment paper.  We can have fun here.    Draw a circle on the paper, following the outline of an 8 inch plate.    Make three of these.   (of course if you have three baking pans the same size you can skip this step, just grease them very lightly and flour them to release the cake)
Now add the flour/potato starch mixture, a little at a time.   Mix well.
Then spoon on a third of the batter into the circles you drew on the parchment paper, spreading it out to the edges of the circles.
Bake in a warm oven, for about 8-10 minutes, just until they're a light golden brown.  (I forgot to take pictures at this point).  As soon as you pull them out of the oven, put on a cooling rack for just a few minutes, let the cool, then stack them on a plate, keeping them on the parchment paper, and cover with plastic wrap.
Open a couple cans of Apricots in Heavy syrup, drain, reserving the syrup. 

Make the custard that's going to go in the layers, while the cakes are cooling a little. 
Custard made with Birds Custard Powder
I always have Bird's Custard powder on hand, you can find it in some supermarkets or at your local World Market.
Place the first layer of cake on a serving platter, I flipped mine over, cut the parchment in half, then placed the parchment directly on the cake plate.

One of the layers with custard on top

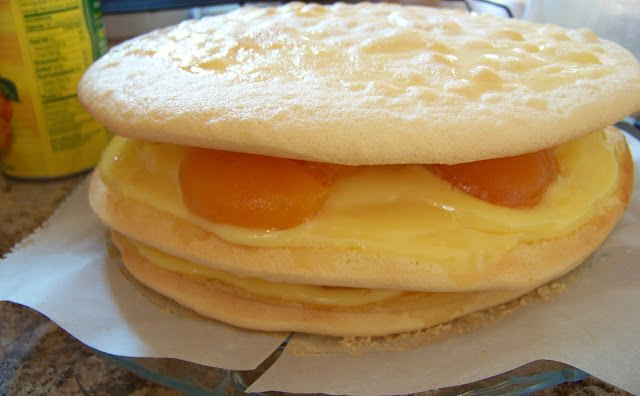
Dribble or brush some of the reserved apricot syrup over the cake layer, then glop the warm custard directly onto the cake.  Spread it out and place the first layer of Apricots directly on the custard.
Custard and Apricots on one layer

Custard and Apricots on one layer and the top
Top with the next cake, and repeat the process, brushing it with the Apricot syrup, then the custard, and finally the apricots.
Assembling the Lagkage

Assembling the Lagkage

Assembling the Lagkage
(it looks so good).
Finally brush the top layer with some more of the reserved Apricot syrup.
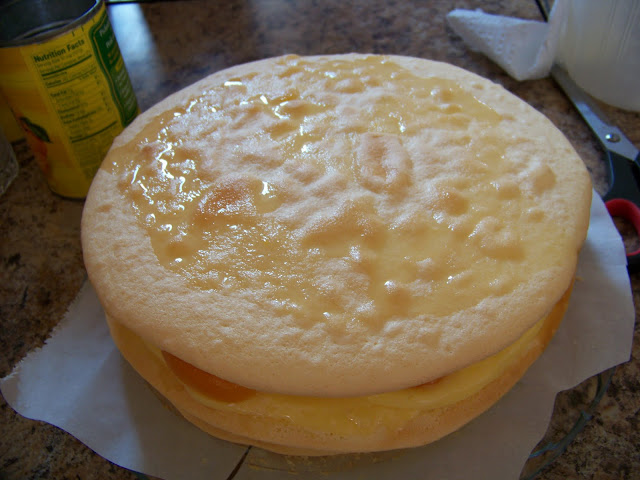
Assembling the Lagkage
See the syrup glistening?

Assembling the Lagkage
Didn't get it real even, but I can fix that.
Whip up a pint or so of heavy whipping cream, and sweeten with about a tablespoon of sugar if desired.
And frost the cake with the whipping cream, making sure you get it into all the crevices.   Place in fridge for a few hours at this point.  This cake actually tastes better if you make it in the morning, and leave it in the fridge all day.   Of course, anything left over the next morning is even better, giggle.
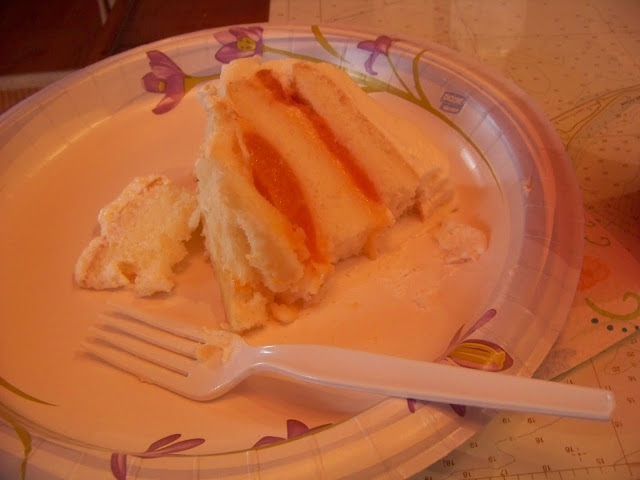
Lagkage (Danish Layer Cake)
I cut and ate the first slice, it was my birthday cake, after all.   And I have to say it was very good.


yield: 8-12 servingsprint recipe

Lagkage (Danish Layer Cake)

prep time: 30 MINScook time: 15 MINStotal time: 45 mins
This is a traditional cake served mostly for birthdays and special occasions in Denmark. There are as many variations of this as there are cooks, but all agree that fruit and custard are in the middle and real whipping cream are on the top.

INGREDIENTS:

  • 1 cup sugar, extra fine granulated
  • 3 eggs
  • 1 tablespoon cold water
  • 1/2 cup flour
  • 1 cup potato starch
  • 1 tsp. baking powder
Topping and filling
  • 1 pint heavy cream, whipped with 1 tablespoon sugar
  • 1-2 cups prepared Custard
  • 2 cans Apricot halved in heavy syrup, drained and the syrup reserved

INSTRUCTIONS:

  1. Preheat oven to about 350 deg. and prepare the parchment baking sheets. Trace a circle around an 8 inch plate onto the parchment paper, and set aside. Mix the sugar and eggs together using your mixer until the sugar has dissolved into the eggs, and it is a whitish color. Sift together the flour, potato starch and baking powder. Then add the flour mixture into the egg and sugar mixture a little at a time, making sure it's well mixed. When it is all incorporated, divide the batter into thirds. Spread the batter onto each parchment circle. Bake only about 8-10 minutes or until lightly browned. Cool on wire rack, leaving paper on the cakes. Stack and cover tightly while you're making the custard. Follow the directions on the tin of Bird's custard powder or make your own from scratch. Open and drain two tins of Apricots in Heavy syrup, reserving the liquid. You'll use this as a kind of simple syrup for spreading over each layer of cake, before you layer the custard and apricots. Place the first cake layer on a serving plate. At this point I remove the parchment paper, cut it in half and keep it under the cake, you can pull it out just before serving. Helps to keep the edge of the cake plate clean. Sprinkle, or brush about 1/4-1/2 cup of syrup on the first layer, take about half the custard, spread it around, then arrange the contents of one can of apricots on the custard, top with the second cake layer, repeat the process, then finish it off with the last layer. Brush this layer with some of the syrup and set aside while you whip up a pint of heavy whipping cream. You can sweeten the whipping cream if you like, but it's not necessary. Frost the cake using the whipping cream and place in the fridge for several hours. This tastes best if prepared in the morning and allowed to sit until you serve it in the evening. I like it best the next day, but don't always have fridge space to allow that.
Created using The Recipes Generator

Lagkage (Danish Layer Cake)

Serve and enjoy.  


Continue Reading
2 comments
Share:

Tuesday, August 23, 2011

Salads, Taquito's, Quesadillas and more.

Occasionally I make a mistake and cook too much of something.

Yes, I know, it's hard for me to believe as well.   Just kidding.

But, I like to cook stuff that can be used in several different recipes.   It just makes sense to me.   So, I'll cook a few chicken breasts, poaching them and then use the breasts in all kinds of different dishes.   And having a couple of poached chicken breasts in the freezer means that I have several different options for dinner.   I can make a Chef's Salad, Chicken Taquito's, Chicken Quesadilla's, or Chicken Tortilla soup.   And that's just what I've done over the past couple of weeks.   And having some cooked chicken in the freezer means I can get dinner on the table in minutes if need be.

I cooked 4 chicken breasts with an onion, and some really tired looking jalapeno's, that had been floating around the freezer for a few months.  Took the chicken out after they had cooked and removed the meat from the bones, and strained the broth.   Put that aside to go back in the freezer, along with a good handful of chopped chicken.  I thought I could use that as the basis for a Chicken Tortilla soup.

And here's what I did with the rest of the chicken.   Three half breasts that is.

Here's dinner one night
Chef's Salad
Always have some fresh frozen peas and corn available to sprinkle on top.  (painfree way of eating more veggies).
Then the other night I didn't feel like cooking, shocking I know, but...  So I took the chicken out of the freezer, shredded it, mixed it with some cheese and a chopped up frozen jalapeno.   (I keep some in the freezer at all times).
Chicken Filling for Taquito's
Dipped some corn tortillas into some hot oil, very important step, makes it much easier to roll up.
Then placed a couple tablespoons of filling down the middle of the tortilla, rolled it up as tightly as I could and secured it with a toothpick before placing it in some hot oil for frying.  (I didn't say this would be a totally healthy meal, just quick and easy). 
Chicken Taquito's
After they've browned on all sides, remove the toothpick and serve alongside some beans or some salsa or... whatever you like.

Chicken Taquito's

And since we didn't use up all the chicken mixture, I made some Chicken Quesadilla's from the rest.   All I did was add some more jalapeno, some chopped onion and some black olives, and of course more cheese.
Chicken Quesadilla's

Heaped upon a flour tortilla placed in a greased pan, then topped it with another tortilla, let it brown, flipped it over and served it cut into wedges.   And pardon me, I forgot to take pictures of the finished Quesadilla, but I did get a picture of the ones in the oven staying warm while I finished off the last of the Quesadilla's. 
Chicken Quesadilla's in oven keeping warm
And I still have the original, very spicy stock in the freezer with some of the chopped chicken in it.   Hmmm, I'm thinking it's time for a nice spicy bowl of soup.   I guess I know what I'm making for dinner tonight.

I like 'cooking' ahead like this.   Several meals out of one pot.  (and don't even think about calling it leftovers, cause it isn't). 

Continue Reading
No comments
Share:

Monday, August 22, 2011

It's a salad kind of night.

If you read this blog on any kind of regular basis, you may have surmised that we host a gathering once a month at our place.   No RSVP's are necessary, it's pretty much a come if you can, and bring a guest if you like.   So last month, July Tapas we had fun, and this month is even funner, or is that more fun?  hmmmm, gotta think on that one.   My husband thought it would be fun to declare our usual Tapa's night, a Salad night.  So we asked everyone to bring either their favourite salad topping or their favourite salad.     I provided some lettuce, both iceberg and a lovely spring mix, and let the creativeness in.   And as is usual here, everyone outdid themselves.   But before I tell you what they brought, I thought I'd feature what I made.
Barley Salad

I had a package of barley in the cupboard, and some frozen Edamame's.  I really wanted to make something that would use both of those things up.   I used to make a dish with brown rice, mushrooms and peas, a little soy sauce and sesame oil.   Hmmmm.  So, I decided to cook the barley, mix it with the Edamame's, some lovely mushrooms and season it with some soy sauce and sesame oil.   I figured that serving this 'salad' warm or a room temperature just might work.    There is no recipe, but here's a rule of thumb.

Barley Salad
1 lb. package Barley, cooked
1 lb. package Edamame beans
8 oz. sliced mushrooms ( I think Portobello's would work wonderfully here as well)
1-2 tbsp.  Soy sauce
1-2 tbsp. Sesame Seed Oil
1 tablespoon Sesame Seeds, mixed in with the mushrooms and cooked alongside them

And as usual, this is all to your taste.   I find the soy sauce is just salty enough, but you can add more or less. 


I also had some rolls that were slightly stale, so I slathered them with some garlic infused olive oil


and baked them in the oven to make some home made croutons.   Waste not, want not, lol.   They were ok, not that great to be honest.   I think if they'd been made with some really good ciabatta bread or sourdough, they would have been fantastic.   But I took the garlic I used to infuse the oil with,  and made some garlic butter for a future use.  It freezes very well, and since I also used some of the garlic oil in it, it will also soften and spread much easier when I do come to use it. 

Got the lettuce salad bar set up, there were mushrooms, scallions, corn, peas and tomatoes as well as the croutons I'd made. (and yes I know I should have taken the wrappings off of everything, but people started arriving and I had to hurry and take the picture.)
 And here's some of what people brought.
Clockwise, Seafood Pasta salad, hiding behind that some Thai wraps, next a wonderful Napa Cabbage salad with fresh ginger, broccoli and pasta, the barley and edamame salad, then an egg salad served with crackers, and a hummus dip, and the remains of some Caprese salad. 

In the foreground the Thai rice wraps, fresh beets, radish, chicken, and some Jicama sticks.
All in all, everyone outdid themselves, brought something that was unique and delicious, and we had a great time as usual.  

I'll let you know what we do next month.


Continue Reading
No comments
Share:

Wednesday, August 17, 2011

Cooking Demonstration

The cooking demonstration is over, and I have a whole new respect for those people on TV who make it look so easy.  YIKES.   I had fun though, and while I may never be asked to do this again, at least I got to try it, and I took my fifteen minutes of fame, yeah right, and parlayed it into a whole new five minutes of ?
Frikadeller, and sides

I have to give kudo's to the staff at the restaurant, they were fantastic.

Here are a few pictures from my cooking adventure:
Frikadeller ready to go in the oven
An assembly line of Frikadeller


Red Cabbage in the pot, cooking
Red Cabbage in the pot.

 
Chopping herbs for the Cauliflower dish
Tarragon waiting to be chopped.

The stage is set for the cooking demonstration
Here's the empty room, before the hordes arrived.   We had over 60 people there, which isn't too bad for a small town.
Cornflakes for Æblekage
Apple Cake's made and ready to be topped with Whipped Cream.
Cornflakes for Æblekage
Ready and waiting.
Copenhagen Salad
Copenhagen Salad

Frikadeller
Frikadeller

Parsley Sauce, Brown Sauce and Potatoes

Cauliflower and Red Cabbage

Dessert Table

 Æblekage
Apple Cake dished up
  Æblekage
Apple Cake with some servings taken out.


 And then the party was over,


 Æblekage

But everyone there seemed to have a good time, and many told me they enjoyed the food.  


Continue Reading
2 comments
Share: