Sunday, October 28, 2012

'Spider' Cake and 'Spider' Eggs for Halloween

I had fun yesterday.  OK, most days I have fun when it comes to making food, especially when I get to make food to share.   But yesterday I made a Spider Cake and Spider Eggs and took them to a Halloween Party at a local bar.   And since they had a contest going, well, I just could not resist, I had to make something.   And what better thing to make for Halloween than a 'Spider' Cake.    AKA Bologna Cake.
Spider Cake


 Bologna Slices spread with Cream Cheese mixture.


Frosting the Spider Cake
 After it was frosted with the Cream Cheese mixture I piped some cheese onto it in the shape of a spider web.   I actually used the cheese in the can and put it into a piping bag with a small tip.  Otherwise you would get a 'star' shape on there. 
Piped web on spider cake
 After making a 'web' all over the cake I had fun.   I made some spiders out of Black Olives.  For the cake I used Jumbo Olives, cut each one in half, then made 'legs' out of the other half.  You can get about 6 legs out of each half.   And if you mess up some of the cuts, well, no one's looking if you happen to pop them into your mouth.

Aw, heck with it, pop a whole one in there, live dangerously.
Spider Cake and Eggs

 Place one Momma Spider on the top of the cake, using a quarter of a smaller black olive for the head and then have some spiders crawling up the cake.  Have fun.
Spider Cake and Eggs


 See what I mean, fun.   Don't they look nice and creepy?

Spider Cake and Eggs
The finished platter.    I used smaller olives for the eggs, cause the Jumbo ones were too large.

Use your imagination, have fun with it.  I did.
Oh and by the way, I won first prize with this. 

 You can customize this for any special occasion.
Here's the recipe:

Bologna Cake

Oscar Mayer Bologna, 12 oz package
2 -  8 oz. packages of cream cheese (use the leftover cream cheese and put into Deviled Eggs)
1 package of dry Ranch dressing
1 8oz can Aerosol Cheese, Sharp Cheddar
 Buttery Crackers for serving with the cake. 

I used the whole package of ranch dressing to 2 packages of cream cheese (what you don't use on the cake is great on crackers the next day.)
Just spread the cream cheese, about a tablespoon or so, on each layer of bologna and continue till you've used up the whole package. I think it is important here to have the bologna in as uniform slices as possible, it makes for a very nice presentation.    Then 'frost' the cake with more of the cream cheese and decorate with the aerosol cheese, (it comes with a handy star tip).
Continue Reading
No comments
Share:

Wednesday, October 24, 2012

Mice, Crunchy Eyeballs, and other goulish treats...

It's almost Halloween again, and I can't wait.   This year I've got invites to several places for Halloween and it's going to be hard to figure out how many places I can get to in a single evening.

So I thought I would share a few ideas of fun things to make and bring if you're going to a Halloween party this year.

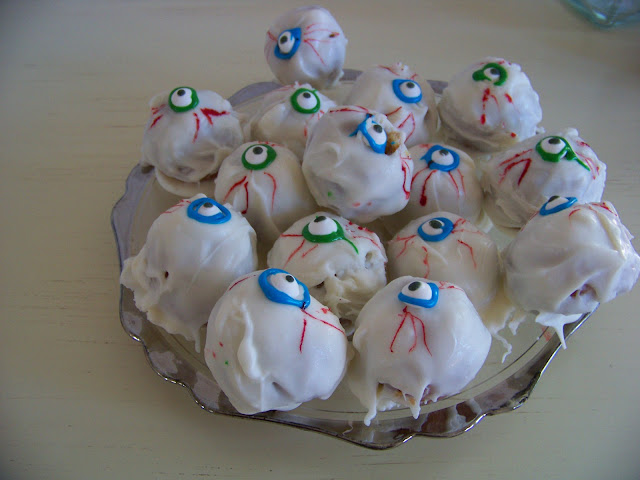
One of my all time faves, Eyeballs, so simple to make and fun to eat.  All you really need is white chocolate for dipping, some red food coloring, some blue candies and oh yeah, the basis of the eyeball, a donut hole.
Dip the doughnut hole in some white chocolate, let it drip off for a second or three, then place a blue or green candy in the middle, and draw some red lines around it with a toothpick dipped in red food coloring.   Simple, fun and delicious.


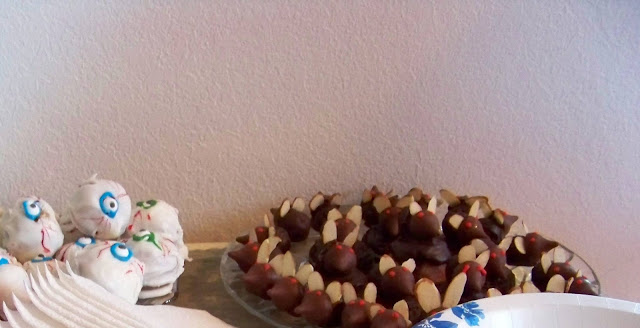
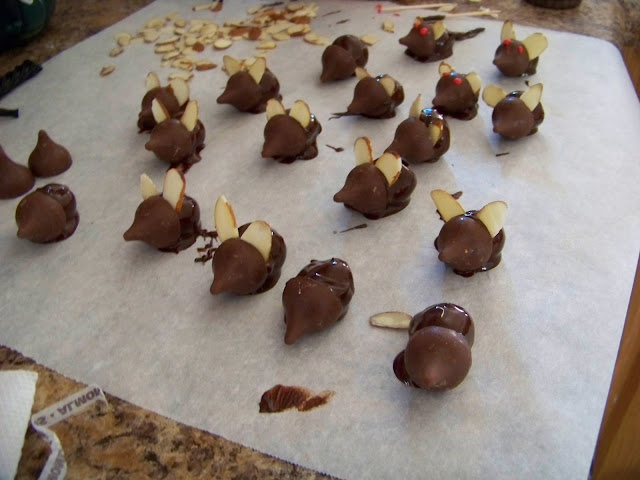
Or how about some Mice?   Get yourself some Hershey kisses, sliced almonds, marashino cherries with the stems on and some good dipping chocolate.   Dip the cherry in the melted chocolate, stick the Hershey kiss on the end and a couple of slices of almonds for the ears, and if you want a drop or two of red frosting for the eyes.   Kids love this one.   (and they taste good too).

Last week a guest brought these Deviled Eggs decorated with black olive 'Spiders'.

Decorate up a Bologna Cake with Halloween colors.   Use the canned cheese for orange, make some spiders out of black olives to crawl over the cake, you use your imagination. Spider Cake  Plus, it's just plain fun to go to a party with a pretty looking 'cake' and have people cut into it and get surprised that it's not a sweet at all.

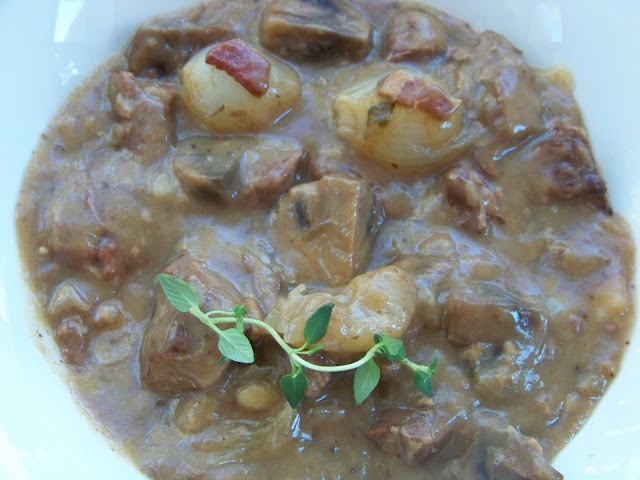
And last but not least, a main dish you can bring. Click here for the  Eyeball Stew recipe.   You can use boiler onions for the 'eyes' and if you want you can even put some small smoked sausages in there for the 'fingers'   

Continue Reading
1 comment
Share:

Tuesday, October 23, 2012

Onion and Mushroom Tart with Goat Cheese.

I had fun making stuff for Saturday's Tapas get together, but I just couldn't make up my mind just what I wanted to make so I ended up with a couple of different dishes.    All right, I made four separate appetizers, sigh.
This one though was a big hit, and I loved it.   Onion and Mushroom Tart with Goat Cheese.  And I will make it again, and again and again.
Onion and Mushroom Tart

I was just lucky I actually got to taste it, it disappeared so fast.   And this is so easy to make.  I mean, easy,  5 ingredients easy.  Onions, mushrooms, thyme, puff pastry and goat cheese.

To start with, take your puff pastry sheets out of the freezer and place in the fridge.   I like them to thaw in the fridge for a couple of hours, before taking them out and letting them finish thawing on the counter.   Cause if your kitchen is too warm, the pastry gets warm and it just doesn't rise.   Now if you're crazy like me, and make your own puff pastry, you'll have some already in the fridge or freezer waiting for you.  Although I didn't have any made up, I just used Pepperidge Farms Puff Pastry Sheets.   And they do work well.

Next up, cut some onions up, and cook them slowly and gently in some EVOO until they are nice and brown and caramelized.   I love slowly cooked onions.  If you have some fresh thyme, strip off a couple of sprigs and sprinkle the leaves over the onions and let them cook a minute or so more.  Or just sprinkle in about a half teaspoon of thyme and stir that in.  Remove the onions to a separate bowl while you cook the mushrooms.   Let them cook until the liquid has evaporated then add the onions back in to the pan, saute them a little more and set aside to cool.

Preheat the oven to 350 degrees. 

Pull out the puff pastry sheet and fold over the edges to make a pretty border, and also to be able to contain the onion/mushroom mixture.    Place the mushroom onion mixture in the middle of the tart and spread out evenly.

Bake for 25 minutes, or until the edges of the tart are nice and brown.
Onion and Mushroom Tart

 Take out and let cool just a little before dotting the top with some goat cheese.   You can make this earlier and just warm it a little in the oven before serving by the way.
Onion and Mushroom Tart with Goat Cheese

Cut into pieces, and stand back cause your guests are going to love this, and will be trying to get just a taste before you get it onto a platter.    I put this plate down and before I could get back to it with the camera, there were pieces missing.  But it's all good.  And very tasty, and best of all easy.

Recipe:  Mushroom and Onion Tart   Bake at 350 degrees 25-30 minutes

2 onions, sliced thinly, I used sweet onions
8 oz. sliced mushrooms
1/2 teaspoon dried thyme
2 oz. block goat cheese
1 sheet frozen puff pastry
1-2 tablespoons EVOO

Heat a good saute pan with one tablespoon of EVOO and add the sliced onions, cooking them over a low heat for about 20-25 minutes.   Stirring from time to time.  Slow cooking means that the sugar really comes out in the onions.  You want them a nice golden color. Add the thyme in the last few minutes.   Remove to a separate bowl, and saute the mushrooms in an additional tablespoon of EVOO until they have released their liquid and then add the onions back in.  Continue to cook until all the liquid has evaporated, then take the pan off of the heat and let them cool.
Turn oven on to 350 degrees to preheat.

Prepare the puff pastry sheet as per instructions, and then make a lip around the edges of the sheet by folding the puff pastry over just a little.  (I forgot to take pictures, again).   Place the mushroom/onion mixture in the middle and spread out.   Place in the preheated oven and cook for about 25 minutes or until the edges are a nice golden color.   Take out and let cool for just a couple of minutes before dotting the tart with some of the goat cheese.   Cut and serve immediately or you could also let it cool, and then warm it a little before serving.    This really is very tasty.

Continue Reading
No comments
Share:

Sunday, October 21, 2012

October Tapas Night

Well, another month and another Tapas night.   I was standing at the sink, washing the wine glasses and trying to think how to start this post, when I realized, I have the perfect opening.

I was standing at the sink...

At any rate, I really don't mind washing the wine glasses and tidying up after one of our Tapas nights.  It means I get to think about how fortunate I am, not only do I have friends, but I have people in my life who love to come on over once a month and have a good time.  I'm very thankful for my house, for being able to host these gatherings, and most of all, for my friends, new and old and those I've not met yet.    You see, we encourage, nay, insist that people we don't even know come on over, and every month there is at least one, if not more new faces.   Some people try to make it every month, others come when they can, there is no pressure to 'come on over', if you feel like it, you show up with an appetizer in hand and visit.  We've met some really cool people doing this, and better yet, have made friends of them. 

One aspect of these gatherings is that I get to cook and try new recipes and also try what everyone else brings.   Along the way, I've picked up lots and lots of recipes, and a couple of extra pounds.  But we won't discuss that today.

I had fun making some new things yesterday, and I'll detail them in another post, but I know you're waiting to see some of the dishes that were presented last night.  Oh, come on, you know you were.   At least my loyal few readers were.

We had quite the gamut of dishes, as usual.   From nuts to soup, well, salad at any rate.


Banana Bread

Spice Loaf

Taffy Apple Salad
Taffy Apple Salad.   This tastes just like Taffy Apples  (I know this cause I've tasted it in the past)

Now that I got the dessert type stuff out of the way, here are a few more dishes...
 Phyllo wrapped Asparagus, totally good. 
 Look at these cuties.   This dish was set down and before I could make it over to the buffet with the camera they were almost all gone.  But what a great idea for Halloween.  Spider Eggs.
Fish Dips
 Two kinds of fish dip, Smoked Mullet and Smoked Grouper.   I love living on the coast, lots of seafood options.   And in the foreground baked Tomato Tarts.
Quiche 
 Two kinds of Quiche, one with just veggies in it and the other with the addition of meat.
Tortellini

Shrimp with kicked up cocktail sauce
Shrimp with kicked up cocktail sauce.   I learned the trick from a friend.   She used bottled cocktail sauce and added some horseradish to it, and some lemon juice and wow did it taste great.  I cooked the shrimp by the way.  
 This was totally fun salad.   Quinoa, Black Beans and Corn with a Lime Chipoltle dressing.
  Really had a great kick.  And I'll be getting the recipe for it, giggle.  Sorry, I didn't mean to giggle out loud, but this would be so awesome with some broiled chicken, and wrapped into a tortilla.   
Just sayin...
 Another Quiche, and believe me when I say people made inroads on this as well. 
 Look at these cuties.   Muffins with a Kumquat Jam glaze and decorated with M & M's.  Fun and sticky.   Oh, and they tasted pretty good too. 
 Egg Salad sandwiches, with a twist, green olives were added to the Egg Salad.  
Salad with an Asian style dressing.   I ate my veggies last night, really I did.
And last but not least, here are two more dishes I made.
                                                                         
Above, a Pissaladière inspired dish.   I used a Puff Pastry Shell and filled it with Carmelized Onions and Sauteed Mushrooms and topped it with some goat cheese.   This disappeared fast. 


Above here, (I neglected to get a picture of them on the buffet, sigh.)   Baked Cheese dip, the one to the right had bacon bits added to it, and the one to the left was basically cheese.   They didn't last long either.   I served them with some toasted bread rounds.


And I didn't get a picture of the Syrian Style Stuffed Grape leaves either, but you know, I had guests and was having fun.  So there.

I'll be posting the how to's on my other dishes later on.   In the meantime, I need to go finish cleaning up.   

Continue Reading
No comments
Share:

Friday, October 19, 2012

Stuffed Grape Leaves

I'm so excited, I'm going to learn how to make Stuffed Grape Leaves, giggle.  Now these aren't Dolmathes, the greek style Dolma, these are Syrian style.   And I'm just lucky enough to have a friend who asked me if I was interested in making some with her.   I couldn't believe my ears, someone asked me if she could come over and make something with me in the kitchen.  I love it.  And especially since I get to make something I've never made before.  I've had Dolmathes, and they were good, but these are a little different, a different riff if you will.  (very suitable for me to say this, since it's a musician who will be showing me some new notes in my kitchen).   Oh and another friend is coming over to make Baklava as well.   How lucky can I get?   Sorry, bursting out with big grins here from excitement.   I've had Robin's Baklava before and I know how additive it can be.   And now I'll learn how to make it as well.  But that will have to be a separate post.

I wrote the above last week when I was all excited.   Now that the big day has come and gone, well, all I can say is I had so much fun.    Debi Jordan is my musician friend ( Shameless plug for her music here) and I gotta say she rocks it in the kitchen and is welcome any time she wants to come on over and cook with me.   Especially when I can expand my repertoire a little.

Now, you will have to bear with me, cause nothing got measured out, so a lot of it was 'eyeballed' and a smidge and a dash and some of this and some of that.  But I can guesstimate pretty well so...   I also did a little shopping and picked up a jar of grape leaves as well as a couple of other things.   We didn't use the couscous, but I can use that when I make some Tabbouli again.


Debi cutting up onions, she already has the grape leaves spread out
To make the stuffed grape leaves you need grape leaves, and they come in a jar.  Debi prefers Orlando Brand, California style.  I also picked up a jar just in case, but we had more than enough and we didn't get a count on just many of those little suckers we rolled.   There are a few things you need to know about grape leaves, one is that you must remove them from the jar and gently flatten them onto a plate so they can relax a little and unfurl.   Another thing to know is that there is a right and a wrong side on grape leaves.  You always put the meat or rice on the inside of the leaf, where the main veins are.  The smooth side is always out.   Another tip, you nip off the end of the stems as you don't want them inside.   All that being said, let's get on with it.

I ground up some lamb and some beef.   There was about three pounds total.
I love my KitchenAid, it does so much for me.

Put that in a big bowl and Debi added some rice and seasoning.   There is the other thing, she used a spice mixture called Syrian Pepper.
All ready to mix together.

Which is basically a mixture of black peppercorns, allspice, cloves and nutmeg, all ground up together.   Some recipes call for cinnamon as well.   This was a new taste for me, and while I was a little hesitant, I found I liked it.  I'm not all that fond of Nutmeg, but it was complemented very nicely by the other spices.  Recipe for Syrian Pepper at the end of this post by the way.

Debi added about a cup or so of rice into the meat mixture, she did what many good cooks do, she eyeballed it.  Of course she has made this many times before so she knew the right proportions.    I'm guessing she also added almost a tablespoon of Syrian Pepper as well as about 1/2 teaspoon of salt, and 1/2 teaspoon of regular ground pepper.   She mixed that all together and we commenced to rolling.

Open the grape leaves up, with the vein side in, take about 2 tablespoons of the meat mixture and form it into a cigar shape.  I found out later, we actually put too much meat in each package, but it's all good and a learning curve.
 Tuck the base of the leaf up and over the meat, and fold in the sides, just as if you were wrapping a package, you don't want any loose leaf hanging out.
 Roll it up into a cylinder, making sure that the leaf stays tucked in.   You want it tight but not too tight, the rice will expand as it cooks and you don't want a bunch of burst leaves, it would totally defeat the whole concept of stuffed grape leaves.   Also, you place them in the pot seam side down.   If you don't they will come undone.    And I need to add something else here.  Some of the grape leaves were stuffed with rice which we'd par cooked with some of the Syrian pepper and Za'atar for a vegetarian version of the Stuffed Grape Leaves, so if you have a vegetarian around, you can safely serve them some grape leaves as well.


Once we got all the meat and rice rolled into nice little rolls, it was time to cook them.   As they were rolled we placed them into a large pot (and I neglected to get a picture of that, but hey, I was busy rolling), and covered them with water with about a cup or so of lemon juice and some garlic cloves. This was left to simmer for about an hour or until the rice was cooked.  Debi said she could tell when they were done by the way they smelled, but I caught her taking a taste test.   We then turned off the pot and let it sit while the rest of the meal was prepared.

While I was busy grinding the meat, Debi was making a Syrian Salad, isn't it gorgeous looking?   as well as the Lebhan, which is a yoghurt sauce.
(just wanted to let you know I made some corrections here, had the name of the yoghurt sauce mixed up with the salad name, my bad and twenty lashes with a wet and sticky noodle to me).
  In the salad was Spinach, Red Onions, Beets, Cucumbers and Feta Cheese.   She finished it off with some Za' tar seasoning, roasted pine nuts and olive oil and lemon juice for the dressing. 

Also along the way, I did take a few pictures of the Baklava as it was being built, which is another post entirely.

However, some phyllo dough was left over and there was still some feta cheese as well as pine nuts and so Debi made some Spinach Pies.  After Robin lined the muffin tin with some phyllo dough brushed with butter.   These were baked off and wow, now I know how to make a version of Spanakopita or I'll just call them Spinach Pies, giggle.  They may not have looked real purty, but they sure tasted good. 


Stuffed Grape Leaves, Spinach Pie, Leban Salad and Yoghurt sauce.  A really great meal.

We finished off the meal with some Cherry Tarts that I'd thrown together earlier in the day, as the Baklava needed to age before we could eat that.

And Robin was right about that.  I snuck a piece the next day, but it is now covered and waiting out of temptations way, I hope.   I'll eat some in a few days.


SYRIAN PEPPER:
3 ounces whole allspice
1 ounce whole black peppercorn
5 whole cloves
1/2 teaspoon ground cinnamon
1/2 teaspoon grated nutmeg
Directions:
1
Grind the allspice, pepper, and cloves in a food processor, coffee grinder or blender.
2
Add the cinnamon and nutmeg and pulse briefly to combine

So there you have part of my cooking adventures, I so love it when someone asks if they can come over to my house and cook, especially when I get introduced to a cuisine I'm not familiar with.    We had some laughs, I learned how to roll a grape leaf and now I have a supply of Za'atar in my cupboard. 


Continue Reading
4 comments
Share:

Monday, October 15, 2012

Secret Recipe Club - Tomato Gratin

I'm so jazzed about this club that I was lucky enough to stumble upon via My Danish Kitchen.   Quite frankly if I hadn't read about it there, I would probably never have heard of it.   I don't read a lot of blogs, I don't have time for it.  Mostly I find them by Googling for a recipe and then reading the blog the recipe appeared in.   Which was my luck in finding Gitte's blog.   And she happened to mention the Secret Recipe Club so I read about it, applied and got put on the waiting list.   And in August it happened, I was told I was going to be in Group B.   Yippeee!!!!   And guess what, thanks to the SRC, I now have a load of new recipes and blogs that I go to and get inspiration from.

The SRC is fun, and I hope to be a part of it for a long time to come.   Basically it's a bunch of bloggers who are placed into groups, and assigned another blog to find, make and post a recipe from.   And it's great.   But you can't tell anyone who's blog you were assigned until the reveal date, and then everyone in your group 'reveals' the recipe they made from the blog they were assigned to.    And this month's blog that I was assigned is, drum roll please,  Jane's Adventures in Dinner.

So I went there, and one of the first things I saw was she's a fellow Canadian.  Yes, I know I keep saying I'm a Dane, but I grew up in Canada, land of the Butter Tart, Tortiere, French Fries with Gravy, gotta stop now, I'm not only making myself hungry but homesick as well. sigh.

And it turns out that not only is she a fellow Canadian,  and I seem to recall reading one of her posts where she mentioned Florida, as in living there, which is where I currently live.  She was probably just visiting, but still...  So, one more commonality.   Giggle.  Sorry, I do get carried away. 

Now that I've maundered on, it's time to tell you what I made.   And believe me when I tell you it was hard to choose.   Not only did I want to make something fantastic, which I knew I would from her recipes, I also wanted to make something I could take to one of our many potlucks.    As it turns out, I found several recipes, some of which are bookmarked.    I hate making decisions sometimes, sigh.
Tomato Gratin


But then I saw this recipe and went, alright.  Especially since we were going to a friends house on Saturday for his birthday and I made this to take along.   One of the reasons that this dish caught my eye was because it was vegetarian friendly.   And easy, and fun and just a little different.  I know I can't post this before the reveal day, but I can make it and share it.  Which I did. 
Tomato Gratin  

So simple to make, and really, really tasty.    Basically three ingredients and you're good to go.  I used Stewed Tomatoes with Celery and Onion, the No Salt Added kind.   I had a loaf of stale french bread, and some nice sharp Cheddar in the fridge.

Pour about a tablespoon of EVOO in the bottom of a baking dish, or maybe a little more, whoops.

 Add two cans of Stewed Tomatoes with Celery and Onion, don't drain them.
The olive oil kinda pooled in the corner there, but don't worry, it gets used.


Next add your cubed bread.   I used some French Bread, but I think this would be even better with some crusty artisan bread (which I don't have access to here, unless I want to drive about 30 miles to the good grocery store).   Toss it together, and then don't do like I did, and forget the nice chopped herbs, in my case some parsley and chives, on the counter.

Sprinkle the fresh herbs on top of the tomato bread mixture and then sprinkle it all with some Grated Sharp Cheddar Cheese.   Bake at 375 degrees for about 20 minutes or so or until the cheese melts


Serve immediately or do as I did, put a piece of foil over top and then wrap it up and take it to a party.
It was very well received.   And I had a few requests for the recipe as well.   I think the next time I make this I will actually use a mixture of cheddar and monterey jack cheese, as I think the Monterey Jack cheese will melt into the tomato mixture a little better.  


Continue Reading
12 comments
Share: