Showing posts with label Holiday. Show all posts

Sunday, December 1, 2024

Mini Berry Pies

 You might have noticed I'm not posting as much these days.   I keep meaning to make something I can share but get caught up in real life.  However, a group I'm a member of,  Sunday Funday, happened to post about the fact that December 1 is Pie Day, and I'm not talking the mathematical 'pi', but rather the eat until you can't eat no more pie, pie. 

Mini Berry Pies

Now, isn't that cutest little baby pie?  I thought so, then I ate it.  Cause I could and there was no one watching me.  

And as it just so happened, I had cooked up the most delicious fruit filling for pies and thought, I can share this, and have to admit that not only did I bake this luscious, unctuous berry filling into mini pies in my cute as a button, electric mini pie machine, but had also been enjoying the sauce on top of waffles, with some heavy cream on top and just plain as well.   And yes they did get a touch brown, but... 

Mini Berry Pies

  I also bake and sell various kinds of bread at a local market and decided to make some pies and bring them to sell.   These were the pies I made for the market and they were a hit.   I sold out fast on these.  And who could blame me.  Each one of these little beauties is about 2 1/2 bites, not even a whole slice of pie, so you can enjoy a couple almost guilt free.  Almost...
Mini Berry Pies

This past summer I got on a berry kick and was buying various kinds of berries to eat fresh, as a snack, and freezing what I didn't eat, so they wouldn't spoil.  I ended up with a lot of fruit in the freezer.   I also have the habit of weighing stuff, and writing on the freezer bag how much is in there, just in case I want to use it for a recipe later on. 

I even had a little pastry left over from the mini pies, from this batch of pies, so I did a slightly larger pie for later, and ummm, kinda bobbled it taking it out of the oven so it made a bit of a mess, but I'm eating it anyway.  So there. 

Mini Berry Pies


What can I say, my memory is shot, and it helps me to know just how much of anything I have in the freezer, cause I'm in the CRS stage of life.    Look it up, if you have to. 

To make a long story short, (er)  Here's what I did.  All the berries were frozen when I put them into the pot to cook. No water was added. 

Blueberries - 1.5 lbs

Cranberries -1 lb

Blackberries -8 oz

Raspberries 8 oz 

1 oz. Lemon Juice (frozen from my lemon tree)

3 + cups sugar - to taste

Cornstarch slurry

Add all the berries to the pot at once, then add the lemon juice and heat over low heat until the berries start to pop and let out their juice.  Raise the temperature and let come to a simmer, and simmer about 20 minutes.  Next add the sugar, starting with 1 cup, stir to dissolve and then add the second cup.  Taste for sweetness, and add another cup or more of sugar if needed.  (your sweetness level may be different from mine, I used about 3 1/2 cups of sugar).  Make up a cornstarch slurry, depending on how thick you want the sauce to be. I like mine on the thicker side, and have to admit I didn't measure really well. Start with 1 tablespoon cornstarch mixed in with 1/4 cup water, swirl into the sauce, let it come back to a boil, and check.  Add more cornstarch slurry if needed.  I did and ended up using 2 tablespoons of cornstarch.   Again, your mileage may vary.  

I also had lots of berry filling left, so I froze it in 2 tablespoon portions, using a silicone cube tray.  

And you can take the berry filling straight from the freezer and put it into the mini pies, but I would suggest thawing it first.  

I also use commercial pie pastry for this, as I find it a little more sturdy and that really helps the pies to come out of the pie cooker.  

I'm loving this little pie baker/appliance.  It bakes a pie in just about 15 minutes.  You can top the pie with a crust or not.  I've done it both ways.  I've also done a little weave on top, and they've come out nicely.   For me, they're perfect.  I can make pie, just for me, and freeze the rest for a snack later on.  I've been playing with different fillings and I think I like the Mixed Berry Filling the best.    

Hey, if you're going to indulge, ya gotta make it worth the calories...

Continue Reading
5 comments
Share:

Thursday, November 11, 2021

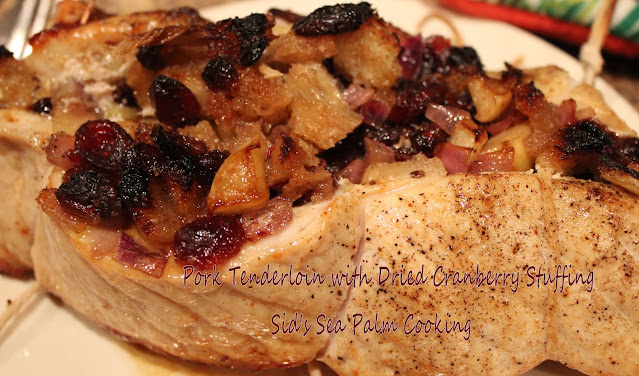
Pork Tenderloin with Dried Cranberry Stuffing

It's time for the Improv Cooking Challenge.  And this month, the challenge, should we care to accept it, was to use Cranberries and Meat together in a dish.   

Pork Tenderloin with Dried Cranberry Stuffing

I participate in this when I get an idea for a new recipe and this month, I had one.  

An idea that is, for a little twist on a stuffed Pork Tenderloin.   

It was a good one, BTW.  Idea that is and the pork, well, I would keep patting myself on the back on how good it tasted, but I'm scared I would dislocate my shoulder. 

Filling for Pork Tenderloin with Dried Cranberry Stuffing
and stuffed in the pork

Pork Tenderloin with Dried Cranberry Stuffing

Here it is in the pan, browning a little.  My sister gave me this idea, she does it with a pork loin.  This means you get that lovely caramelized taste without cooking it to death in the oven.

Pork Tenderloin with Dried Cranberry Stuffing

I didn't do a great job of trussing it up, too much filling, but oh so worth it.

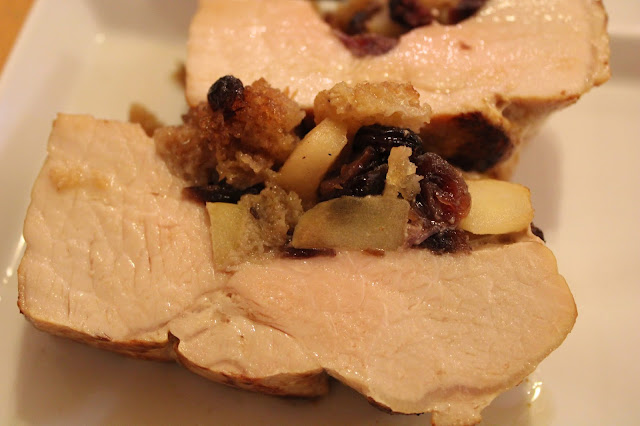
Can you see how moist the meat is?  I know, not the greatest picture but the taste.  So darn good. 

Pork Tenderloin with Dried Cranberry Stuffing
I think this is a perfect dish to make for someone special, yourself, during the holiday season.  Pouring the pan juices over it, while it's resting also helps to keep the meat moist.

I basically used a few items I had on hand, which was good, and have to say WOW!!!! the meat came out moist and tender and the filling, well, can I just say it was amazing.

Pork Tenderloin with Dried Cranberry Stuffing

Pork Tenderloin with Dried Cranberry Stuffing

Yield: 2 Servings
Author: Sid's Sea Palm Cooking -
Prep time: 2 HourCook time: 30 MinTotal time: 2 H & 30 M
This a fabulous take on making a pork tenderloin. Serve with some veggies and you have a company worthy meal.

Ingredients

  • Pork Tenderloin
  • 1/2 cup dried cranberries
  • 4 tablespoons Grand Marnier or 1 tablespoon Grand Marnier with 3 tablespoons orange juice
  • 1/2 apple - chopped
  • 1/4 cup red onion - diced
  • 1 thick slice sourdough or artisan bread cut into cubes
  • 1-2 tablespoons butter
  • String or skewers

    Instructions

    1. Preheat oven to 350 degrees and prepare a small oven safe roasting pan by spraying with a non stick baking spray.
    2. Soak the dried cranberries in the Grand Marnier or mix of Grand Marnier and orange juice for several hours to re-hydrate the cranberries. Do not drain.
    3. Using a sharp knife cut the tenderloin almost in half, lengthwise, butterflying it. Set aside.
    4. In a large pan, melt the butter and saute the red onion until soft, then add the diced apples and the bread. Let the bread get a little color on it and then add the cranberries with the liquid. Stir together and then cover the pan and turn the heat off. Let sit until lukewarm.
    5. Position the string along the bottom of the pork, getting ready to tie it up.
    6. Spread the stuffing evenly along the cut edge of the tenderloin and bring the string up around the pork to tie it off.
    7. Melt 1 tablespoon butter in the same pan the stuffing was cooked in and brown the tenderloin. Turning it evenly if you can.
    8. Place on a greased roasting pan, and roast at 350-375 degrees for about 20 -30 minutes or until a thermometer registers 170 degrees when poked into the meat.
    9. Remove from oven and cover with some foil to let rest for 10-15 minutes. Before carving pour any juices in the pan over the pork. Serve with oven roasted potatoes or your choice of vegetable.


    Did you make this recipe?
    Tag @sidsseapalmcooking on instagram and hashtag it #Sidsseapalmcooking


     Improv Cooking Challenge

    Cranberries & Meat

    Continue Reading
    2 comments
    Share:

    Sunday, December 27, 2020

    Cheater Collards and Ham

     Please do not throw the stale cornbread at me for posting about my Cheater Collards.    

    I can duck. 

    Why am I showing this today?  Well, I'm part of a group called Sunday Funday, and we are assigned a theme and post about it, every Sunday.  I don't always participate, but this time I did.  This time the theme was "Let's Ring in the New Year 2021 With Your Special Dish.   Our guest hostess is Sneha from Sneha's Recipe. I almost forgot to add that. sigh.  

    We actually have rotating hostesses for this as well.  I knew I'd forgotten something when I wrote this in my post Christmas madness.   And I need to make it up to them.  I'll tell you all about them in a separate post though.

    Here in the South, the New Year is begun with Greens and Blackeyed Peas, to bring you luck in the New Year. 

    I didn't do any Blackeyed Peas today, cause I'll be doing a Danish meal on New Years, but I might make some more of this for lunch that day. 
    I love Collards.

    'Cheater' Collards and Ham


    Let me explain about my cheater Collards and Ham.   I love Collards and Ham, but it can take a little while to get it nicely simmered down, and ready to eat.   

    I get impatient, I do.   Especially waiting for the deliciousness of the collards to cook down.  

    A few weeks ago, I found some canned Collards in the store, and bought a can, ate it and then bought several more to keep on hand.  

    I also write the use by date on the front of my cans, cause I don't always want to try and find my glasses to see the teeny tiny print that is hidden on the bottom of the can. I want to be able to look and see at a glance, the use by date.  This also helps me to rotate stuff.  I put the newest purchases in the back and the oldest at the front so I can use them up in a timely fashion.

    Canned Collards


    Of course, I didn't just open a can and dump it into a pot and heat it.   I added some good chicken stock and some ham to it, let it simmer for a little bit, made some cornbread and feasted on it all. 

    My mouth did a happy dance, in fact I'm not sure but that it did a whole cotillion's worth of dances in there.  

    I even made a riff on my Skillet Top Cornbread.  I didn't have any hush puppy mix, but I did have some chives in the garden so I chopped some up and added it to the cornbread.   I'd thought of making some  Toaster Oven Cornbread, and  I even toyed with making some Cornbread with Smaltz, but didn't have any smaltz left.  I did have some leftover glazed carrots from dinner the other night and used some of it in the cornbread as well.   

    I  also had lots of ham left from our meal on Christmas Day, and used some of it, OK, I used a lot.  


    'Cheater' Collards and Ham


    'Cheater' Collards and Ham

    'Cheater' Collards and Ham

    Yield: 2 Servings
    Author: Sid's Sea Palm Cooking
    Prep time: 5 MinCook time: 30 MinTotal time: 35 Min
    This is a quick and easy and delicious way to make quick Collards and Ham for New Years or any time.

    Ingredients

    • 1 Can Seasoned Collard Greens
    • 1 cup Chicken Stock
    • 1/2 -1 cup diced Ham

    Instructions

    1. Simmer the can of Collard Greens, and Ham in the Chicken Stock for 30 minutes and serve with some Cornbread, or Cornbread Muffins.


    All recipes and their respective images are either original or adapted and credited, and are all the sole property of Sid's Sea Palm Cooking © 2011-2021, with all rights reserved thereof.

    Check out my cookbooks on Amazon.  

    All are available as paperbacks or as a downloadable e-book.  

    All the ebooks are currently on sale.
     Simple Shrimp Recipes - 25 + Appetizer, Entree and Dipping Sauces.
     Nibbles and Bites - A Compilation of Appetizers, Canapes and Finger Foods
      Hygge - Danish Food and Recipes

    Continue Reading
    6 comments
    Share:

    Monday, December 9, 2019

    Winter Wonderland Cake for Baking Bloggers

    It's time for Baking Bloggers again and the theme this month is Snow.  Sue of Palatable Pastime is our leader but we all voted on a theme for the month.   Rather democratic of us, I must say. 
    Winter Wonderland Cake

    And I knew right away that I was going to use 7 Minute Frosting on the top to fit in with the Snow theme.
    The only question I had was,  what was I going to put underneath the frosting. 
    Critical question that.  I mean, I hate to say it, but I can probably eat the whole thing when I make this frosting.  And I was brave as well.  I'd made two batches a couple of weeks ago that totally failed.  And it shook my confidence, a lot.  I've been making this frosting for over 50 years many years and it was my first fail, and not just once, but twice, in a row. sigh.
    Winter Wonderland Cake

    I figured out what I'd done wrong though and this time it worked.

    But onto the cake...
    I looked in the pantry for inspiration and what to my wondering eyes should appear, but a lone can of pumpkin hiding by itself, forgotten, overlooked, sitting dejectedly in the rear.  Close by were also some of my faves, dried Cranberries and Pecans.
    So, I played.
    I've never outgrown my days of making mud pies, but now I use real ingredients and feed them to other people.

    Here goes, and I have to say that this cake turned out AWESOME!, flavourwise that is.   And while the 7 Minute Frosting didn't quite do what I wanted it to, it still looked decent and tasted great.  
    Winter Wonderland Cake


    Winter Wonderland Cake

    Yield: 12-16 Servings
    Author:
    prep time: 20 Mcook time: 35 Mtotal time: 55 M
    This holiday themed cake is perfect for any special occasions or holidays in the winter months. You can bake it in two 9 inch layers or in a bundt pan. Either one is good.

    ingredients:

    Cake
    • 1 cup butter
    • 1 1/2 cups sugar
    • 3 eggs
    • 3 cups self rising flour (if using regular AP flour, add 1 1/2 teaspoons baking powder)
    • 1 can (15 oz.) canned pumpkin
    • 1/2 cup Milk
    • 1/2 cup chopped Pecans
    • 1/2 cup dried Cranberries
    • 1/2  tsp. powdered ginger
    • 1 tsp.  Cinnamon
    • 1-2 tablespoons Bourbon
    Frosting between layers
    • 1 can prepared Vanilla Frosting
    • 1/2 cup Dried Cranberries
    • 1/2 cup Chopped Pecans
    • 1/2 ounce Bourbon
    7 Minute Frosting
    • 2 egg whites
    • 1 1/2 cups white sugar
    • 1/3 cup water
    • 1/4 tsp. Cream of Tarter
    • 1 tsp. bourbon ( what was drained from the dried cranberries from the filling)
    • green gel food coloring

    instructions:

    How to cook Winter Wonderland Cake

    1. Preheat oven to 350 degrees, grease and flour two 9 inch pans, or one 10 cup bundt pan.
    2. Cream butter and sugar together until light in color.  This ensures that the sugar has incorporated into the butter.  Add the eggs, one at a time and mix in, adding a couple of tablespoons of flour after each egg.  Add the pumpkin and mix in.  Then add half the remaining flour, mix in, then add the milk and finish off with the rest of the flour.    Add the bourbon,  and then fold in the cranberries and pecans.  Pour the batter into two 9 inch pans which have been greased and floured, dividing it evenly between the two.     Bake for 35-40 minutes or until a toothpick inserted in the center comes out clean.
    3. If baking it in a bundt pan, bake at 325 degrees for 55-60 minutes. 
    Filling
    1. Place the dried cranberries in a small dish and pour enough bourbon over top to cover.  Place in microwave and zap for 30 seconds on high, stir and then zap for another 30 seconds.  Set aside so it can cool.  Drain, reserving the rest of the bourbon for the 7 minute frosting, if desired.
    2. Chop the pecans up a little, and mix into the canned Vanilla Frosting, then add the drained and cooled dried cranberries.  
    3. Mix well.
    7 Minute Frosting
    1. Mix ingredients together in a either a heat proof glass bowl or a stainless steel bowl.  Place over simmering  water, making sure the bowl does not touch the water.  Using a hand mixer, beat at high speed for 7 minutes, until the frosting leaves peaks when the beaters are pulled out (turn mixer off first, otherwise you end up wearing the frosting).  Add the reserved bourbon from the dried cranberries, or add 1 teaspoon regular bourbon and mix in.  
    Assembly
    1. Level off the cakes if desired,  and place onto a plate.  Add a dab of prepared frosting on the center of the plate, and place one layer of the cake onto it, bottom up.   Spread the prepared frosting which has been mixed with the re-hydrated cranberries and pecans, evenly across the cake, pushing some of it to the edges.   Place the other layer on top, bottoms up, and press down a little.   Take out a little of the 7 Minute frosting and add some green gel food coloring to it, tinting it to your satisfaction.  Place into a piping bag, set aside for a few minutes.  
    2. Spread the remainder of the 7 minute frosting across the top and sides evenly across the cake.  
    3. Using the reserved, green tinted frosting, pipe small trees on top, mounding the frosting slightly, and then using the remainder of the frosting, pipe trees onto the side of the cake.  Three dots for the base, then two dots on top and finishing with a dot for the topper.   Sprinkle some Christmas themed sprinkles around the perimeter of the top of the cake, in a pleasing fashion, in between the 'trees'.
    4. This is only a suggestion for decoration, please use your own imagination for decorating. 
    Created using The Recipes Generator

    Check out what the rest of the Baking Bloggers made.

    Baking Bloggers

    Snow

    Winter means snow- with snowflakes both outside and in our kitchens!
    Looking for ideas for Christmas gifts? Check out my cookbooks on Amazon. All are available as paperbacks or as e-book. Any of them would be a great gift for the foodies in your life

    Simple Shrimp Recipes - 25 + Appetizer, Entree and Dipping Sauces. 

    Nibbles and Bites - A Compilation of Appetizers, Canapes and Finger Foods

    Hygge - Danish Food and Recipes

    Continue Reading
    8 comments
    Share:

    Sunday, November 24, 2019

    Thanksgiving Recipe Ideas.

    It's almost T-Day!   Are you ready?

    This year we'll be going  to a Friendsgiving, which is one of the best ideas ever.   I've hosted it a couple of times, and it was great, but it's so nice that I only have to bring a couple of dishes as my contribution this year.

    I'm making and bringing an appetizer, this Butternut and Apple Galette.  This was so good, I just want to share this with the world.

    as well as a Pumpkin Pie.  I do like to make my own crust, so there are full recipes here.
    Here's a few ideas if you're still trying to figure out the menu, or what you'll be bringing to your celebration.

    In years past I've made this amazing Green Bean Casserole, and you know what, it shouldn't be just made at T-Day either.  
    Green Bean Casserole

    as well as these No-Knead Rolls. No Knead Home Made Rolls

    I just made these tasty little bites of deliciousness ( too much hyperbole?, Nah).  Pecan Pie Butter Tarts.  Perfect if you only want a little bite after all that turkey. 
    Pecan Pie Butter Tarts

    I also love making my Boozy Cranberry Sauce from time to time.  Although, I also like the jellied canned stuff. I just like Cranberries.  And when you're making this, it perfumes the entire house.

    I also love stuffing, and make myself this Wild Rice Stuffing, cause I'm the only one in the house who eats stuffing, and I personally love this one.
    Wild Rice Stuffing

    Hint #1
    A few years back, I was cooking meals for our local Senior Center and decided to do make a Christmas in July meal. 
    I cooked several turkeys that day, and one of my volunteers, Lisa gave me the best hint.  After we took the foil draped turkeys out of the oven to rest, she put some towels on top, to maintain their heat, and those were the easiest turkeys I've ever carved.   When I cook a turkey now, I do the same thing. By letting the turkeys rest, under a towel before carving them, means you get a lovely moist meat.

    Hint #2   If you make your turkey gravy from scratch, and end up with a lot of fat on top, you don't want, just dump a few ice cubes on top.  The fat will adhere to the ice cubes, and you can just scoop out the fat.

    Hint # 3  I always keep a package of instant potatoes in the cupboard.  If you accidentally make soupy potatoes and lets face it, we've all made that mistake, just whisk in some instant and they firm right up. And... you don't need to use as much butter either.

    and my final hint.
    Hint #4 If you want super fluffy potatoes, heat the butter and milk or cream together until hot, before mixing it into your fresh cooked potatoes.   Because the milk and butter are already hot, they don't cool down the potatoes and stay nice and fluffy.

    Now that I've given you some ideas, I hope your turkey is in the fridge, thawing, so that you don't end up trying to cook a frozen turkey on the big day.  It's not fun, trying to thaw a turkey in a hurry so that it's still safe to cook and eat.

    Christmas is coming and my cookbook Hygge - Danish Food and Recipes would be a great gift for any foodies in your life. Available as a Kindle e book or in paperback.  

    This post was also featured at Miz Helen's Country Cottage.  

    Continue Reading
    2 comments
    Share:

    Friday, November 22, 2019

    Pumpkin Pie

    I've been making pumpkin pies for years.
    I've made them from scratch, totally scratch.  
    As in growing the pumpkin, roasting it, making it into a puree and baking it.

    Honestly, I've got better things to do with my time now, and prefer to buy my pumpkin, already grown, processed and in the can.  Even if it may have other squashes included.
    My taste buds can't tell the difference quite frankly, and I love just opening a can and dumping it with the rest of the ingredients. 

    All that being said, here is the recipe I make, and yes, I do make my own pumpkin pie spice mixture, because I like it.   If you make your own, you can customize it to your taste as well.

    One fun thing about baking your own pie, is having fun with the scraps of dough left over from the crust.
    Take a look at what I've done in the past.   Go for it, have fun, make a a pretty design on top.  Crimp the sides in a pleasing manner, I'm not too good at that part, I prefer a more rustic look.

    And I also like the Plain Jane approach. 
    Pumpkin Pie- Sid's Sea Palm Cooking


    Pumpkin Pie- Sid's Sea Palm Cooking

    Pumpkin Pie- Sid's Sea Palm Cooking

    Pumpkin Pie- Sid's Sea Palm Cooking

     And sometimes I even get the crumbs...  this is all that was left of the last pie I made and brought to a gathering.  I'm just lucky I got to taste it.


    Pumpkin Pie Filling

    Yield: One 9 inch pie- 6-8 servings
    Author:
    prep time: 15 Mcook time: 45M total time: 1 hr
    This is a lovely, rich tasting pie filling, which you can customize to your own taste, by simply altering the spices. It's also easy and quick.

    ingredients:

    • 1 can pumpkin (15 oz.size)
    • 1 can Sweetened condensed milk
    • 2 eggs
    • 1 teaspoon cinnamon
    • 1/4 teaspoon ground ginger
    • 1/4 teaspoon ground cloves.
    • 1 recipe pie dough or a single pie crust

    instructions:

    How to cook Pumpkin Pie and filling

    1. Heat oven to 375 degrees.
    2. Pre-bake my crust about five - ten minutes, using a fork to prick some holes in the bottom.  This ensures that the bottom crust is cooked. 
    3. Turn oven down to 350 degrees. 
    4. Whisk  the filling  ingredients together and pour into prepared pie shell.
    5. Bake the pie for about 45 minutes or until a toothpick inserted in the middle comes out clean.  An old trick is to also use a clean knife and insert that into the middle, and if the knife blade comes out clean the pie is baked.   But sometimes the filling sticks to the knife even when it's baked.  I use an instant read thermometer and check that way if I'm unsure.  The internal temp should read 175 degrees. 
    Created using The Recipes Generator

    Continue Reading
    No comments
    Share:

    Wednesday, November 20, 2019

    Pecan Pie Fight- Pecan Pie Butter Tarts

    It's time for another Fantastical Food Fight hosted by Sarah of Fantastical Sharing of Recipes and this time round we're fighting with Pecan Pies.
    Pecan Pie Butter Tarts

    Not really, we're just pitting our recipes against each other to see who comes out on top.  

    I think everyone has a particular recipe they like for Pecan Pie, and personally I don't think there is such a thing as a bad one.

    At least not that I've had.  Some of them have been a touch on the skimpy side when it comes to the addition of pecans, but others have almost overloaded the pie with pecans.

    Actually I don't think you can overload it with pecans. My own personal viewpoint. 

    But I wondered about adapting my favorite Butter Tart recipe for this challenge.
    So I did.
    This is not a Butter Tart with Pecans however, at least I don't think it is.
    Cause Butter Tarts are pretty much sacrosant with Canadians.  You don't mess around with Butter Tart recipes.
    I'm just sayin...

    For fun I added some dried cranberries along with the Pecans, and I think I came up with a winner. 

    At least my mouth said it was.

    I thought I'd also share how I get those little circles of dough into the depressions in the tart pan.  I grab my handy, dandy shot glass and use it to press the dough down.  I know they make fancy ones that you can use, but this works well for me.
    Pecan Pie Butter Tarts
     Here's how they look as I'm filling them.
    Pecan Pie Butter Tarts
    And of course, filled and ready for the oven.
    Pecan Pie Butter Tarts

     Look at that gorgeousness. 
    Pecan Pie Butter Tarts


    Pecan Pie Butter Tarts

    Yield: 24 mini tarts
    Author:
    prep time: 10 Mcook time: total time: 10 M
    These are the perfect bite size treat for after Thanksgiving Dinner or for Christmas or just because.

    ingredients:

    • 1/3 cup melted butter
    • 1 cup brown sugar
    • 1 egg
    • 2 tablespoons cream or milk
    • 1 teaspoon vanilla extract
    • 1/2 cup dried cranberries
    • 48 pecan halves - divided
    • Pie crust- either home made or bought

    instructions:

    How to cook Pecan Pie Butter Tarts

    1. Preheat oven to 400 degrees
    2. Melt butter and mix in the brown sugar, vanilla extract and cream.  Add the egg and whisk thoroughly.   Set aside while you chop the pecans and cranberries.
    3. Take half the pecans and do a rough chop, reserving 24 pecan halves.  
    4. Spray the inside depressions of a mini tarts pan with some non stick spray.
    5. Roll out the pie dough or unfold if using commercial pie dough.  Cut out enough circles of dough for each tart pan.  Place a circle of dough onto each depression in the pan, and using a shot glass press the dough down carefully, making sure not to tear the dough. 
    6. Add a little of the chopped pecans and cranberries to the bottom of each tart and then very carefully, pour the filling into each tart, filling it 3/4 of the way. 
    7. Bake at 400 degrees for 5 minutes and then turn oven down to 375 and continue baking for about 20-25 minutes or until the tarts are lightly browned. 
    8. Take out of oven and let cool.
    Created using The Recipes Generator

    You are invited to the Inlinkz link party!
    Click here to enter

    Continue Reading
    8 comments
    Share: