Monday, November 28, 2016

Renee's Microwave Lasagna

Did you catch the title?
 Microwave Lasagna. 
Microwave Lasagna

Yes, you do cook this lasagna in the microwave, and it is good. 

I've been making lasagna this way for years, ever since my next door neighbor and friend Renee brought one over to us.    She was doing the neighborly thing, bringing us an already made dinner as we were going through something difficult at the time, and needed a good home cooked meal. 

I made the mistake of buying a pre-made lasagna a few weeks back and was a little dismayed at how much many noodles were in there, and how 'dry' it was.    The flavour was good, but...

It just wasn't home made.
Since I made some lovely spaghetti sauce the other day, and a lasagna had been requested as a meal, I decided to put one together.

I like a stacked up high lasagna, one that has multiple layers of goodness, cause that's the way Renee made it, and I'm not going to argue with something that tasted so good.

There are a couple of steps you need to take first.    Apart from pulling out the right size casserole dish from the back of the cupboard, that is.
Mix the can of Diced tomatoes in with the Spaghetti Sauce.   This makes it extra saucy and helps the no-boil noodles to cook.  

I use a combination of grated Parmesan, Mozzarella  and  Provolone Cheese and eggs for for the cheese layers, I will use some Ricotta or small curd cottage cheese mixed in with it as well.     
You can also use the grated Italian Cheese blend from the store.   Just add an egg or two to the mixture, it helps to bind it together.
Pictures first, then the detailed instructions.
Casserole dish with first layer of sauce
Lasagna Noodle spread with cheese mixture
Noodles layered on top of sauce
Next up, more sauce, continuing until it reaches 1/2 inch from top. (need some space for bubbling sauce, cause otherwise it kind of ummm, bubbles over and then you have a mess to clean up.  Please learn from my mistakes.
Ready for the Pepperoni and then the Cheese, you can see some pepperoni poking out from under the cheese to the left.  Then is the final layer of cheese
Ready to serve, after a suitable resting period of course.
After it's been attacked by two hungry people.

Here's how I do it.

yield: 2-4 Servingsprint recipe

Microwave Lasagna ala Renee

prep time: 10 MINS cook time: 40 MINS total time: 50 mins
This is a quick to put together lasagna, ready in less than an hour and perfect for weeknight or weekend meals.

INGREDIENTS:

  • 4 cups prepared Spaghetti Sauce (Home made or not)
  • 1/2 package No-Cook Lasagna Noodles (I prefer Barilla)
  • 1 15 oz. can diced tomatoes in sauce, no salt variety
  • 3 cups shredded Mozzarella, divided
  • 8 oz. Whole Milk Mozzarella ball, sliced 
  • 1/2 cup Parmesan Cheese, grated
  • 1 egg
  • 1 cup Ricotta Cheese (can also use small curd Cottage Cheese
  • 1 cup shredded Provolone Cheese
  • 6-8 slices of thin Sliced Pepperoni 

INSTRUCTION

  1. Here's how I do it. First off, get out a deep casserole dish out of the cupboard. Spray it with some non stick cooking spray. (I hate chiseling off stuff, so I make sure I spray it well. 
  2. Mix the spaghetti sauce with the can of diced tomatoes.  Set aside.  
  3. Mix together 2 cups shredded Mozzarella, 1 cup Provolone Cheese, the Ricotta Cheese, 1/2 cup Parmesan and the egg.  This is the Cheese filling.
  4. Get your cheese filling ready, your sauce and no boil noodles. 
  5. Place a layer of sauce in the bottom of the dish, then a layer of noodles, a layer of cheese, more sauce, noodles, cheese and sauce. 
  6. Although I did discover a trick this last time I made it. I spread a layer of cheese on the stiff lasagna noodle and then placed it, cheese side down on top of the sauce. It was so much easier to layer it. Place in the microwave at 70% power for 20 minutes. Zap it for another 10-15 minutes at 80% power. 
  7. Add a layer of Pepperoni Slices, then add some sliced Mozzarella or the rest of the cheese mixture, then zap at 80 % power for another 5 minutes or so, at least until the cheese is melted. Pull out of the microwave and let set for 10 minutes, cut and serve.
  8. *  The Pepperoni slices were not original to the recipe, I got the idea from a lasagna a friend made once, the Pepperoni adds a lovely touch.
  9. ** You can also bake this in the oven, bake at 350 deg. for 1 hour.
Created using The Recipes Generator
Continue Reading
3 comments
Share:

Sunday, November 27, 2016

Smoked Salmon Spread


I love smoked fish, well, pretty much fish in general.   There are a couple kinds I don't care for, but on the whole, I find that I get along with most of it.    I don't know if it's the Danish in me coming out, but one of the joys of living on the coast is being able to get seafood, fresh from the boat, seafood, pretty much any time I care to.

However, I also do like my preserved fish as well.   Which includes smoked fish.     A local grocery store had a special on some smoked fish in a packet, Chicken of the Sea.  So I grabbed a couple of packages and stuck them in the pantry, thinking I would be able to use them, sometime.    I usually keep a few packages of cream cheese in the fridge as well.   They come in handy all the time.  So between the salmon, cream cheese and some sour cream I had the major ingredients.   And of course I'd already found Ina Garten's recipe for Smoked Salmon Spread online so I was set.   She has such great recipes, easy and flavourful.
Smoked Salmon Spread

  I spread it on a nice rye crisp cracker and garnished it with a sprig of basil from the plant I have growing in my kitchen.
Smoked Salmon Spread with Basil on Rye Cracker

***Did you know you can nip off a shoot of basil and root it in a shot glass or some other small glass and then plant it for an indoor plant.  That way you can have fresh basil year round.   I've been doing this since I accidentally saved and rooted one a while back.   I'd nipped off some shoots and placed them in a plastic shot glass filled with water, well, I only need a couple of shoots so left the last one in the water thinking I would use it in a day or so.    I didn't need it after all, but I didn't want to throw it out since it was still looking good.  Well, a week later, the basil is still alive and there are roots coming out.  I'm not one to waste anything so I hurried up and planted it.   I now have all kinds of baby basil's growing and I'm starting to gift them to friends.
   

yield: 6 + servingsprint recipe

Smoked Salmon Spread

prep time: 30 MINScook time: total time: 30 mins
This Smoked Salmon Spread is wonderful on crackers, and keeping the ingredients on hand means you're ready for any occasion.

INGREDIENTS:

  • 8 oz. package of Cream Cheese (at room temperature)
  • 1/2 cup Sour Cream (can also use Creme Fraiche)
  • 1 tablespoon fresh squeezed lemon juice
  • 1 tablespoon fresh minced Dill (can also use dried Dill)
  • 1 teaspoon Horseradish (I use Inglehoffers Creamed Horseradish)
  • 1/2 teaspoon Kosher Salt (Optional)
  • 1/4 teaspoon fresh ground pepper
  • 4 oz. Smoked Salmon

INSTRUCTIONS:

  1. Place the cream cheese and sour cream in your mixer, fitted with the paddle attachment and cream together until smooth. Then add the lemon juice, horseradish, salt, pepper and dill. Mix together. Add the Smoked Salmon and mix. Chill for at least an hour or two and serve with some crudites or do as I did, make some lovely Crostini and serve it that way. It does need that time to rest and mingle the flavours together.
All recipes and their respective images are either original or adapted and credited, and are all the sole property of Sid's Sea Palm Cooking © 2011-2017, with all rights reserved thereof.

Created using The Recipes Generator

Continue Reading
No comments
Share:

Tuesday, November 22, 2016

Garlic Baked Mushrooms ***

 ***This was previously published*** and has been updated. 
As a proud member of the Secret Recipe Club, not only do I get to explore another blog and find and make recipes from it once a month, but when we do our 'reveal', I get to see lots of other really cool recipes.  
This month was no exception.   One of the other bloggers made some Garlic Roasted Mushrooms and it sounded so good.   
It had three of my favourite flavours, well, four if you count butter.

So I made it the other night as a side dish, and promptly consumed half of it.

Garlic Roasted Mushrooms
Mushrooms are low in calories, right? 

Well anyway, here's how I made it, and yes I did change it up a little, but that's what cooks do.
And I think this would be a great side dish for any time of the year, but I'm thinking I'm maybe going to make this as part of my Christmas Eve meal.

1 pound fresh Crimini Mushrooms, cleaned and cut into bite size pieces. (I used good old Button Mushrooms, but next time...)
2-4 cloves garlic, sliced very thin or minced or crushed. 
2 tablespoons capers, drained
2 tablespoons butter, melted
mixed with
1 tablespoon Wild Mushroom and Sage infused Olive oil
salt and pepper to taste
lemon juice
parsley

Preheat oven to 450 deg. 
Prepare the mushrooms, either wash them, or brush any dirt off, then cut into bite-size pieces.   Place in a greased shallow roasting pan.
Mushrooms for Garlic Mushrooms
Melt butter and add the olive oil and then the garlic, just warming it up a little, enough to start releasing the garlic goodness, add the capers.

Pour over the mushrooms, tossing them to make
sure they're all coated.

Mushrooms for Garlic Mushrooms


 Place in the oven for about 20 minutes, then stir and let cook another 10 minutes or so.   They'll release all kinds of mushroomy liquid, but that's good.
Garlic Baked Mushrooms

Take out of oven, forget to sprinkle the parsley over top, give it a squeeze of lemon juice.   Serve as is, or as a side dish for meat entree.    I think they'll also make a great appetizer, and in fact, don't tell anyone, but I'm doing this for Tapas one night.
And that mushroom juice, well, umm, I dipped a crusty roll in it and OMG was it good.  
Garlic Baked Mushrooms
Just wanted to share...

Continue Reading
No comments
Share:

Monday, November 21, 2016

Thanksgiving Timeline for the Big Day

I wrote this out a few years ago, cause I like having a time line to follow.  I still do this.   Last year we had a whole buncha people in for T-Day, but I actually did what I said I would and followed my own timeline.  The only caveat here is this:  MAKE SURE YOU HAVE THE TURKEY IN THE FRIDGE TO THAW EARLY.

Did you know it's almost Thanksgiving? Yup, it snuck up on me too.   I know it happens every year at this time and for some reason, I always get surprised.   Christmas does that to me as well.  It sneaks up on little padded feet and goes WHOOO HOOOO I'M HERE!  just before the big day.   Scares the bejeesus out of me. 

At any rate, before I totally lose my train of thought or it gets derailed permanently, I wanted to share a few hints.    Just stuff I've learned over the years.

1.  Make a list, of dishes you're preparing, how long they take to make and portion out your time accordingly.  This year I'm not hosting, I'm going to go and join a community potluck, but if I was home here's how my list would look.   And since I'm a one man band in my kitchen as well as a master juggler, my list is a little different.   If you have help, exploit them.  Otherwise...


Monday:  Put turkey in fridge to defrost.  Panic when you realize you may not have a big enough turkey, oh wait, that's me.  Sorry.   I like to make an extra turkey breast so I can make sure I have enough white meat for everyone.  Make a list of all the dishes you're preparing and check the pantry to make sure you have it all.   Make a last minute grocery list.   Go to the store. 

Boozy Cranberry Sauce
Tuesday:  Pull out all the serving dishes and make sure they're clean (especially if you only use them once a year and someone else did the dishes, you don't get any surprises this way.  Make Boozy Cranberry Sauce .

Wild Rice Stuffing
Wednesday:  If you have room in your fridge, and you're making the potatoes, yams, or other baked veggies, make them the day before.   You can always reheat yams or sweet potato casseroles or mashed potatoes.  If you're baking pies, do them the day before.   You can also make my Vegetarian Stuffing the day before, it tastes so good the next day, in fact it tastes better the next day.

Or if you insist on making the stuffing on Thursday, chop the celery, onions, carrots and put them in baggies.   Toast the bread cubes for the stuffing, it'll keep overnight just fine.   
You can also set the table if you have room to do so, I don't so, I wait til the last minute.

Thursday:  Check the list you made and assign a time value to everything you do.  Like this;
Depending on when you plan to serve the meal, you may want to modify this list.   I usually plan on 20 minutes a pound for the turkey, with a fudge factor of 30 - 45 minutes.     A twenty pound turkey takes about 4-5 hours, 
7 am   Take Turkey out of fridge
7:30    Take prepared veggies for stuffing out of fridge.
8 am    Have a cup of coffee, go over lists 
8:30    Peel and cook potatoes, mash them, stick them in a crock pot or the fridge so you can reheat them later on.  I use my crockpots, a lot. 
9:00  Make stuffing while potatoes are cooking. 
Put the turkey in the oven at any time, so it will be ready and have time to rest before carving and eating time.   You know when you've got the meal planned for.
If you're like me and didn't have fridge space, this is when you go into hyper mode and get the rest of the veggies prepared.  

12 noon   Set table, clean up disaster area, AKA kitchen.


2 pm  Nap or lay down for 20 minutes, breathe, read a book, relax.  Trust me on this, take at least that amount of time for yourself.  It really helps.

3 pm  Shower and change, put a large apron on, to protect your clothing.   Check Turkey temp and PANIC cause the temp is too low, then realize you didn't put the thermometer in far enough.  Push it a little further in, until it is in the thickest part of the joint between the thigh and drumstick.   If the turkey is browning too fast, put an aluminum tent over it.  Helps it to cook just a tad faster as well.  Watch that little pop up timer too.   And don't panic if the turkey is done before you're quite ready.  Just tent it with some aluminum foil, and put it back into the oven, after you've turned the oven off.  The bird will stay warm.

4:30 pm.  Take turkey out of oven, make the gravy, brown the stuffing, let that poor bird rest for at least 20 minutes while you get all the last minute stuff together.    Carve, serve and pour yourself a large glass of wine cause you made it, and the food's all done on time and your guests are hungry and ready to eat.  

5:00  Sit down and eat and enjoy yourself and don't forget that pat on the back, you survived another Thanksgiving countdown.   And don't forget the wine.   Go ahead, pour yourself another glass, you deserve it.

Continue Reading
No comments
Share:

Sunday, November 20, 2016

Thanksgiving Countdown - What's next

I'm going to make a couple of assumptions here.   But first some pictures.
Everyone likes pictures, right? 
This first one is of a centerpiece a friend made some years back for T-Day.  Fresh flowers, lettuce, peppers. It was truly lovely.
Fresh look Thanksgiving centerpiece
Next up my attempts at decorating the tables.


Now to the Nitty Gritty.
If you're hosting Thanksgiving this year, I hope you have your turkey bought and in the fridge thawing. 
That's kinda important.


I hate trying to cook a frozen turkey, it just doesn't work right. 
My turkey is in the fridge, thawing, slowly. 

This really is a case of do as I do.

Last year we hosted Thanksgiving and we ended up with a lot of people, it was pretty crowded here but a lot of fun.

The weekend before I did do a lot of prep work.

1. I checked to make sure all my serving pieces were available and not tucked away into sundry and mysterious places.  I have to keep my Turkey platter on top of the fridge, the only place it will fit.   But, I wrap it in plastic wrap, so it stays clean.
2. I prepped the celery and carrots for the stuffing (well, it's dressing really, cause I cook it outside the bird).
3.Made sure I had sufficient napkins, and then washed all the plates and silverware we were going to be using.
4. Figured out the logistics of the seating, my husband is really good at that.
5. Made a shopping list of any last minute items.  The time to check your pantry is now.  Don't make assumptions that you'll have everything.
6. Go through the fridge, make room, chuck anything that's questionable.  Trust me on this, you will need the room come T-Day.
7. Check the tablecloths, make sure they're clean.  
8. Stock up on Salt and Club soda.  I'll tell you why later on this week. 

And made sure to let all my guests know I was going to make the Turkey, Mashed Potatoes and Gravy and that they had to bring 'the dish' that means Thanksgiving to them.  
Everyone has it, whether it's a jelled salad, or a special pie, or Great Aunt Gertrude's special Sweet Potato Casserole.

We ended up with a variety of great food last year, lots of laughter, and all in all had a great time.


Continue Reading
No comments
Share:

Friday, November 18, 2016

Chunky Shrimp and Smoked Salmon Spread

It's time for another installment of " What did Sid make with Shrimp this time?" for Fish Friday Foodies.

I've been using Shrimp every month for my contribution to #FishFridayFoodies

I love Shrimp and it seemed that every time I had to post about making something with a seafood, I used Shrimp.  The other bloggers feature lots of different seafood, however, I'm going to stick with Shrimp. 
Chunky Shrimp and Smoked Salmon Spread

 Fish Friday Foodies are a bunch of bloggers who post once a month on the third Friday with a Fish or Seafood dish. 

Each month is a different theme, this month we're doing Holiday Appetizers or First Courses.

As soon as I saw the theme, I was totally on board.
My life is Appetizers.
Really.

Well, I do have a main course or two on here as well, but I LOVE APPETIZERS!!!  Any excuse to create or make some for me to eat or take somewhere to share, I'm on it. 

I knew I was going to use Shrimp, but I a;so used some Smoked Salmon that I'd purchased a few months back cause it was on sale and I knew I'd use it sooner or later.   I had it hidden in the freezer, btw. 
It's later.
I made a spread.   And then I made it chunky.
Cause I could.

And I brought it to our monthly Boat Club potluck and they ate it all.  Not one scraping to take home for breakfast, sigh.
Chunky Shrimp and Smoked Salmon Spread


Chunky Shrimp and Smoked Salmon Spread

Author:
prep time: 5 Mcook time: 30 Mtotal time: 35 M
This spread is perfect for the holidays. The Shrimp and Salmon go so well together and leaving them chunky adds so much to the entire dish. Serve with some Garlic Crostini or a good cracker.

ingredients:

  • 8 oz. Cream Cheese
  • 4 oz. Cooked Shrimp cut into pieces, diced (Reserve 2 shrimp for decorations)
  • 4 oz. Smoked Salmon slices, cut into dice (reserve small strip for decoration)
  • 1 tsp. Worcestershire
  • 2 green onions, minced (use the tops for decorations)
  • 1-2 teaspoons Lime Juice (I used some Rangpur Lime Juice)
  • 1/2 cup Creme Fraiche (Can also use Sour Cream or Greek Yoghurt)

instructions:

How to cook Chunky Shrimp and Smoked Salmon Spread

  1. Cream the cheese, Worcestershire sauce, Lime juice, onions and Creme Fraiche together.
  2. Fold in the Shrimp and Salmon, making sure to keep the seafood as whole as possible.
  3. Decorate with the reserved Shrimp, cut in half lengthwise along with the piece of Smoked Salmon, curled up into a rose.
Created using The Recipes Generator
Chunky Shrimp and Smoked Salmon Spread

Fish Friday Foodies is hosted by Wendy Klik of A Day In the Life on the Farm.  
If you'd like to join Fish Friday Foodies, please email Wendy at wendyklik1517@gmail.com  We post and share new seafood/fish recipes on the third Friday of the month.  #FishFridayFoodies

Continue Reading
19 comments
Share:

Thursday, November 17, 2016

Caramel Apple Slices

This month's Improv Cooking Challenge was Nuts and Caramel.  This is hosted by Nicole Little of Cookaholic Wife and there are some fun combo's of ingredients in the different months.   Last month it was Curry and Carrots, I made some Curried Carrot Hummus

This month though...

Nuts and Caramel were the stars, and together they're perfection to my mouth.

I make my own Caramel, and gift it out around Christmas and since Christmas is next month, this seemed a perfect time to make some. 
And I could use the Caramel for this months' challenge as well.

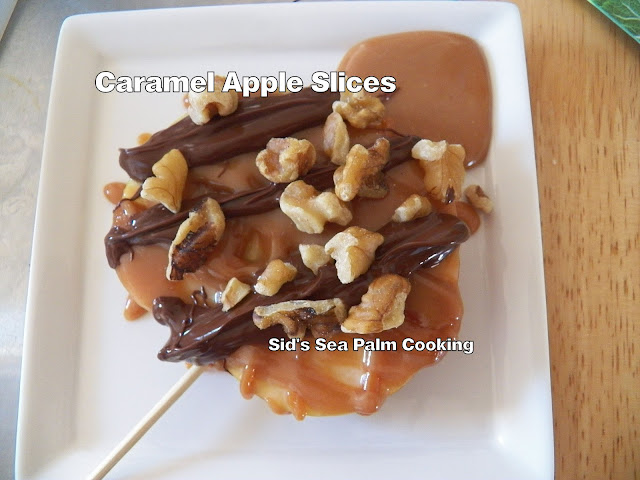
Caramel Apple Slice
 I remembered seeing some Caramel Apple Slices somewhere on the net, I'm sorry I don't remember where.
This clever person had drizzled caramel over some apple slices and decorated them.

They looked so good.

I've always felt that the best part of Caramel Apples has always been a bite of Caramel and a bite of Apple, for me at least.  I like the ratio of 1:1, Caramel and Apple.   But I always ran out of Caramel before the apple was gone.
So...
Here's what I did.  
Caramel Apple Turtle Slices

Prepare the Caramel, whether you make your own or buy it, just warm it until it's just liquid enough to drizzle.  About a half cup will do one apple.
Then melt some Chocolate, about 1/4 cup.
Chop some nuts, I used Walnuts. 
Slice the apples into thick slices

 and put a stick in one end, cause you're making a 'lolly' apple slice.
Drizzle the caramel on the apple slice,

 and then some chocolate and a sprinkle of nuts.
Caramel Apple Slice

Then take a big bite and make sure you've got the right proportion of caramel to apple,

Caramel Apple Slice
 Cut up the rest and finish it off.
 decide that maybe you should play with it a little more and make another one.  

Caramel Apple Slice
Apples are good for you, aren't they?

The Improv Cooking Challenge.   You are given two ingredients to make a dish from and post about it on a certain date, which this month happens to be today, the third Thursday of the month.  
#ImprovCookingChallenge

Continue Reading
8 comments
Share:

Tuesday, November 15, 2016

Boat Club for November 2016

It's been a few months since our last Boat Club potluck get-together, but the food was still fantastic and we got to meet some new people and I took lots of pictures.   Well, I missed a dish, sigh.
I thought I took picture of all the offerings, but as I downloaded them, I realized I missed getting a picture of some Sweet Potato Sausage balls.
Without further ado...
In honor of it being November, there was this totally awesome 'Turkey'.   
Turkey Vegetable Platter
And I made a Chunky Shrimp and Smoked Salmon Spread with Garlic Toast Crostini.  I will be sharing the recipe on Friday, if you can hang out that long.  Or just come on back and read all about it.  There were no leftovers.
Chunky Shrimp and Smoked Salmon Spread
We also had a Pizza, sorry for the color, my camera had to try and amp up the reds.
Pizza
We also had some Potato Salad
Potato Salad
And Ravioli...
I really need to try my hand at making some.  I love Ravioli.

And some Ambrosia, or as one of the guests called it 7 cup Salad.  I love learning new names for dishes. This is one of the dishes I associate with November/December, cause it seems to be served around this time.
Ambrosia Salad
We also had a Sweet Potato Casserole.  ( I think I see a theme here)
Sweet Potato Casserole
But then we got some Brisket which derailed the theme a little.  
Brisket
Along with the Asian Salad, which I took a picture of before the dressing and toppings got added.
There was dessert, and guess what we had.
Pumpkin Pie with whipped topping
Pumpkin Pie
And some Banana Pudding with Pecan Topping
Banana Pudding
Also some Chocolate Cake
Chocolate Cake
And I thought I'd leave you with one more shot of the Chunky Shrimp and Smoked Salmon Spread I made.
Cause I can, since it's my blog.
Chunky Shrimp and Smoked Salmon Spread
Remember the recipe will be shared on Friday. And I had a slight mishap when I was making the Crostini, but I'll tell you all about that on Friday as well.


Continue Reading
No comments
Share:

Saturday, November 12, 2016

Sausage and Peppers

We've been attending a Monday evening potluck here the past couple of months, and I've been having fun with it.
Cause I get to play with a lot of food I might not make for ourselves on a regular basis.

I know, but we get into a rut, making the same old, same old.  It's easy to do, you do the tried and true, quick and easy.  You go ahead and pick the cliche, I want to finish telling you about what I made last week.

I had some lovely red and orange peppers which I'd processed and frozen the previous couple of weeks, and I also had a package of Italian Sausage which I'd picked up on sale and put into the freezer for a future spaghetti sauce.  And there was also some red onions in the pantry that needed to be used. 

Guess what I came up with? 

Sausage and Peppers, I mean DUH!, I had all the ingredients and didn't have to go to the store.

Sausage and Peppers

And there wasn't any left over to take home either, but that's a good thing.   

The recipe card is at the end here, but here are the instructions.
Brown the sausage in a skillet, on both sides.
Add the chicken stock, (in my case it was a frozen cube, pre-measured), place a lid on top, and let it cook for an additional 5 minutes.  Take them off the heat, cut each sausage into either quarters or thirds,  and let sit while the vegetables are prepared and cooked. 

Saute the vegetables in the olive oil butter mixture until the peppers, onions and mushrooms are cooked, this takes about 10-15 minutes.  Stir in the Tomato Paste.These are the peppers I froze and they're in the Pyrex 4 cup measure that Pyrex sent me awhile back.    I love these measuring cups.  They're sturdy and the handle makes it so easy to use them as small mixing bowl as well, cause they're easy to hold onto.
 Add the cut sausages back into the pan, and heat together.
Sausage and Peppers
So pretty.  
Now here's the recipe along with a couple more pictures. 
Hey, it's my blog and I'll take all the pictures I want. 
Sausage and Peppers

Sausage and Peppers


yield: 4-6 servingsprint recipe

Sausage and Peppers

prep time: 20 MINScook time: 20-25 MINStotal time: 40 mins
Sausage and Peppers can go anywhere, from being served in a roll, to a potluck.

INGREDIENTS:

  • 1 lb. Italian Sausage, mild
  • 3 cups Red Pepper Strips
  • 3 Cups Orange Pepper Strips
  • 2 Red Onions
  • 8 oz. Mushrooms, cut into thirds
  • 2 Tablespoons Concentrated Tomato Paste
  • 1/3 Cup Chicken Stock
  • 1 tsp. Fresh Oregano
  • 1/4 teaspoon Red Pepper Flakes
  • 1-2 tablespoons Olive Oil
  • 1 tablespoon Butter

INSTRUCTIONS:

  1. Saute the Sausages in a pan, which has been sprayed with a little cooking oil, until the sausages are browned a little. About 5 minutes, turning the sausages over when they are browned. Add the chicken stock to the pan, and place a lid on top and continue to cook the sausages until done. Remove from heat and set aside. Reserve the cooking liquid. 
  2. Saute the Mushrooms, Onions, Peppers in a skillet with the olive oil and butter. Cook until the peppers and onions are just translucent and limp. Add the Tomato Paste. Stir in.
  3. Cut the sausages into thirds or fourths (or leave whole if serving in a roll.) 
  4. Add the sausages to the pepper and onion mixture along with the reserved cooking liquid and the Red Pepper flakes and cook for another 5 minutes or so. 
  5. Serve, either on a roll, or as part of a potluck.
Created using The Recipes Generator
Continue Reading
2 comments
Share: