Monday, December 13, 2021

Brie Gougeres

 It's time for Baking Bloggers again.  

I haven't been participating in very many blogging events this past few months, but when I saw the theme for December, the little thinking cap hovered over my head and I got an idea.

The theme this month is Baked Party Appetizers.  And it also happens to be the last of Baking Bloggers cause it's been retired.  Something new will be happening in January though.  Stay tuned.

OK, so I got this idea cause I have a small wheel of Brie Cheese in the fridge that's been giving me the 'eye' lately. 

I bought it last month, and kept meaning to eat it, sliced on some good bread or with some crackers, but it's still sitting there, staring at me everytime I open the cheese drawer. And I got tired of those looks I was getting.

 So I elected to make some Gougeres using the Brie.  

I love Pâte à Choux pastry anyway, and honestly, I think it's about the most versatile recipe any cook should learn how to make.  I use the recipe I cut out of the paper back in the '80's which is Julia Child's base recipe. 

You can use the base for sweet or savory, heck,  you can even make it gluten free.  I've done it, and they were good.   

I did go here for inspiration for these, and have to say the my high school french came in handy as well.

And I made a couple of modifications as well, cause gee, I'm the baker here.

 I used Swiss cheese cause it was all I could find in our local grocery store.  And really, the slightly nutty taste of the Swiss cheese married very well with my Brie.   

Now Brie cheese is very soft, or at least it is if you leave it out at room temp to ripen, it becomes very soft.   However, I decided to try 'stuffing' my gougere with little cubes of cold brie.  

Let me show you how I cut it.  I don't remember exactly where I saw this for the first time, but can I just say this, 'IT'S BRILLIANT', and guess what, it also works great for cutting layer cakes as well.  Of course I'm the usually the one who actually scrapes the frosting off the cake before eating.  But when you cut the cake or in my case the wheel of brie, you get a more equitable distribution of the rind per slice.  In the case of a cake, you have the two ends with frosting, for the people who 'must have lots of frosting', and those who want cake with a little frosting.  Use your imagination here, cause I'm just showing how to cut the brie. OOOH, that might not have come out right. 'wink'.   

Brie Cheese

I did cut off the ends where there was a lot of rind, but I ate the cheese inside.  I'm not fond of the rind, but I will eat it,and was wishing I still had my Mauli dog who loved the rind.  She loved it when I bought Brie, cause I'd cut off the rind and feed it to her.  

Whenever possible one should share food with a loved one or ones. 

Here's a few pictures of the process, and my cohort in eating more than our fair share. 

and

and

Stuffed Gougeres


and 

Baked Gougeres

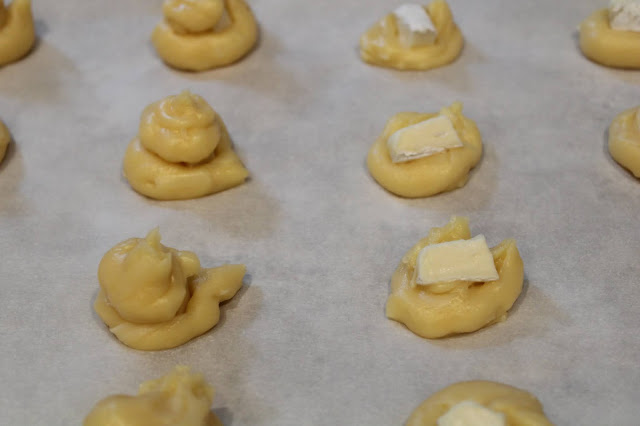
Had a lot of choux dough so thought I would play, a little more.  So I piped out a base, and then placed some slices of the Brie on top of it.

Stuffed Brie Gougere
Here's the Brie Gougere, piped and ready to bake.

Baked Brie Gougeres Bar

After the bake, and it's ready to cut and enjoy.

Baked Stuffed Gougere Strip

Baked Brie Gougeres with a dab of Red Currant Jelly

Brie Gougere with Red Currant Jelly


Baked Brie Gougeres, see the lovely melty Brie cheese inside. 

Brie Gougere

Miss First enjoying her Brie Gougere topped with a dab of Red Currant Jelly.  She loves her melty cheese, she also has a bit of a sweet tooth, so this hit both her happy points.

Miss First enjoying her Brie Gougere

You can see the concentration here, as she eats her treat.

Miss First enjoying her Brie Gougere


Camembert Gougeres

Brie Gougeres

Yield: 6
Author: Sid's Sea Palm Cooking - inspired by quiveutdufromage.com
Prep time: 10 MinCook time: 25- 30 MinTotal time: 35 Min
This is a fun take on traditional Gougeres, using a traditional choux paste recipe and adding Brie cheese.

Ingredients

  • 1 cup water
  • 6 tablespoons unsalted butter, cut into pieces
  • 1/2 tsp. salt
  • 1 cup flour, all purpose, scooped out and leveled.
  • 1 cup eggs, (stirred together with a fork and measured into the cup, about 4-5 large eggs)
  • 2 oz. Camembert Cheese, cut into small pieces - look at the picture.
  • 4oz. Swiss Cheese - grated

Instructions

  1. Preheat oven 425 degrees.
  2. Heat water and butter together, bring to a boil. Take off of heat and dump the flour in and begin to beat it together. It will be rather lumpy at first but keep beating vigorously. It does come together. Keep beating it until it forms a large ball, then place back on medium heat and keep beating it, until it stays together and leaves a thin film of dough on the bottom of the pan. This tells you that a lot of moisture has evaporated, and it will accept more of the egg. Take off of the heat now. Add about 1/4 of the eggs to the dough and beat together. It will look very strange at this point, cause it separates and looks rather nasty, but keep beating and as soon as the egg has incorporated into the dough, dribble a little more in, and work your arm vigorously again, beating the egg in. (at this point you can use a mixer bowl and beat it in with that, but I don't like the dough as well when it is done this way, I find it softens it too much, but then again, if you can't beat the egg in by hand, use your KitchenAid, but dribble the egg in a very little bit at a time). Add the egg, a dribble at a time, beating vigorously with each addition. As soon as the egg is incorporated, add the grated Swiss cheese and combine. If the humidity is high, you may not need all the eggs, but if it's dry you will. I've been making this for many years and can tell from the feel of the dough if I need all the eggs or not. The pastry should just hold its shape when lifted with a spoon.
  3. Now, you're ready to bake your cream puffs. You can spoon them onto a lightly greased baking sheet or parchment covered baking sheet. My personal preference is for Parchment paper, but then again, it's up to you. I pipe the pastry onto the sheet, filling a piping bag with the dough, and cutting a hole in the bag. Pipe a small amount of the choux paste onto the parchment paper and then place a small piece of the Brie on top, pushing it in a little. Pipe another circle of choux paste on top, and using a wet finger (I kept a cup of water beside me for this step), seal the top and bottom of the dough together. Space them about an inch apart on the baking sheet. They will not spread, but will instead puff upwards as they bake.

 DO NOT open the oven to check the progress of the bake, you'll just doom those little puffs of golden deliciousness to a flattened doom.   Instead, turn the light on in the oven and watch through the glass door.  They are done when they are a lovely golden brown color.  And if you have trouble seeing the color through the door, you probably need to clean the glass off. 

Did you make this recipe?
Tag @sidsseapalmcooking on instagram and hashtag it #Sidsseapalmcooking


Baking Bloggers December 2021

Baked Party Appetizers

This is the final installment of Baking Bloggers before it is retired this month. Join us in January on the first Saturday as we begin a new recipe endeavor called “Supper Club Saturday” featuring a variety of favorite recipes from many of our same bloggers, and some new friends. We will also be posting on the last Saturdays of the month for a similar event called “Potluck Party”. See you there!

Continue Reading
3 comments
Share:

Monday, November 15, 2021

Air Fryer Zucchini Spears (Toaster Oven)

A few years back I cooked lunches at our local Senior Center.  It was a once a week deal, and I was allowed to play in the kitchen, and boy did I have fun.  

I'm playing in my own kitchen these days and wanted to recreate those Zucchini Spears and it worked.
I do have to admit to overcooking them a tad, but they tasted great and I ate them all.      I ate them with some Schnitzel.  It was a good meal even if I do say myself. I enjoyed it on my new plate that I got at Ikea, which has little partitions. I love it.

Zucchini with Marinara Sauce


When I cooked at the Senior Center, I tried to use what we had on hand, lots of cans of random stuff in the pantry, but I also used as much fresh produce as I could.  One week we got a load of Zucchini in, absolutely beautiful ones, and I decided to cut them into spears and roast them in the convection oven.  And since we also had a large #10 can of tomato sauce in the pantry I enlisted it and made it part of the meal.  I'm so pleased to say that a few people came back up after we'd dished up the meal and asked for seconds on the zucchini, and I was happy to give them what we had.  This was the lunch I made that day.  It wasn't the last time I did it either and the feedback was great.  Many people told me that I'd converted them into Zucchini eaters. 

 Hamburger Steak, Green Beans, Mac and Cheese, Zucchini Spears and a roll.  I even made the beans the southern way and added some bacon to it.  Gotta season it just right, or in other words, gotta know the customer base and what they like.   

Zucchini Spears with Hamburger Steak

I didn't do a hamburger steak this time, but did enlist some of the pork I'd prepared for a Jaegerschnitzel and made a Schnitzel to go with them this time.  I made a marina sauce out of some Pomi tomato sauce I got in my Misfits box this time, and well, can I just say, I like my own cooking. 
Air Fryer Zucchini with Marinara Sauce


I was going to do a recipe card for this, but decided against it.   I set my Nuwave oven at 425, on the Air Fryer setting, tossed the zucchini in a little olive oil.  Spread them out on a roasting pan and cooked them for about 8 minutes, decided I wanted a little brown on them, so I turned them over, and cooked an additional 5 minutes which was about 5 minutes too long.  They were really soft. 

My version of marinara sauce basically has a little finely minced onion added to some tomato sauce, some Italian seasoning and is left to simmer for a few minutes.   I served them alongside some Schnitzel


Here's the links to more great dishes.


Multicooker Monday November 2021

Continue Reading
5 comments
Share:

Thursday, November 11, 2021

Pork Tenderloin with Dried Cranberry Stuffing

It's time for the Improv Cooking Challenge.  And this month, the challenge, should we care to accept it, was to use Cranberries and Meat together in a dish.   

Pork Tenderloin with Dried Cranberry Stuffing

I participate in this when I get an idea for a new recipe and this month, I had one.  

An idea that is, for a little twist on a stuffed Pork Tenderloin.   

It was a good one, BTW.  Idea that is and the pork, well, I would keep patting myself on the back on how good it tasted, but I'm scared I would dislocate my shoulder. 

Filling for Pork Tenderloin with Dried Cranberry Stuffing
and stuffed in the pork

Pork Tenderloin with Dried Cranberry Stuffing

Here it is in the pan, browning a little.  My sister gave me this idea, she does it with a pork loin.  This means you get that lovely caramelized taste without cooking it to death in the oven.

Pork Tenderloin with Dried Cranberry Stuffing

I didn't do a great job of trussing it up, too much filling, but oh so worth it.

Can you see how moist the meat is?  I know, not the greatest picture but the taste.  So darn good. 

Pork Tenderloin with Dried Cranberry Stuffing
I think this is a perfect dish to make for someone special, yourself, during the holiday season.  Pouring the pan juices over it, while it's resting also helps to keep the meat moist.

I basically used a few items I had on hand, which was good, and have to say WOW!!!! the meat came out moist and tender and the filling, well, can I just say it was amazing.

Pork Tenderloin with Dried Cranberry Stuffing

Pork Tenderloin with Dried Cranberry Stuffing

Yield: 2 Servings
Author: Sid's Sea Palm Cooking -
Prep time: 2 HourCook time: 30 MinTotal time: 2 H & 30 M
This a fabulous take on making a pork tenderloin. Serve with some veggies and you have a company worthy meal.

Ingredients

  • Pork Tenderloin
  • 1/2 cup dried cranberries
  • 4 tablespoons Grand Marnier or 1 tablespoon Grand Marnier with 3 tablespoons orange juice
  • 1/2 apple - chopped
  • 1/4 cup red onion - diced
  • 1 thick slice sourdough or artisan bread cut into cubes
  • 1-2 tablespoons butter
  • String or skewers

    Instructions

    1. Preheat oven to 350 degrees and prepare a small oven safe roasting pan by spraying with a non stick baking spray.
    2. Soak the dried cranberries in the Grand Marnier or mix of Grand Marnier and orange juice for several hours to re-hydrate the cranberries. Do not drain.
    3. Using a sharp knife cut the tenderloin almost in half, lengthwise, butterflying it. Set aside.
    4. In a large pan, melt the butter and saute the red onion until soft, then add the diced apples and the bread. Let the bread get a little color on it and then add the cranberries with the liquid. Stir together and then cover the pan and turn the heat off. Let sit until lukewarm.
    5. Position the string along the bottom of the pork, getting ready to tie it up.
    6. Spread the stuffing evenly along the cut edge of the tenderloin and bring the string up around the pork to tie it off.
    7. Melt 1 tablespoon butter in the same pan the stuffing was cooked in and brown the tenderloin. Turning it evenly if you can.
    8. Place on a greased roasting pan, and roast at 350-375 degrees for about 20 -30 minutes or until a thermometer registers 170 degrees when poked into the meat.
    9. Remove from oven and cover with some foil to let rest for 10-15 minutes. Before carving pour any juices in the pan over the pork. Serve with oven roasted potatoes or your choice of vegetable.


    Did you make this recipe?
    Tag @sidsseapalmcooking on instagram and hashtag it #Sidsseapalmcooking


     Improv Cooking Challenge

    Cranberries & Meat

    Continue Reading
    2 comments
    Share:

    Monday, November 8, 2021

    Bara Brith (Welsh Tea Bread)

    It's time for Baking Bloggers again.  I've not participated in many online blogging events, cause I just haven't felt like making or baking food the past few months.  I had an excuse. 

    However the event this month for Baking Bloggers was for Quick Breads and Tea Loaves.  

    I love making a quick bread or Tea Bread.  Most of the time, they satisfy my sweet tooth, without having to make and frost a cake.  

    And they can be frozen and brought out when you want a 'little' something to accompany a cuppa.  

    Bara Brith is a Welsh Tea Bread, which means speckled bread.  And not only do you eat it alongside a cuppa, but you put the tea in the bread as well.  

    Would that make it a double tea bread? 

    Bara Brith Tea Bread

    Simple right?   Well, not exactly.  You see like most recipes that are tried and true and that are region specific, there are variations.  Lots and lots of variations. 

    One story I read said that bakeries in Wales would gather all the leftover bread dough at the end of the day, add dried fruits to it and bake it.  Which would explain the recipes out there that use yeast to leaven the bread. Some recipes use self rising flour and all have dried fruits.  Many of the recipes also incorporate candied citron. Which I didn't have on hand, and quite frankly, didn't feel like making.  I usually make my own, but... 

    And then as I read the recipes I'd googled online, and also looked up in my cookbooks, discovered that many of the authentic recipes called for mixed spice.   OK, I got that, but did not want to sub in pumpkin spice or apple spices as some recommended, I instead decided to make up my own little jar of mixed spice.  I wanted to make it taste proper, and that meant using the right spices.  And I'm glad I did.  

    You do need to plan a little ahead with this bread though, cause you soak the dried fruits in tea overnight.  Many recipes just call for strong black tea, but some variations call for Earl Grey Tea, however I used some Lady Grey Tea I had in the cupboard.  The slight citrus tang of the tea was wonderful with the fruits. 

    Also, I used a combo of three dried fruits I had on hand, but you can use any combo you like.  I had prunes, golden raisins, and dried cranberries. I chopped the prunes up a little so that they were roughly the same size as the raisins and cranberries.  I also used the organic dried Cranberries from Trader Joe's so they weren't as vibrantly colored as most dried cranberries. 

    Dried fruit for Bara Brith

    I do want to say that, it really is helpful to use a scale and a proper measuring cup for this, however, I basically winged it with the fruit.  I guesstimated the proportions, but I love dried fruit in pretty much any tea bread.  I also want to say that dried currants are usually used in this as well, but they're hard to come by in this part of the world, so I subbed in what I had on hand.  Depending on how 'dry' your fruit is, it will have absorbed most, if not all the tea.  But don't worry, just dump the whole thing in there.  This was just after I put the hot tea on the fruit.  I forgot to take a picture the next morning but much of the tea had been absorbed.  The tea gave the bread a lovely tan color.
    Soaked fruit for Bara Brith Tea Bread

     Another fun thing to do with the bread, is spread warmed honey on top of the freshly baked loaf.   It adds another lovely dimension or layer of flavor. 


    Bara Brith Tea Bread


    Bara Brith (Welsh Tea Bread)

    Bara Brith (Welsh Tea Bread)

    Yield: 6
    Author: Sid's Sea Palm Cooking -
    Prep time: 12 HourCook time: 1 Hourinactive time: 12 HourTotal time: 25 Hour
    This tea bread can be enjoyed with a 'cuppa', or just on it's own, spread with a good butter. Best enjoyed the next day, it keeps for several days, but guaranteed that it won't last that long in your house.

    Ingredients

    Fruit Mixture
    • 1/2 cup each - 
    • Dried Cranberries
    • Golden Raisins
    • Currants or Prunes
    • 1 cup hot tea - Earl Grey or Lady Grey or your favorite black tea.
    Batter
    • 250 gr. Self Rising Flour
    • 1 tsp. Mixed Spice
    • 100 gr. Brown sugar
    • 1 large egg
    • Warmed Honey to glaze (about 1-2 tablespoons)

    Instructions

    soaked Fruit
    1. Make a strong cup of black tea, Earl Grey works well here.
    2. Pour over the measured out fruit and set aside to soak overnight.
    Batter
    1. Preheat oven to 350 Degrees.
    2. Grease a 2# loaf pan and set aside.
    3. Mix the flour, spices and brown sugar together in a large bowl. 
    4. Add the egg and dried fruit along with the tea it soaked in.  Mix together until just combined.  Pour or spoon prepared batter into the greased pan and place in oven. 
    5. Turn out loaf onto a rack, and place right side up. Using a pastry brush, paint the warmed honey over the loaf and leave to cool.  After it's cooled, wrap it up.  Wait to cut it until it is fully cool, even the next day. Serve with fresh butter.  


    Did you make this recipe?
    Tag @sidsseapalmcooking on instagram and hashtag it #Sidsseapalmcooking

    Baking Bloggers November 2021

    Quick Breads

    Continue Reading
    4 comments
    Share:

    Sunday, November 7, 2021

    Mixed Spice

     When I made the Bara Brith the other day I got flummoxed a tad by one of the recipe ingredients, but I googled what it was.   The Bara Brith recipe will be on the blog tomorrow, but just in case you want to be prepared, you can make this up today.

    Mixed Spice


    Many of the Bara Brith recipes, actually, many British recipes call for Mixed Spice as one of the ingredients.  It's commonly used around the Christmas holidays and for many people, it reminds them of their childhood.  Much like Pumpkin Spice does in the colonies.   

    Personally, I like Pumpkin Spice and make up my own mix but only use it in Pumpkin Pie. It's basically Cinnamon, ginger and cloves. 

    Mixed Spice however has a few more ingredients, and for many Brits, nothing smells and tastes quite like it. 

    But it sure is easy to make, and I made it.  

    Enough for several tea breads, that is.  

    Some recipes called for the addition of mace, but I really don't like it, and nutmeg is a more than acceptable substitute.  I buy my nutmeg whole, and then use my microplane to grate as much as needed for a recipe. 

    Nutmeg - grated

    I'm going to keep some of this spice mix on hand now, cause I really like it.  

    From bottom left going clockwise - Nutmeg, Cinnamon, Allspice, and snuggled in all together bottom right, Cloves, Ginger and Coriander. 

    Mixed Spice

    And here's how they look when they're all at the party together.

    Mixed Spice


    Mixed Spice

    Mixed Spice

    Author: Sid's Sea Palm Cooking -
    Prep time: 5 MinTotal time: 5 Min
    This is patterned after the british Mixed Spice you can purchase in stores there at holiday time.

    Ingredients

    • 1 tablespoon each:
    • Allspice
    • Cinnamon
    • Nutmeg
    • 1 teaspoon each:
    • Clove
    • Coriander
    • Ginger

    Instructions

    1. Mix all the ingredients together and keep in a sealed jar, use as directed for recipes.


    Did you make this recipe?
    Tag @sidsseapalmcooking on instagram and hashtag it #Sidsseapalmcooking

    Continue Reading
    No comments
    Share:

    Wednesday, October 27, 2021

    Jaegerschnitzel

    I had ordered a jaegerschnitzel, the special of the day at the restaurant and got disappointed.  What I was served was basically a breaded cutlet topped with a cream sauce, more of a Rahmschnitzel (which is veal schnitzel topped with a mushroom cream sauce)  and not what I was expecting.   The version I was used to had a brown sauce with lots of mushrooms, and was a hearty and filling meal.  

    My mouth had been set for something, just like this.  Which is what I ended up making, cause gee, I can.  And I also know how to make it.  


    Jaegerschnitzel


    I remember the first time I had schnitzel, I was astounded by the sheer size of it, the one piece of meat took over the plate, hanging off the edge. And was beautifully golden brown and slightly crispy along with being so tender. 
     

    Heaven, I tell you.

    As is my wont, if I order something in a restaurant that isn't quite what I was expecting, I try to recreate it at home.  

    And I just could not get the idea out of my head, a beautifully thin, browned piece of schnitzel.  

    So I got to work and made some.   

    A Jaegerschnitzel is also known as a Hunterschnitzel.  In fact there are a variety of schnitzel's that are found throughout Germany and in many parts of Europe.  Many people are familiar with Weinerschnitzel, which is actually Austrian.

    Basically a schnitzel is any cut of meat that is thinly sliced and beaten til it's very thin, a 1/4 inch thick at most.   I think the most common one is made with pork, but chicken and veal are also up there. 

    Hey, Chicken Piccata is basically a schnitzel, if you think about it. The methodology of making it is very similar if not almost identical to a regular schnitzel.  Although in Germany when it's made with pork it's known as sweineschnitzel.  

    Enough with the history lesson, if you want to read more about it, check out what Wikipedia says.   

    Here's how I made it. 

    First off, I bought some thin cut pork chops, laid two of them out on a plastic cutting board, and placed a piece of plastic wrap over them.

      As you can see, they're not that big.  And I did not cut off the fat.  I left it on.


    I then proceeded to use the flat part of my meat mallet and pounded them out til they were about 1/4 inch thick. I didn't bother measuring.  However they expanded in size to almost, if not, 3 times the size I had begun with.   This is also the point in which you cut a couple of slits around the edges of the meat to keep it from curling up when cooking. 

    After pounding the meat out, I season the meat with a little pepper and salt on each side. Not a lot, just a bit.  You can use all kinds of seasonings if you like. 

    I then let the meat rest while I sauteed some mushrooms in a little ghee.   And made a mushroom brown gravy. 

    I also made some spaetzle to go with the schnitzel, and I'll tell you all about that in a future post.

    Mushrooms

    I like to use a heavy duty fry pan to cook the schnitzel in.  Pour enough oil into the pan, so that the schnitzel will float a little when you add it to the oil.  Heat over medium high heat until the oil reaches about 330-340 degrees.  Any less and the schnitzel will absorb the oil and get greasy, any higher, and the coating will burn before the meat cooks.

    I had already prepared two bowls for dipping, one with egg and the other one with bread crumbs.  I didn't have a third bowl filled with flour as I prefer to use a small strainer to sprinkle flour lightly over the meat before dipping it into the egg.  I find the less flour the crispier the schnitzel.  And this way I can just turn the meat over and sprinkle the other side. (it saves on dishes as well).

    Schnitzel
    You should work quickly at the point.  Well, fairly quickly.  The meat has rested, and is ready to be dipped in the egg and bread crumbs, and fried. 

    After sprinkling the meat with the flour, I dip it into the whisked egg and shake off the excess.  Then dip the meat into the bread crumbs, don't press it in, you want a very light coating. Shake off the excess. You're not making a tonkatsu. As you can see here, a very light coating.

    Schnitzel

    Place the meat into the heated oil, and fry on each side a couple of minutes. Just til golden brown.
    Schnitzel

    Take out and drain on either a paper towel or my favorite, coffee filters. 

    Serve alongside some lovely sweet and sour red cabbage, aka Rodkal.  And spaetzel.  

    I had made two schnitzel, only ate one, and enjoyed the second one the next day with a squeeze of lemon on top.  Along with the rest of the spaetzel and the red cabbage.  

    Schnitzel


    Jaegerschnitzel (Hunter Schnitzel)

    Jaegerschnitzel (Hunter Schnitzel)

    Yield: 2
    Author: Sid's Sea Palm Cooking -
    Prep time: 20 MinCook time: 3 MinTotal time: 23 Min
    This simple, and yet elegant dish is perfect for guests, or as a family meal. It's easy to scale up or down according to how many you are serving. Not to mention, totally delicious.

    Ingredients

    Schnitzel
    • 2 thin pork chops 
    • 1/4 cup flour
    • 1 egg
    • 1/2-3/4 cup fine bread crumbs
    • 1/2 cup oil for frying
    • salt and pepper to taste
    Mushroom topping
    • 6-8 mushrooms per serving.
    • 1-2 teaspoons ghee or butter
    • 1 packet pork gravy (powdered variety)
    • 1 cup water
    • Alternatively, use a cup of pork or chicken gravy made from a roast.

    Instructions

    Schnitzel
    1. Crack an egg into a shallow bowl and whisk. Set aside.
    2. Add the bread crumbs to another bowl. Set aside.
    3. Place the pork chops on a piece of plastic wrap and cover with a second piece of plastic wrap. This ensures that the pork chop does not stick to the mallet. It also helps to get a thinner more consistent piece of meat.
    4. Using the flat side of a meat mallet, pound the pork chops to about a quarter inch thick.
    5. Peel the chop off the plastic wrap and cut a slit in the edges of the chop to keep it from curling up when fried. Just a couple per chop. Season each chop with a little salt and pepper on each side.
    6. Heat oil in shallow pan to about 330 degrees.
    7. Sprinkle each side of the chops with some flour, or dip into some flour, coating each side lightly.
    8. Dip each chop into the egg, making sure each side is coated. Then shake the excess egg off before dredging the chop into the bread crumbs, coating it lightly. Do not press the bread crumbs into the chop. Shake the excess bread crumbs off. Place into the heated oil and fry for about 1-2 minutes per side, turning once. Remove from oil and drain on either a paper towel or a couple of coffee filters. The schnitzel should be a light golden color.
    Mushroom topping.
    1. Wash and slice the mushrooms. 
    2. Heat the ghee or butter in a pan. Add the mushrooms and cook til a golden color.
    3. Make the gravy according to instructions or heat up prepared gravy.  Add the mushrooms. 
    4.  Set aside to keep warm while the schnitzel are cooking.
    Serving
    1. Place a schnitzel on each plate, scoop a generous spoonful of mushrooms and gravy on the middle of each schnitzel, and serve alongside Spaetzel or potatoes and a vegetable.

    Estimate only

    Did you make this recipe?
    Tag @sidsseapalmcooking on instagram and hashtag it #Sidsseapalmcooking

    Continue Reading
    2 comments
    Share: