Showing posts with label Multicooker Monday. Show all posts

Monday, November 15, 2021

Air Fryer Zucchini Spears (Toaster Oven)

A few years back I cooked lunches at our local Senior Center.  It was a once a week deal, and I was allowed to play in the kitchen, and boy did I have fun.  

I'm playing in my own kitchen these days and wanted to recreate those Zucchini Spears and it worked.
I do have to admit to overcooking them a tad, but they tasted great and I ate them all.      I ate them with some Schnitzel.  It was a good meal even if I do say myself. I enjoyed it on my new plate that I got at Ikea, which has little partitions. I love it.
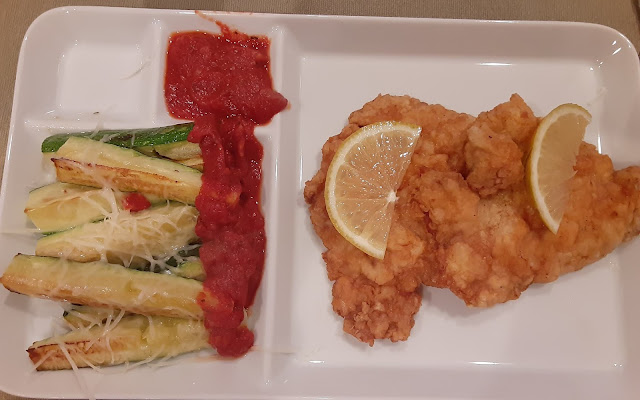
Zucchini with Marinara Sauce


When I cooked at the Senior Center, I tried to use what we had on hand, lots of cans of random stuff in the pantry, but I also used as much fresh produce as I could.  One week we got a load of Zucchini in, absolutely beautiful ones, and I decided to cut them into spears and roast them in the convection oven.  And since we also had a large #10 can of tomato sauce in the pantry I enlisted it and made it part of the meal.  I'm so pleased to say that a few people came back up after we'd dished up the meal and asked for seconds on the zucchini, and I was happy to give them what we had.  This was the lunch I made that day.  It wasn't the last time I did it either and the feedback was great.  Many people told me that I'd converted them into Zucchini eaters. 

 Hamburger Steak, Green Beans, Mac and Cheese, Zucchini Spears and a roll.  I even made the beans the southern way and added some bacon to it.  Gotta season it just right, or in other words, gotta know the customer base and what they like.   

Zucchini Spears with Hamburger Steak

I didn't do a hamburger steak this time, but did enlist some of the pork I'd prepared for a Jaegerschnitzel and made a Schnitzel to go with them this time.  I made a marina sauce out of some Pomi tomato sauce I got in my Misfits box this time, and well, can I just say, I like my own cooking. 
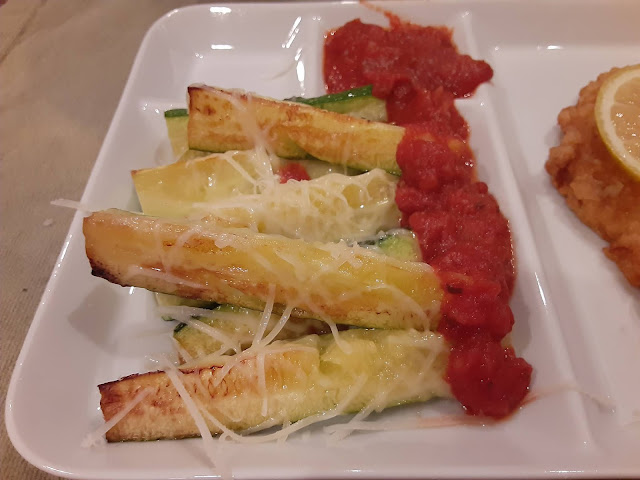
Air Fryer Zucchini with Marinara Sauce


I was going to do a recipe card for this, but decided against it.   I set my Nuwave oven at 425, on the Air Fryer setting, tossed the zucchini in a little olive oil.  Spread them out on a roasting pan and cooked them for about 8 minutes, decided I wanted a little brown on them, so I turned them over, and cooked an additional 5 minutes which was about 5 minutes too long.  They were really soft. 

My version of marinara sauce basically has a little finely minced onion added to some tomato sauce, some Italian seasoning and is left to simmer for a few minutes.   I served them alongside some Schnitzel. 


Here's the links to more great dishes.


Multicooker Monday November 2021

Continue Reading
5 comments
Share:

Monday, March 15, 2021

Yorkshire Pudding Wraps for Multicooker Monday

It's time for Multi Cooker Monday, and I have to say I've been impatiently waiting for it. 

 Mainly cause I've been having fun, not only making but eating, these Yorkshire Pudding Wraps this past month.   

This great little group was started by Sue of Palatable Pastime and I love it, cause there are no themes, you use whichever small kitchen appliance you like.  

Best of all, I've got ideas for all the 'toy's' I'd like to purchase in the future, if I can ever find room for them.  


In the meantime... I use my little toaster oven a lot.  Here's my offering this month. 


 A friend pointed this new food craze/fun food thing out to me, and asked if I had ever heard of it.  

I hadn't, but was intrigued. So I googled it and found out people have actually been doing this for awhile.  


I'm talking about Yorkshire Pudding Wraps

I love making Yorkshire Puddings, and of course eating them as well.  I love them drowned in a good beef gravy or as a cold breakfast with lashings of butter and jam. 

But I had never heard or thought of wrapping meat or other good foods inside.  Now that I know they exist, I'm in trouble. 


As it turns out Yorkshire Pudding Wraps are also a perfect dish for MultiCooker Monday.  Cause I make them in my little toaster oven.  I have a little Pyrex dish, 4x6 inches, which fits perfectly inside the oven. 

WIN WIN WIN!!!!

 The first time I made them, it was a breakfast thing.  And then I played and played and gained a couple of pounds playing.

My first attempt, and it was a delicious one, was to bake the little single serving Yorkshire pudding, add some ham and cheese to it, I then rolled it up, and devoured it.  I did dip the ends of the wrap, that didn't have any ham or cheese, in some golden syrup.

Yorkshire Pudding Wrap

I added the cheese and ham the last couple minutes of cooking so that the cheese would melt.

Ham and Cheese Yorkie Wrap

I  also did a sweet version.   I had some slightly overripe peaches, so I sliced them up, poached them in a little sugar syrup.  Took out the peaches and cooked the syrup down a little, adding a touch of fruity balsamic glaze to it, placed the drained, peach slices on top of the Yorkshire Pudding and drizzled the syrup on top before rolling it up.  

Yorkshire Pudding Wrap with Peaches

I then folded it up, added the rest of the syrup and 'prettied' it up with some rosemary flowers.


Yorkshire Pudding Wrap with Peaches

And then proceeded to eat it all up. 

Yorkshire Pudding Wrap with Peaches

 I had some Prime Rib which I reheated in my "Jacuzzi Cooker", my husband's name for my Sous Vide. I can't call it anything else now.  

At any rate, I sliced some of the meat and piled it on this Yorkie Wrap, on top of some gravy, then smothered it in more gravy. I cannot tell you how delicious this was.  I've still got a little meat left in the fridge, and I think it will be finding a new purpose in life. WINK! 

Roast Beef Yorkie Wrap

I made a modified Toad in a Hole with one for Sunday Breakfast, was going to make some onion gravy to top it with, but decided to just add a little golden syrup to the plate and dipped it. I did brown my sausage a little first.  Just cause I like it like that.

Toad in a Hole Yorkie Wrap


Toad in a Hole Yorkie Wrap

I dipped the ends in some more golden syrup.


So many possibilities here.  It'll be a delicious and fattening journey to try them all.   Check out the great recipes from some of my fellow bloggers using various small kitchen appliances or as I like to call them 'toys'.  (wink) 


Yorkshire Pudding Wrap - for one

Yorkshire Pudding Wrap - for one

Yield: 1 serving or you could split it, if desired.
Author: Sid's Sea Palm Cooking
Prep time: 10 MinCook time: 25 MinTotal time: 35 Min
This is such a fun dish to make and eat, and makes breakfast or any meal feel special.

Ingredients

  • 1 large egg
  • 1/4 cup flour
  • 1/4 cup milk
Suggested Fillings
  • Ham and cheese
  • Stewed fruit
  • Leftover roast and gravy
  • English sausage and onion gravy

Instructions

  1. Whisk together until smooth.  Let sit at room temperature while toaster oven heats up with an oven ready glass dish, which has been greased.  Let this heat up for at least 5-10 minutes or until the baking dish is very hot.  Pour the batter in, and bake for 20-25 minutes, letting it puff up somewhat. 
  2. Remove from oven, and flatten out with a rolling pin.   Add the fillings of choice and roll up or fold over.  Serve while hot.


Did you make this recipe?
Tag @sidsseapalmcooking on instagram and hashtag it #Sidsseapalmcooking
Created using The Recipes Generator


Multicooker Monday

Continue Reading
13 comments
Share:

Monday, November 16, 2020

Bread baked in the Crockpot

Time for Multicooker Monday where we make and post a dish made in a small kitchen appliance.   I usually seem to be stuck on Toaster Oven offerings, but I also use my Crockpot a lot.  So this month, I'm sharing a bread I've made in my Crockpot. 

Crockpot Bread

Our hostess for Multicooker Monday is Sue from Palatable Pastime.   

We're a group of bloggers who get together and we post on the third Monday of the month. We make and blog about a dish made in or with a small kitchen appliance.  

This month I'm getting away from my handy, dandy Toaster Oven.  I'm using my CrockPot. 

I ran across this recipe for Crockpot Bread over at The Hearty Soul the other week and I had to attempt it. Full credit needs to go to Danielle Luttrell.  But I also googled Crockpot Bread and this is what I came up with.  I looked at so many recipes, some said to let the dough sit overnight, and others you could bake the same day. I kinda took a bit of a shortcut.  I proofed it in my oven. 

I looked here and here and here for inspiration. 

I mixed the dough in my Kitchenaid, let the machine do the work of kneading until it formed a beautiful little ball.
I then took the insert out of my crockpot, sprayed the inside with some non-stick spray, and placed the dough ball inside the insert, after slashing the dough. 

Crockpot Bread

I then put the whole thing in my oven, turned on the proof setting and let it rise for awhile, until the dough had doubled in size.
Crockpot Bread

I then took the insert and placed it into the crockpot, set it on high, and took a piece of paper towel, stuck it halfway in, under the lid and walked away for 1 hour.  I checked on the bread, using a thermometer after it had been in the crockpot for 2 hours. At two hours the thermometer registered 180 degrees, which told me that the interior of the bread was baked. The top however was very pale.
Crockpot Bread


I then removed it very carefully from the crockpot and placed it under the broiler in my oven for a minute or so to brown the top a little.  

Crockpot Bread

It over proofed in the crockpot, sigh.  And developed a thick crust on the bottom as well, cause I over-baked it.  I should have checked the bread at the 1 1/2 hour mark, for temperature.    

Crockpot Bread

I kinda knew my Crock pot had hot spots, but this loaf really showed me where they were. 

The internal crumb was great.  As was the flavor.  

I'll eat the bread anyway, cause Bread! 


Crockpot Bread
Crockpot Bread

Yield: 12-16 Servings - Slices
Author: Sid's Sea Palm Cooking - Adapted from several recipes
Prep time: 20 MinCook time: 2 Hourinactive time: 1 HourTotal time: 3 H & 20 M
This is a take off on my No-Knead bread, kneaded in the Kitchenaid, and baked in a crockpot, for a quick home made loaf of bread.

Ingredients

  • 4 cups Bread Flour, scooped and leveled. 
  • 1 1/2-1 3/4 cup warm water
  • 1 envelope yeast
  • 1 1/1 teaspoons sugar
  • 1 1/2 teaspoons salt

Instructions

  1. Add the sugar to one cup of warm water, in the bowl of a kitchenaid mixer (stand mixer),  sprinkle with yeast and let it sit for a few minutes until the yeast 'blooms' on top of the water. 
  2. Add three cups of flour to the water yeast mixture and let the dough hook mix the flour into the water mixture.  Add the salt and let the dough hook knead the dough.  Add the final cup of flour and a half cup warm water to mixture.  Let the mixer knead the dough. If it's dry outside, add an additional 1/4 cup of water until the dough looks like bread dough.
  3. Let the Kitchenaid continue to knead the dough for an additional 10 minutes or so using the second speed setting, not the lowest.  As soon as the dough looks firm and elastic and has a slight sheen to it, it is ready to be formed.  (you can also take out the dough and knead it by hand if you wish).
  4. Form into a ball, and place in the bottom of a crock pot insert which has been lightly sprayed with cooking spray.  You can slash the bread at this point if you like.  I did.  Place a lid on top and let rise until doubled in size.  I used the bread proof setting on my oven and it took 45 minutes to rise to double in size.
  5. Turn on the crockpot to high and place the insert into the crockpot base carefully.   Place a single sheet of paper towel on top of the bread dough after a half hour to help absorb the moisture coming off of the bread as it bakes.
  6. Check the internal temperature of the bread with an instant read thermometer after 2 hours. The bread is done when it reaches an internal temperature of 190-200 degrees. 
  7. Lift the bread out and place on oven rack under the broiler for 1-2 minutes if you want a nice browned top, keeping an eye on it so it doesn't burn. 
  8. Slice and enjoy.

Note:  Crockpots vary, your crockpot may cook a little higher or lower when it is set on high.  

Check the bread after 1 1/2 hours. I pulled this at 2 hours and it was overdone.  It had developed a very thick crust on the bottom and sides.  I like a good crunchy crust, but it was a bit much.  

Created using The Recipes Generator

Multicooker Monday November 2020:

Recipes using Small Kitchen Appliances

Continue Reading
6 comments
Share:

Monday, October 19, 2020

Toaster Oven Corn Bread with Schmaltz

I'm ready, got my offering made, and consumed, for Multicooker Monday.  This is Sue's baby, she started Multicooker Mondays.  We post on the third Monday of the month,  we make and blog about a dish made in or with a small kitchen appliance. 

I really only have two small appliances I use on a regular basis to cook on and in.  My Crockpot and my handy dandy little toaster oven.  

 I know I made Cornbread last month for Multi-Cooker Monday but I'm doing a sorta repeat.  This time though, I made it with Turkey Schmaltz.  

Cornbread made with Turkey Schmaltz

Cornbread made with Turkey Schmaltz

What is Schmaltz you ask?  Well, it's the fat that renders out of a chicken or in my case, a Turkey.  I know that technically it isn't true Schmaltz, but I'm calling it that. 

I made a lovely turkey for Canadian Thanksgiving and ended up with, not only lots of juice, but also some fat that had rendered out of the the turkey breast as it was cooking.   I also made stock out of the turkey carcass and froze it in cubes, and those stock cubes are now residing in the freezer waiting to be used.  

I was actually going to use the Schmaltz (fat) for something else until I remembered how Sarge would make cornbread using bacon grease in it for an extra taste boost.  (I've probably mentioned Sarge in the past, one of these days I'll tell you more about him. Suffice to say, he's been cooking for large groups for longer than I've been alive.)  

So I drug out the recipe I'd written down and modified it a little, well, a lot actually. Cause we used to cook for upwards of 100 people at a time, the recipe I had made a lot. I used to shadow Sarge so I could get a sense of how much he used of each ingredient, cause he rarely measured out ingredients, he 'knew' how it should look, before he baked it.  He loved to 'season' with bacon grease, greens especially. 

 I wanted to eat this cornbread with some Collard Greens, since I just discovered some canned seasoned Collard Greens that are actually pretty tasty. I liked adding ham cubes, not bacon grease to them.  They're not as good as mine but are an acceptable substitute.

Collard Greens with Cornbread

Now to make proper corn bread you cook it in a cast iron skillet in the oven.  I did cheat a touch, and cooked it in a toaster oven, and baked it in a little pyrex pan I have, which fits perfectly into the toaster oven.  

This didn't even taste remotely like turkey, either.  Which is good, cause I smothered a piece in butter and honey and ate it while it was hot. 

One of the side benefits of being the cook, you get to taste test first. 

Cornbread made with Turkey Schmaltz


Cornbread with Turkey Schmaltz

Yield: 4 servings
Author: Sid's Sea Palm Cooking -
Prep time: 5 MinCook time: 25 MinTotal time: 30 Min
A slightly different take on regular cornbread, using leftover turkey fat, also known as schmaltz.

Ingredients

  • 1 1/2 cups Self Rising Cornmeal
  • 1/4 cup Creme Fraiche or Sour Cream
  • 1/4 cup milk
  • 2 tablespoons Turkey Schmaltz or Chicken Schmaltz + 1 tablespoon for the pan.
  • 1 lg. egg
  • 1/4 tsp. salt
  • 1/2 tsp. sugar

Instructions

  1. Place the 1 tablespoon of Turkey Schmaltz into the baking pan you're going to bake the cornbread in.  Place in a preheated 450 degree toaster oven.
  2. Mix the dry ingredients together, then rub the schmaltz into the dry ingredients until fully incorporated.
  3.  Mix the wet ingredients together and add to the dry ingredients.  Mix together until just incorporated.
  4. Spoon into the heated pan, spreading it out a little.  Bake at 450 degrees for 20 minutes, checking to see if it's baked all the way through. If not, bake an additional 5 minutes.
  5. Serve with butter and honey or alongside some lovely collard greens.

I baked this in a small pyrex dish, which measures 5 by 7 inches. 

Created using The Recipes Generator

Multicooker Monday October 2020:

Recipes using Small Kitchen Appliances

Continue Reading
4 comments
Share:

Monday, September 21, 2020

Cornbread in the Toaster Oven

 I've been a member of this group, MultiCooker Mondays for a few months now.  Sue of Palatable Pastimes started the group and asked us to share recipes using a variety of small kitchen appliances other than our stoves.  

Corn Bread

I have a few tried and true small kitchen appliances and use them, a lot.  I even have a Sous Vide, but haven't really played with it a lot.  It's actually been a bit of a dud for me.  I may play with it more now that I'm not working.  

But... This post is actually about one of the many things I've used my little Black and Decker Toaster Oven for.  

This is a basic, basic Toaster Oven and I'm continually surprised at how versatile this little thing is.  I keep thinking up new ways of using it.  

This month, I baked some cornbread in it.  I even used a mix, which is something I rarely do.  But I needed some cornbread for another recipe, Savory Corn Cheesecake, so I picked up a package of Jiffy Corn Muffin mix.  (I even used the toaster oven to bake the Cheesecake in).

Jiffy Corn Bread


I made the cornbread my own though.  Instead of using milk, I used a mix of my homemade CrĂ©me Fräiche and Buttermilk.  It did add a little something extra.  I think I've been in the south too long, cause when I tasted the finished cornbread, I thought it was really sweet. I'm used to the way we make it in the south now. No sugar added. 

Corn Bread

 But it was still good, especially with some butter and honey on top.  The butter melted fast.

Corn Bread
I ate it with a fork, cause I really don't like sticky fingers.

Corn Bread

I did bake it in a smaller pan than they suggested, but it worked out so well. This 5x7 inch dish fits perfectly in my toaster oven.  
After using about a third of the cornbread in the cheesecake, I just kept slicing and eating it, but I did save a little and ate it with some collard greens and it was amazing.  I thought I'd taken pictures, but it's nothing more than a happy memory as is the cornbread.    


Toaster Oven Cornbread

Yield: 4-6 servings
Author: Sid's Sea Palm Cooking -
Prep time: 5 MinCook time: 20 MinTotal time: 25 Min
Baked in a small pan, this cornbread is quick and easy to make in your toaster oven. No need to warm up the house to make.

Ingredients:

  • 1 package Jiffy Corn Muffin Mix
  • 1 egg
  • 1/3 cup mixture of buttermilk and Creme Fraiche

Instructions:

  1. Mix together and bake in a greased pan which will fit into your toaster oven at 350 degrees for 20 minutes or until done.
Created using The Recipes Generator

Multicooker Monday September 2020:

Recipes using the Instant Pot, Slow Cooker & More

Continue Reading
10 comments
Share:

Monday, August 17, 2020

Roasted Salted Almonds in the Toaster Oven

I got a craving one day for salted, roasted almonds but the only almonds I had inhouse were raw.  
So I played around a little, made up some heavily salted water, dropped the raw almonds into it, let them soak for a little while and then spread them out on a tray and toasted them in my toaster oven. 
VOILA!!!!  Success, they were about perfect.  A hint of salt, perfectly roasted, and a little bit too moreish.   
It only took a day or so for them to disappear. 
Roasted Salted Almonds
 

I've since consumed probably more than my share of these little gems, and decided it would be perfect to share for Multi Cooker Monday.   
Hosted by Sue of Palatable Pastime, we're a bunch of blogger who share recipes and how to hints for using various small kitchen appliances. 
I love using my little toaster oven and use it several times a week.  It's so much more efficient than heating up the big oven, and perfect for making just enough for two, or one person. 

So here goes, and it's not so much a recipe, but more of a suggestion on how I do it.  Your toaster oven may vary, mine is a very basic Black and Decker.  

Raw Almonds
Salt
Water

Dissolve about 1-2 tablespoons of salt in about 1 cup of water.  Place a cup or two of raw almonds in the salt mixture and let sit for a few minutes. 

Take the almonds out of the salt water, and spread in a single layer on a pan that fits in the toaster oven.  Roast at 375 for 12-15 minutes and then turn off the oven, and walk away and let the nuts sit in the oven til cool. 
Roasted Salted Almonds
 I do check them out at the 12 minute mark to make sure they haven't gotten too 'done'.  
And that's it, you now have some lovely salted nuts ready for munching.  
Best part of this, you can make the salt water bath as salty as you like.  Less salt or more salt. 

I've had some fun participating in Multi Cooker Monday in the past.    I use my toaster oven and crockpot a lot, and have featured recipes from both.  A couple months ago I made some lovely No Knead Rolls in my little oven. I love making Chicken Stock in my crockpot.   I mean, come one, it's almost a set it and forget kinda thing. 

Look what some of my fellow bloggers have come up with this month.  

Multicooker Monday August 2020:

Recipes using Small Kitchen Appliances

Continue Reading
9 comments
Share:

Monday, June 15, 2020

Toaster Oven No Knead Rolls

I'm an unabashed lover of bread.   Well, let me qualify that, I love home made bread.  The very act of making the bread, kneading it, watching it as it rises and then the amazing aroma of the baking bread.
It makes my heart sing and my mouth water. 
No Knead Rolls for Toaster Oven


However, sometimes, you want home made rolls and don't have time to either let it rise slowly or even feel like kneading the dough.  

Which is where this month's Multicooker Monday offering comes in.  Sue of Palatable Pastime is our hostess for this particular foray.  

We're a group of bloggers who are asked to make something with one of our favorite or even not so favorite kitchen helpers, ie: Toaster Ovens, Crockpots, Instant Pots, etc.  Honestly, with some of the great recipes other bloggers have posted, I've almost made up my mind that I need more kitchen toys. 

But for right now I'll stick with the few I already have. 

Although that toaster oven with convection air fry capabilities is getting higher on my list of must have toys, kitchen appliances.  

To be honest, I almost forgot about Multicooker Monday this month, but managed to come in under the wire.
Whew...

I do a 2-3 week menu plan, and use it to plan out shopping trips, and also try to keep track of what is in the freezer, to vary our meals. 
Variety is the spice of life?

It works,  mostly.

On the menu plan the other day was Steak and Salad, and for some reason, just Steak and Salad, isn't quite enough for me.  I need a carb to go with it.  

Either potatoes or bread.   That completes the meal for me.   And I was out of potatoes until my next shopping excursion, so I opted to make some bread.  

It didn't hurt that I was able to score some bread flour recently, so I felt like I could go ahead and make some of my No Knead Rolls, but with the hot weather, I didn't want to turn on the oven, so I baked them in my little toaster oven.   Which fits perfectly with the theme of Multicooker Monday. 

I also didn't want to make a full recipe, 6 rolls are more than enough for us.  We ate two with our meal, and I had the rest for breakfasts the next few days.  They make a great egg and bacon breakfast sandwich, substantial enough for the entire day of working.
No Knead Rolls for Toaster Oven

They're also good toasted with a little butter and honey on top.  Using my toaster oven, of course.

Toasted No Knead Rolls for Toaster Oven


No Knead Rolls for the Toaster Oven

Yield: 6 Rolls
Author: Sid's Sea Palm Cooking -
Prep time: 1 H & 20 MCook time: 15 MTotal time: 1 H & 35 M
These rolls are basically a quick and easy yeast roll that tastes great, and is nice and hearty.

Ingredients:

  • 2 cups Bread Flour + 1-2 tablespoons for dusting
  • 3/4 cup milk,  warmed to 120 degrees
  • 1 egg
  • 1 tablespoon sugar
  • 1/2 tablespoon yeast
  • 1/2 teaspoon salt
  • 2 tablespoons  melted butter

Instructions:

  1. Warm the milk, add the egg and sugar to it and whisk together.  Sprinkle the yeast over top, and wait a couple of minutes.  Add the flour and mix in.  Then add the salt.  This is a wet and sticky dough, so don't be surprised.   Cover the bowl and let rise for an hour or until doubled in size.  I use the bread proofing setting on my oven and let it rise there for 1/2 hour.  Punch down the dough, and then separate it into 6 equal portions.  I dust the dough with a little flour at this point as the dough is very sticky and hard to handle.  Form into 6 equal balls, and place on a greased pan that will fit into the toaster oven.  Brush the tops of the rolls with a little melted butter and place a piece of plastic wrap over top.  Let rise for 1/2 hour or so, or until the rolls have doubled in size.   Turn the toaster oven on to 400 degrees and place the rolls inside.   Bake for 15 minutes and if not browning enough on top, turn the oven up to 450 degrees and bake an additional 3-5 minutes.  Brush the tops with butter as soon as they are out of the oven.  Serve hot.
  2. NOTE:  This particular day I started the dough at 4:15 pm, and started baking them at 5:40 pm.  We ate at 6:05 pm.    It really can be that quick to make and enjoy lovely home made yeast rolls for dinner.  
Created using The Recipes Generator

Multicooker Monday June 2020: Recipes using Small Kitchen Appliances

Continue Reading
14 comments
Share: