It's time for the Baking Bloggers reveal today. I've made this dish several times now for gatherings. I also realized that this dish is not only delicious, but also gluten-free and keto-friendly. This month, the theme is Baking with Spring Vegetables, and I had a great idea. I was going to use the chive blossoms on my chive plants, and make something really good out of them, and then I realized, they're not a spring vegetable.
Hello, can anyone say 'whoops, senior moment'
Actually, don't.
But I realized that one of the first vegetables you can harvest in the spring is radishes. I've enjoyed many a handful of freshly pulled radishes, washed off quickly and scarfed down almost as quickly.
Those alongside the asparagus and baby beets are some of my favorites.
And as much as I love fresh, raw radishes, they are equally brilliant, cooked.
Yes, cooked! Well, roasted actually.
And when you roast them, WOOHOOO!!!! Although my mouth says, "ERMAGERD!!, give me more."

I used this recipe from Martha Stewart as an inspiration, sorta but then I went totally out of the box.
Radishes ready for roasting- this brings out a natural sweetness and a slight nutty flavor that pairs beautifully with the Gouda Cheese, but if you have another kind of cheese you like, use it. I like Gouda but Edam works well also.
 If you see some empty space on the pan, it may be because I sampled a few pieces.
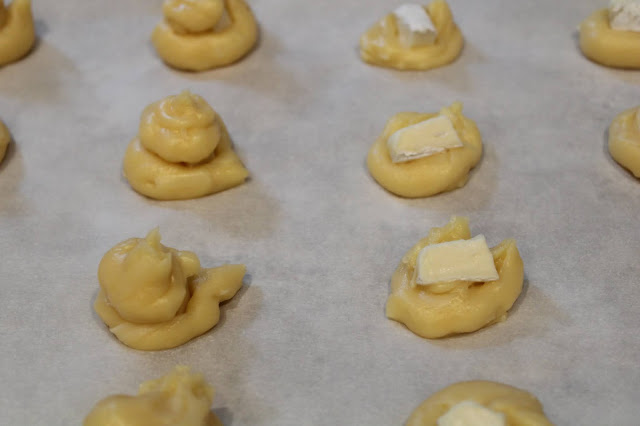
 I've gotten slightly hooked on Cauliflower crusts lately. This was spread out in a freestyle manner on parchment paper. I made a ridge around the edges.

 After the bake, just before cutting the tart.
 And since I'm the cook, I sampled.
 And realized I needed to try and get some money shots.
 And so I played a little.
 As I said, I did sample a couple of slices. I was only going to eat one, but it tasted so good, I had a second before I brought the whole thing to a gathering. BTW, this is also gluten-free as well as being low carb and keto for those who are following a different eating plan.

I used this recipe from Martha Stewart as an inspiration, sorta but then I went totally out of the box.
Radishes ready for roasting- this brings out a natural sweetness and a slight nutty flavor that pairs beautifully with the Gouda Cheese, but if you have another kind of cheese you like, use it. I like Gouda but Edam works well also.


The roasted radishes spread on top of the cooked crust.


Roasted Radish Tart
Yield: 8-12 Servings as an appetizer
prep time: 30 Mcook time: 1 hourtotal time: 1 H & 30 M
This is a fun tart to make as an appetizer, or you could also serve it as a light meal with some crusty bread to accompany it. There are a couple of steps involved but it's actually pretty easy.
ingredients:
Radishes
- 1 lb. Radishes
- 1-2 teaspoons Olive Oil
- salt
- You can also reserve a couple of radishes and slice them thinly to top the tart if desired.
Base
- 1 small head of Cauliflower, riced, cooked, and wrung dry.
- 1 1/2 eggs
- 1/2 cup shredded Gouda Cheese
Filling
- 1 1/2 Eggs- beaten lightly
- 1/2-3/4 cup shredded Gouda Cheese
- 1/2 cup cream
- 1 teaspoon fresh thyme leaves + 1/2 teaspoon for decoration if desired
instructions:
Roasting Radishes
- Preheat oven to 450 degrees.
- Toss the cut radishes with the olive oil, and place in a single layer in a rimmed baking sheet. Sprinkle with salt.
- Bake for 15 minutes, stir and bake an additional 20 minutes or until the radishes are cooked and lightly browned.
- Set aside while the base cooks.
Base
- Rice the Cauliflower, cook until tender - I micro-waved mine for 3 minutes- let cool, then place into a cheesecloth or clean tea towel and wring it dry. You want to expel as much moisture as possible. After it has cooled, mix in the egg and cheese. Spread the mixture out either into a tart pan with a removable bottom or free-style onto a rimmed baking sheet lined with parchment paper.
- Bake at 425 degrees for about 10 minutes, then check for doneness. It should be firm to the touch and slightly browned on top. If not done, add another 3-5 minutes of cooking time.
Filling
- Whisk together the egg, cream, cheese, and thyme leaves.
Assembly
- Keep the oven on at 425 degrees
- After cooking the base, remove it from the oven. Spread the radishes evenly on top of the cauliflower crust. Pour the egg custard filling on top and spread it out evenly. You can also add some thinly sliced Radish on top if desired. Bake for 10-15 minutes or until the filling is just set. Sprinkle with the reserved thyme leaves.
- Slice into small pieces for serving as an appetizer or larger pieces for a meal. This goes very nicely with some crusty bread as well.
Baking Bloggers
Baking with Spring Vegetables
- Baked Mixed Veg Pasta by Sneha's Recipe
- Baked Romaine Lettuce Chips by Our Good Life
- Chicken and Asparagus Pasta Bake by Palatable Pastime
- Rhabarberkuchen - German Rhubarb Cake by Pandemonium Noshery
- Roasted Asparagus with Shaved Fennel by Culinary Adventures with Camilla
- Roasted Radish Tart by Sid's Sea Palm Cooking
- Roasted Spring Vegetable Farro Salad by Caroline's Cooking
- Roasted Veggie Cobb Salad by Cookaholic Wife
- Spring Vegetable Gratin by A Day in the Life on the Farm
- Sweet Onion Galette with Parmesan and Mascarpone by Karen's Kitchen Stories
All recipes and their respective images are either original or adapted and credited, and are all the sole property of Sid's Sea Palm Cooking, © 2011-2026, with all rights reserved thereof.


")
")


")


