Showing posts with label Improv Cooking Challenge. Show all posts

Thursday, November 11, 2021

Pork Tenderloin with Dried Cranberry Stuffing

It's time for the Improv Cooking Challenge.  And this month, the challenge, should we care to accept it, was to use Cranberries and Meat together in a dish.   
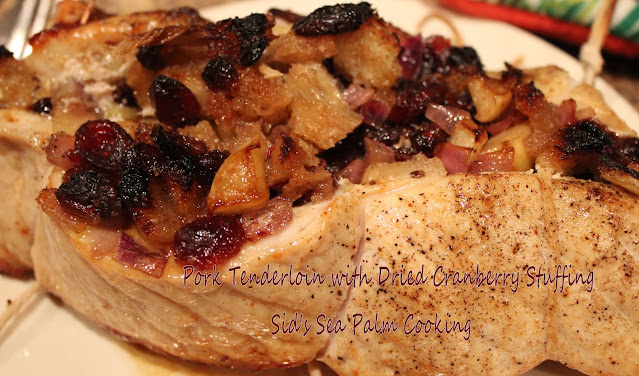
Pork Tenderloin with Dried Cranberry Stuffing

I participate in this when I get an idea for a new recipe and this month, I had one.  

An idea that is, for a little twist on a stuffed Pork Tenderloin.   

It was a good one, BTW.  Idea that is and the pork, well, I would keep patting myself on the back on how good it tasted, but I'm scared I would dislocate my shoulder. 

Filling for Pork Tenderloin with Dried Cranberry Stuffing
and stuffed in the pork

Pork Tenderloin with Dried Cranberry Stuffing

Here it is in the pan, browning a little.  My sister gave me this idea, she does it with a pork loin.  This means you get that lovely caramelized taste without cooking it to death in the oven.

Pork Tenderloin with Dried Cranberry Stuffing

I didn't do a great job of trussing it up, too much filling, but oh so worth it.

Can you see how moist the meat is?  I know, not the greatest picture but the taste.  So darn good. 
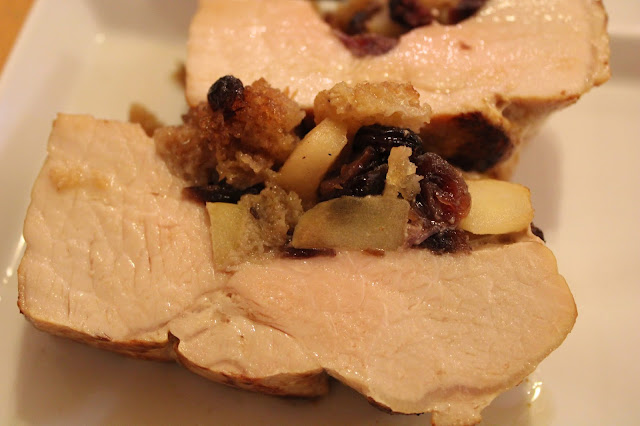
Pork Tenderloin with Dried Cranberry Stuffing
I think this is a perfect dish to make for someone special, yourself, during the holiday season.  Pouring the pan juices over it, while it's resting also helps to keep the meat moist.

I basically used a few items I had on hand, which was good, and have to say WOW!!!! the meat came out moist and tender and the filling, well, can I just say it was amazing.

Pork Tenderloin with Dried Cranberry Stuffing

Pork Tenderloin with Dried Cranberry Stuffing

Yield: 2 Servings
Author: Sid's Sea Palm Cooking -
Prep time: 2 HourCook time: 30 MinTotal time: 2 H & 30 M
This a fabulous take on making a pork tenderloin. Serve with some veggies and you have a company worthy meal.

Ingredients

  • Pork Tenderloin
  • 1/2 cup dried cranberries
  • 4 tablespoons Grand Marnier or 1 tablespoon Grand Marnier with 3 tablespoons orange juice
  • 1/2 apple - chopped
  • 1/4 cup red onion - diced
  • 1 thick slice sourdough or artisan bread cut into cubes
  • 1-2 tablespoons butter
  • String or skewers

    Instructions

    1. Preheat oven to 350 degrees and prepare a small oven safe roasting pan by spraying with a non stick baking spray.
    2. Soak the dried cranberries in the Grand Marnier or mix of Grand Marnier and orange juice for several hours to re-hydrate the cranberries. Do not drain.
    3. Using a sharp knife cut the tenderloin almost in half, lengthwise, butterflying it. Set aside.
    4. In a large pan, melt the butter and saute the red onion until soft, then add the diced apples and the bread. Let the bread get a little color on it and then add the cranberries with the liquid. Stir together and then cover the pan and turn the heat off. Let sit until lukewarm.
    5. Position the string along the bottom of the pork, getting ready to tie it up.
    6. Spread the stuffing evenly along the cut edge of the tenderloin and bring the string up around the pork to tie it off.
    7. Melt 1 tablespoon butter in the same pan the stuffing was cooked in and brown the tenderloin. Turning it evenly if you can.
    8. Place on a greased roasting pan, and roast at 350-375 degrees for about 20 -30 minutes or until a thermometer registers 170 degrees when poked into the meat.
    9. Remove from oven and cover with some foil to let rest for 10-15 minutes. Before carving pour any juices in the pan over the pork. Serve with oven roasted potatoes or your choice of vegetable.


    Did you make this recipe?
    Tag @sidsseapalmcooking on instagram and hashtag it #Sidsseapalmcooking


     Improv Cooking Challenge

    Cranberries & Meat

    Continue Reading
    2 comments
    Share:

    Thursday, April 8, 2021

    Tomato Tart with Balsamic Glaze

     I don't participate often enough in the Improv Cooking Challenge, but had to do it this month.

    This month it's all about Tomatoes and Balsamic Vinegar. 

    Tomato Tart with Balsamic Glaze

    Let me tell you a little about the Improv Cooking Challenge.  It's hosted by Nichole of Cookaholic Wife

    She likes to throw out a challenge for anyone who cares to participate. Nichole will suggest two ingredients for us to use, and make something delicious from.  

    She calls it the Improv Cooking Challenge. 

    I call it fun.


    I've participated in it a few times, and have had a blast.  I've made a Candied Carrot Coffee Cake, which was pretty darn tasty.  I made a taste from my home town, Almond Chicken, I've used Lavender and Lemon in these Lavender and Lemon Scones.  I've been a long time fan of Chopped on the Food Network and this is just my little way of playing along.  There are more, just click on the Improv Cooking Challenge in the cloud to the right. 

    I happened to run into some incredible tiny heirloom type tomatoes at Trader Joes, and well, gee, magic happened. 

    At least my mouth said it did. 

    I do love my puff pastry, and combining tomatoes and balsamic together is magic.  At least in my book. 

    I had a little bit of a Fig and Strawberry Balsamic glaze left and it was the perfect foil for the Tomatoes and Puff Pastry. 

    I also had fun with the Puff Pastry trying out something I'd seen on Instagram.  I made some little boats for the tomatoes, and they were fun to make. 

    Here are the photo's I took of the process, and guess what, they were actually fairly easy.  And it makes the tarts look really special, like you took hours and hours to make them.    😜 

    Start with a sheet of puff pastry, that has been thawed in the fridge.   Cut each third of the pastry (you know where it folds) into two pieces.  

    Then cut two slices into each side of the pastry like the picture below.

    Puff Pastry for Tomato Tart

    After you cut it. Pick up one side, like so.

    Puff Pastry for Tomato Tart

    Then fold it over, tacking it down with a little water to make it stick.

    Puff Pastry for Tomato Tart

    Then take the other side, and pull it through.   This makes a nice little boat.  As you can see, I had a couple of eager little tomatoes in there. They had their turn to shine, a little later on. 

    Puff Pastry for Tomato Tart

    And after you've got it done, fill with some sliced cherry tomatoes or whole ones, if you like. But I wanted the sliced ones which I then adorned with some chopped chives from my garden.  You can use any kind of fresh herb you like.  I like chives.  Recognize the tomatoes that were so eager to be a part of the dish? No?, well, they're in there, or in one of them.

    Tomato Tart with Balsamic Glaze

    I added a little of my Fig and Strawberry Balsamic Glaze to them before they went into the oven to bake at 425 degrees for 25 minutes.  

    Tomato Tart with Balsamic Glaze

    I also employed a trick my mother taught me.  After they were baked, I turned off the oven and placed the pan of tarts back in. This 'dries' them out, and in effect bakes them a little longer so that when you bite into the tart, it flakes apart.  

    After they baked I added a little scootch more glaze and then proceeded to demolish eat a couple.  

    If I bake it, I'll eat it.  

    It was lunch... and a snack...

    Tomato Tart with Balsamic Glaze

    Tomato Tart with Balsamic Glaze


    Improv Cooking Challenge:April 2021

    Tomatoes & Balsamic

    Continue Reading
    7 comments
    Share:

    Thursday, October 8, 2020

    Candied Carrot Coffee Cake

      It's time for the Improv Cooking Challenge again.  I don't participate as often as I'd like.   This month the challenge was to combine Carrots and Cinnamon in a recipe.  And I may not even be included in the final HTML, cause I plain forgot to sign up.  I'm posting about it anyway. 

    I am in the final list, yeah me.  And... I forgot to tell you who our hostess is. Nichole of Cookaholic Wife came up with the idea of incorporating two different food ingredients into a recipe. We get to play with different combinations every month that we care to participate. 

    I came up with a doozy of a recipe.   At least I think it's pretty good.

    At first I thought Muffins with a twist, but then decided I really wanted a piece of coffeecake, and that's when the inspiration hit.  And I had a little bit of fun too and decided that this recipe could also slip in under the wire for a Halloween Breakfast treat as well.     

    Candied Carrot Coffee Cake


    You got the little orange bits in the cake, right?   

    Here are a couple pictures of the process. 

    The carrots in the bowl with the sugar and butter, before and after being zapped in the microwave for a minute or so.  I put a piece of cling wrap over the bowl before microwaving it. 

    Diced carrots, butter and brown sugar
    Diced carrots, butter and brown sugar

    Look at the lovely 'juice' from the melted butter and sugar, I kept that and added it to the oat topping.  

    Which went so nicely with the oat streusel topping. 

    Candied Carrot Coffee Cake

    Candied Carrot Coffee cake

    Yield: 4 servings
    Author: Sid's Sea Palm Cooking -
    Prep time: 10 MinCook time: 35 MinTotal time: 45 Min
    This is a light, lightly sweetened coffee cake, perfect for a quick snack but it only makes a few servings. Which is not a bad thing. This is also baked in a toaster oven.

    Ingredients

    Cake
    • 2 carrots, diced fine, cooked with 2 tablespoons butter and 2 tablespoon brown sugar in the microwave, drained and butter sauce reserved. (about 1cup total)
    • 1 cup self rising flour
    • 2 tablespoons cold butter
    • 2 tablespoons sugar
    • 1 egg
    • 1/2 cup Créme Fräiche or Sour Cream
    • 2 tablespoons milk
    • 1/2 teaspoon vanilla extract
    Topping
    • 1/2-3/4 cup quick cooking oats
    • 2-3 tablespoons melted butter
    • 2-3 tablespoons brown sugar
    • 1/2 teaspoon cinnamon
    • butter sauce from the cooked carrots

    Instructions

    Cake
    1. Heat the toaster oven to 375 degrees.    Grease a small pan, mine was 5x7 inches,  set aside.   Cook the carrots and drain the butter sauce, retaining the sauce.  Set aside to cool.
    2. Rub the cold butter into the flour, add the sugar and the cooked, drained carrots.  Mix together, lightly.  Whisk the egg, creme fraiche, vanilla extract and milk together.  Add to the dry ingredients and mix together until just combined.
    3. Spoon into the prepared pan and top with the Oat streusel topping.  Bake at 350 degrees for 35 minutes or until a toothpick inserted in cake comes out clean. 
    Topping
    1. Mix the oats, brown sugar and cinnamon together.  Melt the butter and add the butter sauce.  Pour over the oats mixture and mix together and sprinkle or spread evenly on top of the cake batter.  bake the cake.
    Created using The Recipes Generator


    October Improv Cooking Challenge


    All recipes and their respective images are either original or adapted and credited, and are all the sole property of Sid's Sea Palm Cooking © 2011-2021, with all rights reserved thereof.

    Check out my cookbooks on Amazon.  

    All are available as paperbacks or as a downloadable e-book.  

    All the ebooks are currently on sale.
     Simple Shrimp Recipes - 25 + Appetizer, Entree and Dipping Sauces.
     Nibbles and Bites - A Compilation of Appetizers, Canapes and Finger Foods
      Hygge - Danish Food and Recipes


    Continue Reading
    9 comments
    Share:

    Thursday, September 10, 2020

    Savory Corn Cheesecake

     Every so often I participate with other bloggers in the Improv Cooking Challenge. Our hostess, Nicole  of Cookaholic Wife challenges us to use two separate ingredients in a recipe and then post about it.  

    I've participated in the past and had fun with it.  This month we're tasked with making something with Cheese and Corn. 

    My first thought was Cornbread with Cheese and Corn, but I wanted to do something a little more challenging. 

    Especially with all the cream cheese I had in the fridge.  

    So I thought, I wonder if I can do a Savory Cheesecake.  

    Savory Corn Cheesecake

    I googled and found one recipe.  It happened to be vegan and I'm bookmarking it to make for my daughter who is vegan, but I'm not. 

    So...

    I played, and came up with something that my mouth sang about.  This is so simple and you don't need to add a lot of seasonings to it, the cream corn comes through beautifully. 

    Breakfast...

    Savory Corn Cheesecake

     Lunch...
    Savory Corn Cheesecake

    You can see a few of my previous 'challenges' at the end of the post. 

    Savory Corn Cheesecake

    Yield: 2 servings as a light lunch or 8 appetizer sized servings
    Author: Sid's Sea Palm Cooking -
    Prep time: 5 MinCook time: 45 MinTotal time: 50 Min
    This is a light custard like cheesecake that is perfect served with a small salad for lunch or as an appetizer.

    Ingredients:

    • 4 oz. softened  Cream Cheese
    • 1 egg
    • 1/2 cup creamed corn
    • 2 tablespoons heavy cream
    Crust
    • 3/4 cup cornbread, cooked and crumbled
    • 2 + teaspoons melted butter

    Instructions:

    Crust
    1. Fits a 4 inch Springform pan.
    2. Crumble the cornbread and mix with the melted butter. Press into the base of a 4 inch springform pan.  Bake at 350 degrees for about 10 minutes to set. 
    Filling
    1. Mix the cream cheese, egg and heavy cream together until smooth.  Add the creamed corn and mix well.
    2. Pour into the prepared springform pan over the crust. 
    3. Bake in toaster oven for 45 minutes at 375 to 400 degrees until browned and set.
    4. Remove from oven.  Let sit for a few minute and then loosen the cheesecake along the sides and then release and remove the sides of the pan.
    5. Slice and serve with a sprinkle of Tagin seasoning on top if desired.
    6. Can also be served with a dollop of a Cilantro Pepper Sauce

    Optional:  Add a sprinkle of Tajin seasoning on top to serve.  

    Created using The Recipes Generator
    September Improv Cooking Challenge

    Continue Reading
    5 comments
    Share:

    Thursday, May 14, 2020

    Almond Chicken

    It's time for the Improv Cooking Challenge, hosted by Nichole of Cookaholic Wife.
    This month we're tasked to make a dish with the combo of Meat and Nuts.

    I don't always participate in the Improv Cooking Challenge, and I should.  I love trying to make up a recipe or find a recipe that fits within the parameters of the challenge, which consists of putting two disparate ingredients together.

     I looked at the ingredients and thought about making a meatloaf with walnuts, but honestly didn't feel the love so decided to shelve that idea.  I will make one in the future though, and tell you all about it, but not this month.

    Then I looked at my menu plan for the week, and something clicked.  I'd written down Chicken as the protein but didn't have any notation beside it, and then the light-bulb exploded over my head and I suddenly got a craving for Almond Chicken, just like the Almond Chicken I used to get in Chinese restaurants, back in the dark ages. 
    Almond Chicken
     
    So I googled, and googled and googled and looked through my cookbooks, and couldn't find that elusive recipe.
    Then I pulled an ace out of the hole and asked people on FB from my old home town to see if anyone there had the recipe or could remember that dish.
    Almond Chicken
    Turns out the restaurant I used to order it from, still makes it.  And some wonderful people gave me their versions of how to make it.
    Then I twiddled with it a little more and I GOT THIS!!
    Only one thing lacking, not enough chopped almonds on top.
     This is a very light tempura style batter you dip the chicken cutlets in.
    Almost enough chopped almonds, almost.  I love using my mezzaluna for stuff like this.  I've had this one for over 40 years, and it's still going strong.
    Chopped Almonds
     And the finished dish, with some ham fried rice and home made Sweet and Sour Sauce.  So good.
    Almond Chicken


    Almond Chicken

    Yield: 2 servings
    Author:
    Prep time: 15 MCook time: 15 MTotal time: 30 M

    Ingredients:

    Batter and Chicken
    • 2 chicken  breasts cut into thin cutlets- 2-3 per breast
    • 1 Cup AP flour
    • 1/2 cup cornstarch or potato starch
    • 1 ice cold cup water
    • 1 egg
    • 1/4 tsp. Baking Powder
    • Oil for frying
    • 1/2 cup flour for dredging
    • 1/2 cup finely chopped almonds for topping
    • Lettuce for serving
    Marinade
    • 1 tablespoon Soy Sauce
    • 1 tablespoon Rice Wine Vinegar
    • 1 tsp. Sesame Oil

    Instructions:

    1. Cut the chicken breasts into cutlets, place in marinade.
    2. Heat the oil in a pot or skillet that is deep enough that it will enable the chicken to be submerged as it fries. 
    3. Whisk together the flour, cornstarch, water and baking powder until smooth. This makes a very light tempura batter. 
    4. Dredge the marinated chicken in some flour and then into the batter.  Place the batter dipped chicken into the hot oil and fry.  Turn over halfway through and finish frying,  This will only take a couple of minutes because the chicken has been cut thin.  Place onto either a paper towel or some coffee filters to drain.  Continue to fry the chicken until it's all done. 
    5. You can cut the fried cutlets up into chunks and serve on lettuce if desired or leave the cutlets whole.   Sprinkle with the chopped almonds and serve alongside some fried rice or a stir fry.  
    Created using The Recipes Generator
    Check out what the other bloggers have made!

    Improv Cooking Challenge: May 2020

    Ingredients: Meat and Nuts

    Continue Reading
    8 comments
    Share:

    Thursday, January 9, 2020

    Brie and Havarti Crackers

    It's time for the Improv Cooking Challenge, hosted by Nichole of Cookaholic Wife.  I barely made it in here this time.

    I was so busy, making, baking and, very important, taste testing my offering.   This month the Challenge is Cheese and Crackers.
    And my thought was this, why not combine them, and have a two-fer.
    So I did, took some cheese, made some crackers and VOILA!
    These Brie and Havarti Crackers.
    They were so tasty topped not only with the Pineapple Chutney but also with some Deviled Ham Spread.
    Also good, just by their lonesome.
    I did want to show them being cut out, since I've been watching many cooking video's that show people cutting out cookies, crackers, etc., and leaving so much room in between the crackers.  Lots of wasted dough.  Drives me up the wall.  So, I make sure I cut as much out of each rolled out piece of dough that I can, and then gather up the scraps and re-roll them out. 

    Brie and Havarti Crackers

    Yield: approx. 120 + crackers- depending on size.
    Author:
    prep time: 45 M 
    cook time: 21 M 
    total time: 66 M
    These are a light, crisp, flaky cracker that goes well with toppings, but also tastes great crumbled into either chili or tomato soup. They're also great, eaten plain, with lots of cheesy taste.

    ingredients:

    • 2 cups self rising flour
    • 4 oz. cold butter
    • 6 oz. cold Brie cheese with rind cut off.
    • 1 1/4 cup finely shredded Havarti cheese
    • 1/2 tsp. Baking Powder
    • 1-3 tablespoons ice water (more if needed to gather the dough into a ball)
    • optional: 
    • 1/2 tsp. Mustard powder
    • or
    • 1/4 tsp. Cayenne powder
    • 1 egg, whisked for brushing on top
    • Optional: grated Parmesan Cheese for topping crackers

    instructions:

    How to cook Brie and Havarti Crackers

    1. Cut the butter and Brie cheese into the flour and baking powder until it's well combined.  You can add the optional mustard OR cayenne pepper now.  
    2. Add enough water to combine the dough into a ball.   Form into logs or a flat disk, making several of either or both, wrap well and place in the fridge for at least 30 minutes or longer to chill.
    3. Heat oven to 400 degrees.  Cover a cookie sheet or pan with parchment paper/ 
    4. Cut  thin rounds from the log or roll the disk out very thin.   Cut small rounds and place on a parchment paper covered cookie sheet or pan.   Brush tops with beaten egg or not.  If you like, you can even sprinkle a little Parmesan cheese on top as well.   This is totally optional however, the crackers are very cheesy without.
    5. Bake in 400 degree oven for 10 minutes, checking to make sure that the crackers haven't browned.  They need to stay a light golden color, as they get bitter when browned. 
    Created using The Recipes Generator
    All recipes and their respective images are either original or adapted and credited, and are all the sole property of Sid's Sea Palm Cooking © 2011-2020, with all rights reserved thereof.

    Check out my cookbooks on Amazon.  All are available as paperbacks or as e-book. 
     Simple Shrimp Recipes - 25 + Appetizer, Entree and Dipping Sauces.
     Nibbles and Bites - A Compilation of Appetizers, Canapes and Finger Foods
      Hygge - Danish Food and Recipes


    Check out what the other bloggers have made!

    Improv Cooking Challenge: January 2020

    Ingredients: Cheese and Crackers

    Continue Reading
    11 comments
    Share:

    Thursday, October 10, 2019

    Orange Blast sauce for pork

    I had a bad week last week, and barely remembered that the Improv Cooking Challenge was this week, and the theme was Orange and Olive Oil. 

    I had an idea and boy was it delicious.

    This challenge is hosted by Nichole of Cookaholic Wife
    I've actually missed out on a few of the challenges, but am so glad I got to participate in this one.  

    I'd seen where a fellow blogger named Dorothy from Shockingly Delicious had combined orange marmalade and hatch chiles together to make a sauce.
    And since I had a bunch, OK, several pounds of Hatch Chiles in my freezer, I wanted to try it.
    The beginnings of the sauce, I played with equal amounts of Marmalade and Hatch Chiles first, but then added some chutney and that not only balanced it all out, but made for an absolutely fantastic sauce.

    https://www.sidsseapalmcooking.com/2019/10/orange-blast-sauce-for-pork.html
     Look at those little pieces of orange on the pork.
    https://www.sidsseapalmcooking.com/2019/10/orange-blast-sauce-for-pork.html
    And it looked wonderful.  But we had this cooking challenge for orange and olive oil, and it made me think.  I also wondered how I could make them into a taco filling.
    https://www.sidsseapalmcooking.com/2019/10/orange-blast-sauce-for-pork.html

    I like experimenting, what can I say?
    This was a good experiment.

    As in...

    Boy did I hit that out of the park. WOOHOOO!

    I liked it.  I think it would be totally awesome slathered on a pork roast or some chicken so that the sugars in the marmalade caramelize a little more, but I was happy to use this in some taco's yesterday.


    Orange Blast Sauce for Pork, Chicken or Shrimp

    Yield: 2-4 servings
    Author:
    prep time: 10 Mcook time: 15 Mtotal time: 25 M
    This is such a simple sauce to put together, and so flavorful, you'll want it slathered on pork or chicken or shrimp or even venison.

    ingredients:

    Orange Blast Sauce
    • 1/2 cup Orange Marmalade
    • 1 small Hatch Chile, roasted, seeded and chopped
    • 1/2 cup Major Grey's Chutney
    • 1 tablespoon orange juice (opt.)
    • 1 teaspoon Olive Oil
    Pork Chop/Chicken
    • 1-2  pork chops per person - cooked
    • or
    • 1-2 pieces of chicken per person - cooked

    instructions:

    How to cook Orange Blast Sauce for Pork, Chicken or Shrimp

    1. Mix all the ingredients for the sauce together and simmer on low heat for about 10 minutes, stirring constantly, to prevent it from burning.
    Cook pork or chicken
    1. Cook your meat until done, saute or bake it
    2. Slather the meat with the sauce, and place in oven or under broiler until the sauce caramelizes a little, watching carefully so it doesn't burn.
    3. Slice the pork into thin slices and mound into a prepared taco shell and top with lettuce, tomatoes and a little cheese if desired.  
    4. You can also serve this in a wrap with some thinly sliced red cabbage and onions for a different taste experience.
    Created using The Recipes Generator

    October Improv Cooking Challenge
    Olive Oil and Orange


  • Continue Reading
    8 comments
    Share: