Showing posts with label Appetizer. Show all posts

Sunday, May 3, 2026

Blini with Smoked Salmon

 I love Smoked Salmon.  

That was a complete sentence. 

smoked salmon Blini

 I've been known to pick up pieces and just shovel them into my mouth, ok, so I was a little more delicate than that.    I've made quite a few dishes/recipes with smoked salmon over the years, but this is one of my favorite ways to use it, for now.  I may change my mind in the future.  As I experiment try new recipes. 

Smoked Salmon on Buckwheat Blini

I've used both cold-smoked and hot-smoked salmon in my recipes.  I think it elevates just about every recipe you make.   I've made Salmon Mousse, Smoked Salmon Tarts, Salmon Cakes, topped Deviled Eggs with a curl of smoked salmon, and I've even made my own Gravad Laks.  And I made this amazing Smoked Salmon Cheesecake once as well.   And a few years back, I made this Chunky Shrimp and Smoked Salmon spread, and people still ask me about it.  It is good, I will say that.   It also looks pretty on a plate. 

Get the idea, I like Smoked Salmon?  Well, I do.   I actually have way more Smoked and regular Salmon recipes on my blog.  Go ahead and take a look.  I would detail them here, but this post is all about Elegant Appetizers for Mother's Day for our Sunday Funday Bunch.

Sunday Funday Logo

And I just had to participate, with, you guessed it, Smoked Salmon.  Our hostess this week is Wendy of A Day in the Life on the Farm. Even though I'm the only mother I'm celebrating this year, I can make it special for me.  So I did, make it special, that is.    And I blame it all on The Great British Bake Off.   They had their contestants make Blini with Hot Smoked Salmon once, and I kinda glommed onto that idea and came up with these little bites of deliciousness. 

Too much hyperbole? Nah.   

I made some buckwheat blini (I had some buckwheat flour on hand to make buckwheat Pancakes).  And then I played, a lot.  

I raided my dill plant, minced up some red onion and some capers, and decorated. 

Minced Red Onion, Capers and Dill

 Then I consumed.
Blini with Smoked Salmon


But before I finished consuming, I decorated with some fresh Dill Fronds, cause I could. 
Smoked Salmon Blini

 I even topped them off with some Caviar.  I had way too much fun, and now I have a jar of Caviar in the fridge to use on something. I'm sure I'll come up with an idea or two to use it.   I'll share my attempts on here as well.  

Take a look at what our other fabulous cooks came up with: 


Buckwheat Blini with Smoked Salmon

Buckwheat Blini with Smoked Salmon

Author: Sid's Sea Palm Cooking - Adapted from many recipes
Prep time: 10 MinCook time: 3 MinInactive time: 30 MinTotal time: 43 Min

Make this Mother's Day extra special with these bites of deliciousness. Be aware, this recipe makes a lot of blini. 

Ingredients

Blini
  • 1/2  cup Buckwheat Flour
  • 1/2 cup AP Flour
  • 1 egg separated - room temperature
  • 3/4 cup warm milk
  • 1 teaspoon yeast
  • 1/2 tsp. sugar
  • 1/2 tsp. salt
Toppings
  • 1/2 cup Crème Fraîche
  • 1 tsp. Creamed Horseradish
  • 2 + oz. Cold Smoked Salmon, sliced thinly
  • 1-2 Tablespoons finely minced Red Onion
  • 1-2 Tablespoons, finely chopped Capers
  • 2 + teaspoons Caviar
  • 2 + teaspoons finely chopped Fresh Dill, plus more for decorations
  • Mix the Crème fraîche and horseradish together and set aside

Instructions

  1. Heat the milk to about 110 degrees, add egg yolk, yeast, and sugar, set aside until frothy.
  2. Sift the dry ingredients together, then add the milk-yeast mixture and combine.
  3. Cover with some plastic wrap and set aside for about an hour or until the batter has doubled in size.
  4. Beat the egg white until stiff. Fold into the risen batter.  
    Egg whites folded into batter

  5. Place a non-stick frying pan on the stove and heat to medium-high. Or spray some cooking spray in a frying pan and heat.
  6. Dollop about a tablespoon of the batter into the heated pan, doing about 4 at a time, cook until  bubbly, turn over and cook an additional 45 seconds or so. Remove to a warmed platter.
Assembly
  1. Now for the fun part, assembly:
  2. Dollop about a half teaspoon of the Crème fraîche-horseradish sauce on each blini.
  3. Form a 'rose' out of each piece of salmon, and place carefully on top of the creme fraiche mixture. Top with a sprinkle of the finely minced onion, capers, and chopped dill. Add a 1/4 teaspoon of caviar on top if you wish. Use some dill fronds to decorate further if desired.
  4. Serve immediately.


Did you make this recipe?
Tag @sidsseapalmcooking on Instagram and hashtag it #Sidsseapalmcooking

Continue Reading
10 comments
Share:

Tuesday, March 3, 2026

Pierogi


I posted this originally a few years ago.  I'm now updating the post, cause I can and also because I've got a lot of pierogi in the freezer.  

A few years back (20 + years ago) , we were living full-time in an RV,  a fifth wheel to be exact.   We were staying in a campground and had made quite a few friends there.  

One of those friends was of Slavic descent, and one day she offered to show us how to make pierogi, but we needed room to do it in.  So I offered her my kitchen to play in. 

Pierogi

I don't remember how many of us there were that day, but I think we had 4 or 5 women in there, in rapt attention as Marge made the dough.   

I had my Kitchenaid stand mixer out on the counter, and we made use of it. 

I'm not too sure how many potatoes we ended up peeling and cooking, but it was a few, and as I seem to recall, one of the group had to run over to her RV and grab some more potatoes for the filling and the dough.

I made some more pierogi the other day, but only made a small batch this time, but a small batch is still a lot.

Pierogi

Especially when you are the only one who eats pierogi.   But they do freeze, amazingly well.  

I personally love filling them with mashed potatoes, cheese, and onions, but feel free to play with the fillings, adding or deleting any part of them.  

Pierogi
Be aware, though, they do tend to shrink a little after being cut.   I used a new-to-me cutter, and it worked well.  I also used my new pasta machine to roll out the sheets of pierogi dough. I cannot tell you how happy I am with it.  

Pierogi

However you do it, having one of these little presses does make it a little easier.  I would cut them out a little bit larger than the diameter of the press.  They do tend to shrink a little, but they still work.   

Pierogi

I also discovered that you can take them straight out of the freezer and stick them into an air fryer. I used my combo air fryer toaster oven for this.  They came out beautifully.  The edges were lovely and crisp, and tasted so good with some sour cream and butter.  I mean, everything is better with butter, I think. 

Pierogi cooked in air fryer


Fill them with whatever you like. I've mostly done the classic Ruskie style, which is potatoes and twarog cheese, though I use Colby Jack.    I'm going to experiment a little.  I've never had sauerkraut inside, but I may give that a whirl, and Mushrooms sauteed with a little seasoning is also mentioned.  You can even fill them with some fruit, if you like.  I have lots of shells from my latest foray into Pierogi making, and will utilize them in future endeavors, ok, so they'll be cooking adventures.  


Pierogi
Pierogi


Yield: Makes about 4 doz.
Author: Sid's Sea Palm Cooking - adapted from several recipes
Prep time: 30 MinCook time: 10 Mininactive time: 30 MinTotal time: 1 H & 10 M
You can make a quick and hearty meal when you keep a few dozen in the freezer.

Ingredients

Dough
  • 3 1/2 cups flour mixture of AP flour and Bread Flour (add more if needed) + more flour for rolling out.
  • 1 large potato- cooked and riced
  • 3/4-1 cup potato water (from the boiled potatoes)
  • 1 egg
  • 1 1/2 tsp. salt
Filling
  • 1 Cup Cooked mashed potatoes, with no added butter or milk
  • 1/2 cup grated Cheddar cheese
  • 1 small onion, finely chopped and sauteed in 1 teaspoon butter (optional)

Instructions

Dough
  1. Cook the potatoes in salted water until done. Drain the potatoes, but keep the potato water. Set aside til cool. Rice up one potato, and place it into the bowl of a stand mixer. Add the flour and 3/4 cups of the cooled, reserved potato water, salt, and the egg. Mix together for a few minutes. If it looks too dry, add more water, 1 tablespoon at a time, or if it looks too sticky, add more flour, 1 tablespoon at a time. The dough will be sticky. Let mix for a couple of minutes and turn out onto a piece of plastic wrap. Wrap well to keep from drying out and let rest for a few minutes while you prepare the filling.
  2. Take a small portion of the dough and roll it out on a well-floured surface. The dough will be sticky to handle. Keep the remaining dough covered. Cut out circles with a floured glass or cookie cutter, whichever size you like. I used a 3-inch wide cutter. Add a teaspoon of the prepared filling to the center of the circle of dough and fold over to make a pocket, squeezing out the excess air, and making sure that the edges are pressed down firmly to seal. Use a fork here if you like, or if you have a dumpling press, use that. I did. It was easier. Do not overfill. You will probably only use a teaspoon of filling per pierogi. I used a melon baller to dip out the correct amount.
  3. When rolling out the dough, you need to get it thin, about 1/8th thick. If you tear it, just moosh it back up and re-roll the dough.
  4. When you've used up all the dough or filling, place the filled pierogi in a single layer on a freezer-safe cookie sheet or stiff cutting board and freeze. When frozen, place the pierogi into a plastic bag and put them back into the freezer until ready to use.
  5. You can cook some up fresh, or wait til later.
  6. When cooking perogies, fresh or frozen. Add to gently simmering water and cook them just until the pierogi float to the top. Serve with some fresh butter and sour cream.
  7. You can also brown them in a pan after cooking, and serve with more butter, sauteed onions and of course sour cream or Créme Fräiche.. I like using my own homemade Créme Fräiche. and some homemade butter.
Filling
  1. Sauté onions, grate cheddar cheese, and add to the cooled, riced mashed potatoes. Mix well and set aside.
Created using The Recipes Generator

All recipes and their respective images are either original or adapted and credited, and are all the sole property of Sid's Sea Palm Cooking, © 2011-2026, with all rights reserved thereof. 

Continue Reading
2 comments
Share:

Sunday, February 1, 2026

Spicy Avocado Deviled Eggs

This week on Sunday Funday we're celebrating Avocados since it's National Avocado Month, starting today.  I had to participate since avocados are one of my favorite green veggies.  BTW, it's also Banana Month as well, and I'll be sharing my Banana Bread recipe later on this week. 

Wendy of A Day in the Life on the Farm suggested we have fun with Avocados this week.   She's also our hostess for this event.  

I made some Spicy Avocado Deviled Eggs with some Guacamole and Sambal Oelek.   

Spicy Avocado Deviled Eggs

I got hooked on Guacamole the first time I tried it, and I'll buy avocados and make Guacamole just cause.   Why am I talking about Guacamole?  

Well, it just so happens that this week on Sunday Funday, it's Avocado Month and 

Sunday Funday
I'm sharing my recipe for Spicy Avocado Deviled Eggs, along with a shortcut.    I'm sure we've all been there: picked the perfect avocado, taken it home, cut it open, and found it all brown inside. Or we've gotten some unripe ones, taken them home, let them ripen, cut them open, and YUCK.   Big old brown spots, showing where they were bumped or ? during transportation.    

Awhile ago,  ok, so it was several years ago, I bought some premade, or rather processed, avocado in little tubs.  These are by Wholly Avocado; some are guacamole, and some are just plain processed avocado.  I like keeping them in my fridge for those avocado emergencies, cause I'm tired of chucking avocados, cause they have a habit of ripening and needing to be used TODAY by 2PM at the latest.   You know what I mean.    And now that you've suffered through my avocado lecture, let me bore you with my hints, or rather, my hard and fast rule when it comes to making hard-cooked eggs. 

I'm quite frankly shite at figuring out how long to cook eggs to get them to the perfect doneness, so many years ago, I bought an Eggsact Egg Timer.  You can get it here.  I love my Timer and use it often because I love a soft-boiled egg, and this way I can cook it to my taste. 

If I can plan ahead, when I make Deviled Eggs, I like to take the eggs out the day before and let them sit on the counter for at least 24 hours.   Mainly because I buy super-fresh eggs, and they are notoriously hard to peel once they're hard-cooked.  

I then cook them with my timer, the timer changes color and lets you know how cooked they are by where the color changes,  and as soon as they're hard-cooked, I take the pot, drain the hot water, and shake the eggs inside, fracturing the shells. 

Hard Cooked Eggs


I then fill the pot with cold water, let them sit for just a minute or so, pick off a little piece of shell, puncturing the membrane a little,
Hard Cooked Eggs

Place the egg back in the pot, and continue until I've done all the eggs.  Then I peel them.  The eggs will still be warm, but you can handle them easily.   The cold water gets in under the membrane, and the shells peel away easily. 
Egg Shells

Peeled Eggs

And if you should happen to find a stubborn egg, well, gosh, if you're making deviled eggs, just smoosh that egg white in with the rest of the yolks.  You just get more filling that way.   Or if making egg salad or potato salad, no one will know but you.    I've been making my hard-cooked eggs this way most of my life, and it works.  I buy very fresh eggs, which are notoriously hard to peel, so I let them sit on the counter for at least 24 hours before cooking them. 

Now that we have those two things out of the way, let me show you how to make my spicy avocado deviled eggs.    I made only 4 eggs this way, because while I love eggs, I can only eat so many per day.  OK, so two is my usual limit.  

I also want to say, that if you do my little trick of setting the eggs on the counter overnight, make sure they're sitting upright, as the yolk will migrate to the side of the egg, and that means a thinner side wall, as you can see here, getting the yolk out made me 'break' or tear that thin side wall.  

Hard Cooked egg yolks and whites

I also have fun with my eggs. I don't just cut them lengthwise; I'll cut them in half, then cut a very thin slice off the bottom, so they sit nicely, before I cut them in half.   Variety is the spice, they say.  

You will also end up with way more filling than you need.  I personally like piping them into the egg whites with a star tip,

Spicy Avocado Deviled Eggs

but you do you.   However, you get the filling in there, it's good.    I like the leftover filling on crackers or tortilla chips as a nice little treat/snack.  

Here goes the recipe, such as it is.  I only made 4 eggs this time, but if you make more eggs, just increase the amounts as needed.  I would suggest a dozen eggs, 2 avocado mini's, or a half cup of mashed avocado.   

Check out the fun my fellow Sunday Funday bloggers had with Avocados. 


Recipe for the Spicy Avocado Deviled Eggs follows:  

Spicy Avocado Deviled Eggs

Spicy Avocado Deviled Eggs

Yield: 2
Author: Sid's Sea Palm Cooking -

Deviled Eggs are so much fun to play with. You can add all kinds of deliciousness to them. I added Guacamole and Sambal Oelek to these eggs. Just double, triple, or quadruple the ingredients for your deviled egg extravaganza. I cooked 4 eggs for this recipe, but you can do more

Ingredients

  • 4 hard-cooked eggs, cut lengthwise or in half.
  • 1/4 cup prepared guacamole
  • 1 heaping teaspoon Sambal Oelek, more or less to taste.
  • 1 teaspoon mayonnaise if desired

Instructions

  1. Mash up the egg yolks on a plate with a fork and, if need be, add any whites you massacred, breaking them up as well.
  2. Place the mashed egg yolks and any whites into a small bowl.
  3. Add the guacamole and the mayonnaise if needed, stir together.
  4. Place the mixture into a piping bag, equipped with a star tip.
  5. Pipe the mixture into the prepared egg whites. You can enjoy the leftover egg yolk mixture on crackers or tortilla chips, or make a fancy egg sandwich. Cause there will be leftovers, depending on how high you pipe the filling onto and into the egg whites.


Tag @sidsseapalmcooking on Instagram and hashtag it #Sidsseapalmcooking

All recipes and their respective images are either original or adapted and credited, and are all the sole property of Sid's Sea Palm Cooking, © 2011-2026, with all rights reserved thereof. 

Continue Reading
16 comments
Share:

Friday, March 17, 2023

Boxty with Smoked Salmon

 I used to participate in Fish Friday Foodies, but then my husband passed away and honestly, I just didn't feel 'it' anymore and basically stopped cooking and experimenting.  

Then Wendy said this was going to be the last Fish Friday Foodies, and I went, 'No! ', I'm finally starting to cook and experiment and play in the kitchen again, and I wanted to play this time.  I love Boxty's anyway and topped with Smoked Salmon, AMAZING!!!! especially with some Creme Fraiche on top.

Boxty with Smoked Salmon

So I did.   Years ago I was reading a book and they referenced Boxty's, which are an Irish potato dish.   The theme this month for the Fish Friday Foodies is Irish seafood dishes.   

So what do Irish Boxty cakes have to do with Fish?  Well, there are several recipes out there that include smoked fish inside the boxty's, but I'm just not that fond of including smoked fish inside a cooked recipe, so I searched and searched and finally found a reference to this dish.  Actually I found several references, you can see them here and here and here.
 

As many of you may know, I love my appetizers, so decided to make this as an appetizer cause I could, and I did.  You can however make the cakes a touch bigger, and serve them alongside a nice salad as a light lunch or dinner.  

Now for a fun ditty...

“Boxty on the griddle,

Boxty in the pan,

If you can't make boxty,

You'll never get a man.”

 Just had to throw that in there, cause it was cute.   

Now for one of the best parts of this recipe, you can use that little bit of mashed potatoes from dinner that you just can't bring yourself to throw away.    Many recipes call for adding grated fresh potatoes to leftover mashed, adding some flour, an egg, some milk.  

Come to think of it, I've been making these for years.  However, I usually just add everything together until it looks right, this time round I actually measured it out, just in case you want to do so as well.  

I gotta say this would have been a winner at one of our Tapas gatherings. Come to think of it, I think I need to do a Tapas Night again, and these would be perfect.  

I topped them with some smoked Salmon, my own homemade Créme Fräiche., some chopped chives from my garden and finely minced shallot.  

Dang, they were good.

Boxty with Smoked Salmon

Boxty with Smoked Salmon

Yield: 6-10
Author: Sid's Sea Palm Cooking
Prep time: 5 MinCook time: 7 MinTotal time: 12 Min
This makes not only a great appetizer but also doubles as a light lunch or dinner with the addition of a salad.

Ingredients

  • 4 russet potatoes
  • 2 tablespoons butter
  • 2 tablespoons cream
  • 1 egg
  • 1/3 cup milk
  • 1/3 cup flour
  • Salt and Pepper to taste
  • oil and butter for frying
Topping
  • Smoked Salmon slices
  • Créme Fräiche - homemade - link in post.- can use sour cream instead.
  • Chopped Chives
  • Finely chopped shallot
  • Fresh cracked pepper if desired

Instructions

  1. Cook two of the russet potatoes and mash with the butter and cream. Set aside to cool.
  2. Grate the remaining two potatoes and sprinkle a little salt over them, then place the grated potatoes into either a double layer of paper towel or a clean cloth and wring the liquid out of them, set aside while you mix up the flour, egg, and milk in a small bowl. Add the cooled mashed potatoes to the bowl and mix well. Finally, add the grated potatoes and stir in. (the grated potatoes might have turned a pretty shade of pink, but don't worry, this is a normal enzymatic reaction, they're perfectly safe to eat.)
  3. In a pan, heat up some oil and butter. I use a small spoon to measure out the batter, but you can use a 1/4 cup measure as well. Spoon the batter into the pan much like making small pancakes. Cook until brown on the bottom and then flip over and finish cooking on the other side. To keep them warm, place in a 200-degree oven while finishing off the remainder.
  4. Top with a slice of smoked salmon, some Créme Fräiche, finely chopped shallot, and chives.


Did you make this recipe?
Tag @sidsseapalmcooking on instagram and hashtag it # Sidsseapalmcooking

Continue Reading
3 comments
Share:

Thursday, March 17, 2022

Chutney Chicken Salad

 Got some leftover chicken?  

Have I got a recipe for you then.  

That is if you're not doing the 'traditional' Corned Beef today or you just happen to have some leftover chicken, not doing anything, but hanging around.  

Actually this would be good any old time of the year.  But if you are doing the traditional meal today, check out my Corned Beef recipe. I've actually got one going in my crock pot right now.  

Back to the chicken, I had cooked two large chicken breasts the other day, and ate part of one the first day, and the last two days, I ate this chicken salad.  

I may have to cook the other chicken breasts that are hanging out in my freezer, so I can make this again for myself.  I ate it on a bed of butter lettuce and felt rather virtuous. 'wink'.

Chicken Salad

I have to admit to making this for myself a couple of times now, but I'm ready to share how I made it along with the basic ingredients.  

This is a quick and easy salad to make and serve and is totally delicious.  You can add more or less of all the ingredients to serve 2 or more people.  Chicken loves sweet stuff, so the chutney mixes well with all of it. 

Finish off with a sprinkle of walnuts if you choose.  I think you could also use any kind of nuts as well. I usually have lots of walnuts on hand so, I used them. 

I used full fat mayo, but I bet you could also sub in Greek Yoghurt.  

In other words, make it to your taste.  


Chutney Chicken Salad

Chutney Chicken Salad

Yield: 2
Author: Sid's Sea Palm Cooking
Prep time: 10 MinTotal time: 10 Min
Leftover chicken meets chutney and makes friends.

Ingredients

  • 1-2 cups chopped cooked chicken
  • 2 ribs celery chopped
  • 1/2 cup dried cranberries
  • 1/4 cup chopped walnuts - opt.
  • Butter Lettuce - opt.
  • 1/4-1/2 cup mayonnaise
  • 1/4 -1/2 cup Major Grey Chutney

Instructions

  1. Cut the celery and leftover chicken into a dice- roughly the same size. Place the chicken, cranberries and celery into a bowl.
  2. Mix the mayo and chutney together and pour over the chicken mixture and toss it together.
  3. Mound the chicken salad onto some butter lettuce to serve. This is great with a slice of home made bread or a croissant.

Estimate only

Did you make this recipe?
Tag @sidsseapalmcooking on instagram and hashtag it Sidsseapalmcooking

Continue Reading
No comments
Share:

Monday, December 13, 2021

Brie Gougeres

 It's time for Baking Bloggers again.  

I haven't been participating in very many blogging events this past few months, but when I saw the theme for December, the little thinking cap hovered over my head and I got an idea.

The theme this month is Baked Party Appetizers.  And it also happens to be the last of Baking Bloggers cause it's been retired.  Something new will be happening in January though.  Stay tuned.

OK, so I got this idea cause I have a small wheel of Brie Cheese in the fridge that's been giving me the 'eye' lately. 

I bought it last month, and kept meaning to eat it, sliced on some good bread or with some crackers, but it's still sitting there, staring at me everytime I open the cheese drawer. And I got tired of those looks I was getting.

 So I elected to make some Gougeres using the Brie.  

I love Pâte à Choux pastry anyway, and honestly, I think it's about the most versatile recipe any cook should learn how to make.  I use the recipe I cut out of the paper back in the '80's which is Julia Child's base recipe. 

You can use the base for sweet or savory, heck,  you can even make it gluten free.  I've done it, and they were good.   

I did go here for inspiration for these, and have to say the my high school french came in handy as well.

And I made a couple of modifications as well, cause gee, I'm the baker here.

 I used Swiss cheese cause it was all I could find in our local grocery store.  And really, the slightly nutty taste of the Swiss cheese married very well with my Brie.   

Now Brie cheese is very soft, or at least it is if you leave it out at room temp to ripen, it becomes very soft.   However, I decided to try 'stuffing' my gougere with little cubes of cold brie.  

Let me show you how I cut it.  I don't remember exactly where I saw this for the first time, but can I just say this, 'IT'S BRILLIANT', and guess what, it also works great for cutting layer cakes as well.  Of course I'm the usually the one who actually scrapes the frosting off the cake before eating.  But when you cut the cake or in my case the wheel of brie, you get a more equitable distribution of the rind per slice.  In the case of a cake, you have the two ends with frosting, for the people who 'must have lots of frosting', and those who want cake with a little frosting.  Use your imagination here, cause I'm just showing how to cut the brie. OOOH, that might not have come out right. 'wink'.   

Brie Cheese

I did cut off the ends where there was a lot of rind, but I ate the cheese inside.  I'm not fond of the rind, but I will eat it,and was wishing I still had my Mauli dog who loved the rind.  She loved it when I bought Brie, cause I'd cut off the rind and feed it to her.  

Whenever possible one should share food with a loved one or ones. 

Here's a few pictures of the process, and my cohort in eating more than our fair share. 

and

and

Stuffed Gougeres


and 

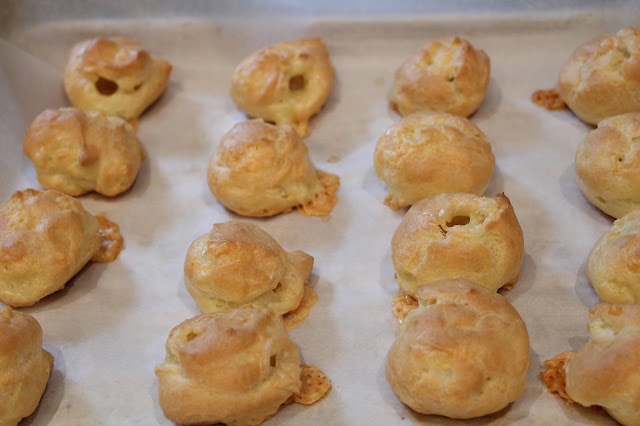
Baked Gougeres

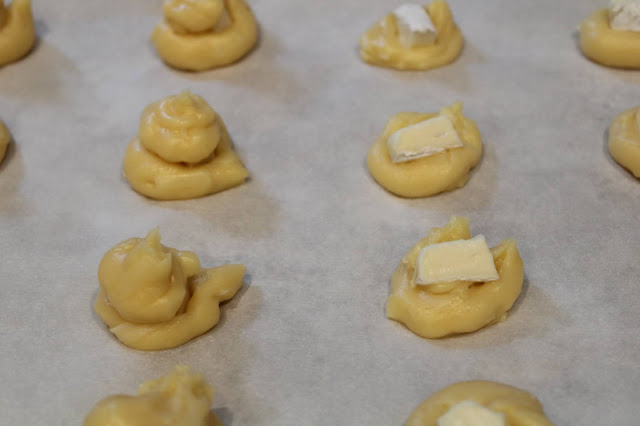
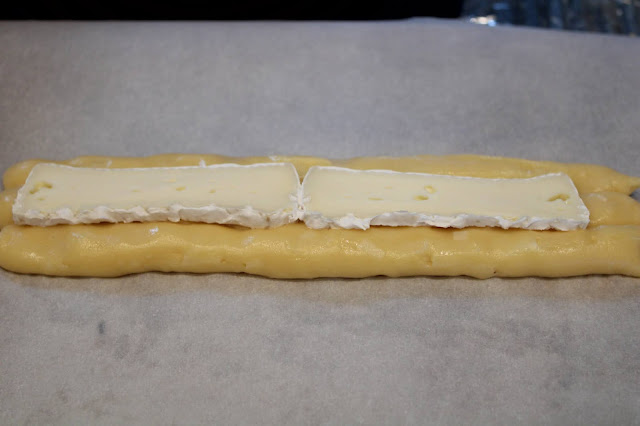
Had a lot of choux dough so thought I would play, a little more.  So I piped out a base, and then placed some slices of the Brie on top of it.

Stuffed Brie Gougere
Here's the Brie Gougere, piped and ready to bake.

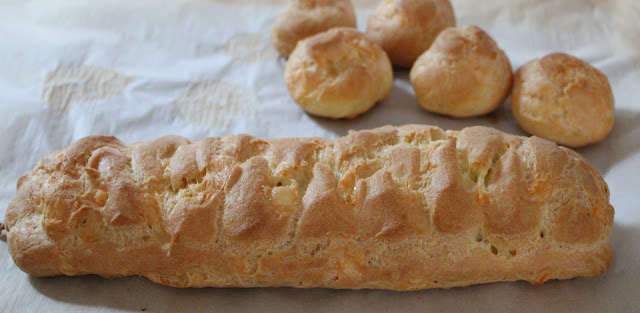
Baked Brie Gougeres Bar

After the bake, and it's ready to cut and enjoy.

Baked Stuffed Gougere Strip

Baked Brie Gougeres with a dab of Red Currant Jelly

Brie Gougere with Red Currant Jelly


Baked Brie Gougeres, see the lovely melty Brie cheese inside. 

Brie Gougere

Miss First enjoying her Brie Gougere topped with a dab of Red Currant Jelly.  She loves her melty cheese, she also has a bit of a sweet tooth, so this hit both her happy points.

Miss First enjoying her Brie Gougere

You can see the concentration here, as she eats her treat.

Miss First enjoying her Brie Gougere


Camembert Gougeres

Brie Gougeres

Yield: 6
Author: Sid's Sea Palm Cooking - inspired by quiveutdufromage.com
Prep time: 10 MinCook time: 25- 30 MinTotal time: 35 Min
This is a fun take on traditional Gougeres, using a traditional choux paste recipe and adding Brie cheese.

Ingredients

  • 1 cup water
  • 6 tablespoons unsalted butter, cut into pieces
  • 1/2 tsp. salt
  • 1 cup flour, all purpose, scooped out and leveled.
  • 1 cup eggs, (stirred together with a fork and measured into the cup, about 4-5 large eggs)
  • 2 oz. Camembert Cheese, cut into small pieces - look at the picture.
  • 4oz. Swiss Cheese - grated

Instructions

  1. Preheat oven 425 degrees.
  2. Heat water and butter together, bring to a boil. Take off of heat and dump the flour in and begin to beat it together. It will be rather lumpy at first but keep beating vigorously. It does come together. Keep beating it until it forms a large ball, then place back on medium heat and keep beating it, until it stays together and leaves a thin film of dough on the bottom of the pan. This tells you that a lot of moisture has evaporated, and it will accept more of the egg. Take off of the heat now. Add about 1/4 of the eggs to the dough and beat together. It will look very strange at this point, cause it separates and looks rather nasty, but keep beating and as soon as the egg has incorporated into the dough, dribble a little more in, and work your arm vigorously again, beating the egg in. (at this point you can use a mixer bowl and beat it in with that, but I don't like the dough as well when it is done this way, I find it softens it too much, but then again, if you can't beat the egg in by hand, use your KitchenAid, but dribble the egg in a very little bit at a time). Add the egg, a dribble at a time, beating vigorously with each addition. As soon as the egg is incorporated, add the grated Swiss cheese and combine. If the humidity is high, you may not need all the eggs, but if it's dry you will. I've been making this for many years and can tell from the feel of the dough if I need all the eggs or not. The pastry should just hold its shape when lifted with a spoon.
  3. Now, you're ready to bake your cream puffs. You can spoon them onto a lightly greased baking sheet or parchment covered baking sheet. My personal preference is for Parchment paper, but then again, it's up to you. I pipe the pastry onto the sheet, filling a piping bag with the dough, and cutting a hole in the bag. Pipe a small amount of the choux paste onto the parchment paper and then place a small piece of the Brie on top, pushing it in a little. Pipe another circle of choux paste on top, and using a wet finger (I kept a cup of water beside me for this step), seal the top and bottom of the dough together. Space them about an inch apart on the baking sheet. They will not spread, but will instead puff upwards as they bake.

 DO NOT open the oven to check the progress of the bake, you'll just doom those little puffs of golden deliciousness to a flattened doom.   Instead, turn the light on in the oven and watch through the glass door.  They are done when they are a lovely golden brown color.  And if you have trouble seeing the color through the door, you probably need to clean the glass off. 

Did you make this recipe?
Tag @sidsseapalmcooking on instagram and hashtag it #Sidsseapalmcooking


Baking Bloggers December 2021

Baked Party Appetizers

This is the final installment of Baking Bloggers before it is retired this month. Join us in January on the first Saturday as we begin a new recipe endeavor called “Supper Club Saturday” featuring a variety of favorite recipes from many of our same bloggers, and some new friends. We will also be posting on the last Saturdays of the month for a similar event called “Potluck Party”. See you there!

Continue Reading
3 comments
Share: