Friday, November 29, 2019

Cranberry Cheesecake Tarts

It's time to deal with the leftovers from Thanksgiving.  And by now you're probably up to your ears or mouths with ideas and recipes for all the leftover turkey.

You probably have leftover cranberry sauce as well.  While it's great layered on a turkey sandwich, you can also use it for a dessert.
Yup, dessert.
Cranberry Cheesecake Tarts

 I actually make extra cranberry sauce just so I can make these little tarts.  I also make sure I've got 'leftover' pie crust as well.

I was a Girl Guide in an earlier incarnation and our motto was 'Be Prepared', and in my case that means being prepared to deal with leftovers.

And true confessions time here, I sometimes would rather eat the leftovers from T'day because I can such fun with them.

Without further ado, and no drum riff, here's how I turn leftover Cranberry Sauce into a delicious and different dessert.
Cranberry Cheesecake Tarts

First off, this is best with either your own homemade cranberry sauce or whole berry sauce in the can.


Cranberry Cheesecake Tarts

Yield: 1 dozen small tarts
Author:
prep time: 10 Mcook time: 25 Mtotal time: 35 M
This is a great way to use up leftover Cranberry Sauce if you have any leftover after Thanksgiving or Christmas.

ingredients:

Cranberry topping
Pie crust
  • 2 cups flour
  • 1/4 lb. Butter
  • 2-4 tablespoons ice water (Use more if needed)
Cheese Cake Filling
  • 2 packages Cream Cheese, room temp 16 oz. total
  • 2 large eggs
  • 1 cup confectioners sugar
  • 1 teaspoon Homemade Lemon Extract
  • 1 tablespoon Lemon Zest
  • 1 tablespoon Grand Marnier

instructions:

How to cook Cranberry Cheesecake Tarts

Cranberry Sauce
  1. Heat the sauce up a little and add the sugar, stir until dissolved. Set aside to cool, while you make the pastry dough and the filling.
Pie Crust
  1. Rub or cut the butter into the flour, until the butter is the size of small peas. Then add the water, 1 Tablespoon at a time, and form into a ball. You do not want to work this very much. Divide the ball into two pieces and let it rest for about 40 minutes. (I say that cause that's how long I let it rest).
  2. Roll out and cut your tart shapes. Set aside for a couple of minutes while you get the filling together.
Cheesecake Filling
  1. Add all the ingredients together in the Kitchen Aid mixer and mix until the mixture is nice and smooth.
  2. Using a scoop (I used my smallest ice cream scoop here), scoop some of the filling into each of the tarts, the filling will poof up a little, so don't fill to the top. Add just a little spoonful of the Cranberry sauce to the top.
  3. Bake in a 350 degree oven for 25 minutes, or until the filling is set and the pastry is done.

Created using The Recipes Generator

Continue Reading
2 comments
Share:

Sunday, November 24, 2019

Thanksgiving Recipe Ideas.

It's almost T-Day!   Are you ready?

This year we'll be going  to a Friendsgiving, which is one of the best ideas ever.   I've hosted it a couple of times, and it was great, but it's so nice that I only have to bring a couple of dishes as my contribution this year.

I'm making and bringing an appetizer, this Butternut and Apple Galette.  This was so good, I just want to share this with the world.

as well as a Pumpkin Pie.  I do like to make my own crust, so there are full recipes here.
Here's a few ideas if you're still trying to figure out the menu, or what you'll be bringing to your celebration.

In years past I've made this amazing Green Bean Casserole, and you know what, it shouldn't be just made at T-Day either.  
Green Bean Casserole

as well as these No-Knead Rolls. No Knead Home Made Rolls

I just made these tasty little bites of deliciousness ( too much hyperbole?, Nah).  Pecan Pie Butter Tarts.  Perfect if you only want a little bite after all that turkey. 
Pecan Pie Butter Tarts

I also love making my Boozy Cranberry Sauce from time to time.  Although, I also like the jellied canned stuff. I just like Cranberries.  And when you're making this, it perfumes the entire house.

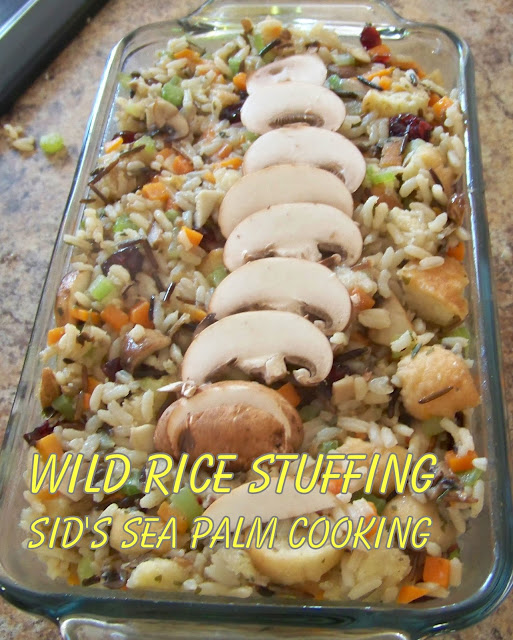
I also love stuffing, and make myself this Wild Rice Stuffing, cause I'm the only one in the house who eats stuffing, and I personally love this one.
Wild Rice Stuffing

Hint #1
A few years back, I was cooking meals for our local Senior Center and decided to do make a Christmas in July meal. 
I cooked several turkeys that day, and one of my volunteers, Lisa gave me the best hint.  After we took the foil draped turkeys out of the oven to rest, she put some towels on top, to maintain their heat, and those were the easiest turkeys I've ever carved.   When I cook a turkey now, I do the same thing. By letting the turkeys rest, under a towel before carving them, means you get a lovely moist meat.

Hint #2   If you make your turkey gravy from scratch, and end up with a lot of fat on top, you don't want, just dump a few ice cubes on top.  The fat will adhere to the ice cubes, and you can just scoop out the fat.

Hint # 3  I always keep a package of instant potatoes in the cupboard.  If you accidentally make soupy potatoes and lets face it, we've all made that mistake, just whisk in some instant and they firm right up. And... you don't need to use as much butter either.

and my final hint.
Hint #4 If you want super fluffy potatoes, heat the butter and milk or cream together until hot, before mixing it into your fresh cooked potatoes.   Because the milk and butter are already hot, they don't cool down the potatoes and stay nice and fluffy.

Now that I've given you some ideas, I hope your turkey is in the fridge, thawing, so that you don't end up trying to cook a frozen turkey on the big day.  It's not fun, trying to thaw a turkey in a hurry so that it's still safe to cook and eat.

Christmas is coming and my cookbook Hygge - Danish Food and Recipes would be a great gift for any foodies in your life. Available as a Kindle e book or in paperback.  

This post was also featured at Miz Helen's Country Cottage.  

Continue Reading
2 comments
Share:

Friday, November 22, 2019

Pumpkin Pie

I've been making pumpkin pies for years.
I've made them from scratch, totally scratch.  
As in growing the pumpkin, roasting it, making it into a puree and baking it.

Honestly, I've got better things to do with my time now, and prefer to buy my pumpkin, already grown, processed and in the can.  Even if it may have other squashes included.
My taste buds can't tell the difference quite frankly, and I love just opening a can and dumping it with the rest of the ingredients. 

All that being said, here is the recipe I make, and yes, I do make my own pumpkin pie spice mixture, because I like it.   If you make your own, you can customize it to your taste as well.

One fun thing about baking your own pie, is having fun with the scraps of dough left over from the crust.
Take a look at what I've done in the past.   Go for it, have fun, make a a pretty design on top.  Crimp the sides in a pleasing manner, I'm not too good at that part, I prefer a more rustic look.

And I also like the Plain Jane approach. 
Pumpkin Pie- Sid's Sea Palm Cooking


Pumpkin Pie- Sid's Sea Palm Cooking

Pumpkin Pie- Sid's Sea Palm Cooking

Pumpkin Pie- Sid's Sea Palm Cooking

 And sometimes I even get the crumbs...  this is all that was left of the last pie I made and brought to a gathering.  I'm just lucky I got to taste it.


Pumpkin Pie Filling

Yield: One 9 inch pie- 6-8 servings
Author:
prep time: 15 Mcook time: 45M total time: 1 hr
This is a lovely, rich tasting pie filling, which you can customize to your own taste, by simply altering the spices. It's also easy and quick.

ingredients:

  • 1 can pumpkin (15 oz.size)
  • 1 can Sweetened condensed milk
  • 2 eggs
  • 1 teaspoon cinnamon
  • 1/4 teaspoon ground ginger
  • 1/4 teaspoon ground cloves.
  • 1 recipe pie dough or a single pie crust

instructions:

How to cook Pumpkin Pie and filling

  1. Heat oven to 375 degrees.
  2. Pre-bake my crust about five - ten minutes, using a fork to prick some holes in the bottom.  This ensures that the bottom crust is cooked. 
  3. Turn oven down to 350 degrees. 
  4. Whisk  the filling  ingredients together and pour into prepared pie shell.
  5. Bake the pie for about 45 minutes or until a toothpick inserted in the middle comes out clean.  An old trick is to also use a clean knife and insert that into the middle, and if the knife blade comes out clean the pie is baked.   But sometimes the filling sticks to the knife even when it's baked.  I use an instant read thermometer and check that way if I'm unsure.  The internal temp should read 175 degrees. 
Created using The Recipes Generator

Continue Reading
No comments
Share:

Wednesday, November 20, 2019

Pecan Pie Fight- Pecan Pie Butter Tarts

It's time for another Fantastical Food Fight hosted by Sarah of Fantastical Sharing of Recipes and this time round we're fighting with Pecan Pies.
Pecan Pie Butter Tarts

Not really, we're just pitting our recipes against each other to see who comes out on top.  

I think everyone has a particular recipe they like for Pecan Pie, and personally I don't think there is such a thing as a bad one.

At least not that I've had.  Some of them have been a touch on the skimpy side when it comes to the addition of pecans, but others have almost overloaded the pie with pecans.

Actually I don't think you can overload it with pecans. My own personal viewpoint. 

But I wondered about adapting my favorite Butter Tart recipe for this challenge.
So I did.
This is not a Butter Tart with Pecans however, at least I don't think it is.
Cause Butter Tarts are pretty much sacrosant with Canadians.  You don't mess around with Butter Tart recipes.
I'm just sayin...

For fun I added some dried cranberries along with the Pecans, and I think I came up with a winner. 

At least my mouth said it was.

I thought I'd also share how I get those little circles of dough into the depressions in the tart pan.  I grab my handy, dandy shot glass and use it to press the dough down.  I know they make fancy ones that you can use, but this works well for me.
Pecan Pie Butter Tarts
 Here's how they look as I'm filling them.
Pecan Pie Butter Tarts
And of course, filled and ready for the oven.
Pecan Pie Butter Tarts

 Look at that gorgeousness. 
Pecan Pie Butter Tarts


Pecan Pie Butter Tarts

Yield: 24 mini tarts
Author:
prep time: 10 Mcook time: total time: 10 M
These are the perfect bite size treat for after Thanksgiving Dinner or for Christmas or just because.

ingredients:

  • 1/3 cup melted butter
  • 1 cup brown sugar
  • 1 egg
  • 2 tablespoons cream or milk
  • 1 teaspoon vanilla extract
  • 1/2 cup dried cranberries
  • 48 pecan halves - divided
  • Pie crust- either home made or bought

instructions:

How to cook Pecan Pie Butter Tarts

  1. Preheat oven to 400 degrees
  2. Melt butter and mix in the brown sugar, vanilla extract and cream.  Add the egg and whisk thoroughly.   Set aside while you chop the pecans and cranberries.
  3. Take half the pecans and do a rough chop, reserving 24 pecan halves.  
  4. Spray the inside depressions of a mini tarts pan with some non stick spray.
  5. Roll out the pie dough or unfold if using commercial pie dough.  Cut out enough circles of dough for each tart pan.  Place a circle of dough onto each depression in the pan, and using a shot glass press the dough down carefully, making sure not to tear the dough. 
  6. Add a little of the chopped pecans and cranberries to the bottom of each tart and then very carefully, pour the filling into each tart, filling it 3/4 of the way. 
  7. Bake at 400 degrees for 5 minutes and then turn oven down to 375 and continue baking for about 20-25 minutes or until the tarts are lightly browned. 
  8. Take out of oven and let cool.
Created using The Recipes Generator

You are invited to the Inlinkz link party!
Click here to enter

Continue Reading
8 comments
Share:

Saturday, November 16, 2019

Hatch Chile Soup- Relleno style for #SoupSaturdaySwappers

It's time for Soup Saturday Swappers again.  April of  Veggies First, Then Dessert is our hostess this month and set the theme as Sweet or Hot Pepper Soup.

Excuse me,  but with 15# lbs. of Hatch Chiles in the freezer, I knew my soup was going to be in the Hot Pepper group.
I do love my Hatch Chiles.  Even though this year, the mild Hatch were really fiery. WOOOOO!

I googled recipes, and looked at a lot of takes on soups, including one really intriguing sounding low carb soup, and then went, you know I love my Chile Relleno's, how can I make them into a soup?

I found this recipe , but I had all those Hatch Chiles, and wanted to use them.
I did make them some what low carb and left out the chicken, but used chicken broth, cause I had a lot on hand.

Because the Hatch Chiles I have this year are really spicy, in fact I can't tell the hot from the mild, I elected to use some canned chiles along with the others, because they're usually milder.

And then couldn't decide which bowl I wanted to serve my soup in, so I got two bowls dirty and then hurried up and ate the soup before it got colder.   Best part is, I've got lots for lunches this next week.


Hatch Chile Soup - Relleno Style

Yield: 4 servings
Author:
prep time: 10 Mcook time: 30 Mtotal time: 40 M
This soup makes 4 comfortable servings which tastes great.

ingredients:

  • 1 quart or 4 cups stock - Chicken or Vegetable
  • 1 cup canned chopped Hatch Chiles, or
  • 1 cup fresh, peeled chopped Hatch Chiles
  • 1 small onion, finely diced
  • 1 tablespoon olive oil
  • 1 can Cannellini Beans, drained (15 oz.)
  • 2 corn tortillas, torn into pieces
  • 1 cup shredded cheese, either Monterey Jack or Cojack
  • 1 1/2 teaspoons cumin
  • 1/2  + teaspoon chile-garlic-ginger paste ( I used my own home made) Add more if you like heat.

instructions:

How to cook Hatch Chile Soup - Relleno Style

  1. Saute the onions in the olive oil until softened and translucent, add the cumin to the onions and mix in.  Turn pan off and set aside.
  2. Add the sauteed onions, drained beans, chiles to the stock and simmer for about 15 minutes or until the onions are cooked.  Add the torn up tortillas and mix in.  The tortillas will break apart rapidly.  Let simmer another 5-10 minutes. Using an immersion blender, if desired, break up the beans and chiles a little.  
  3. Add 1/2-1 teaspoon of the chile-garlic-ginger paste and heat through.   Ladle the soup into an oven safe bowl, add a handful of cheese to each bowl and place under broiler until the cheese melts. 
  4. Serve.
  5. Note:  You can add chicken to this and use chicken stock if desired.  
Created using The Recipes Generator


Continue Reading
8 comments
Share:

Friday, November 15, 2019

Broget Fiskesuppe #FishFridayFoodies

It's time for Fish Friday Foodies again.  This time round Camilla of Culinary Adventures is our hostess and she suggested Soups and Stews from around the World. 

And I mean, Hello, I had to make something Danish.
No questions, if's and's, or buts.

I made this, it's called Broget Fiskesuppe.
Broget Fiskesuppe

I also had a tin of smoked mussels a friend had given me, and a dim memory came out and waved a little flag and reminded me of a soup I once tasted that had smoked mussels in it.

So I did what any self respecting person would do, well, anyone who has a FB group like mine called Dansk Mad og Opskrifter (Danish Food and Recipes), I asked the members if anyone had the recipe using smoked mussels. 
And one of the members, David Wilde came through and gave me the following recipe.
Broget Fiskesuppe
Broget Fiskesuppe

I have to say this isn't quite how I remember the soup I  had before, I loved the broth in this but honestly, I really don't care for multiple types of seafood in the same dish unless it's something stuffed with crab.

I will be trying this again, but instead, I'll use crab and shrimp together, no fish and no mussels.
I also think that the broth would be good with chicken and sausage. It never hurts to have a basic soup stock, that you can add various bits and pieces to. 

I  did make a few changes to the original recipe, adding some cayenne and turmeric as well as more curry.  


Broget Fiskesuppe

Yield: 4 generous servings
Author:
prep time: 10 Mcook time: 20 Mtotal time: 30 M
This is an interesting mixture of fresh and canned seafood. I served it in a bowl, but I think it would go great over some hot rice or pasta.

ingredients:

  • 1 large onion,
  • 1 large clove of garlic,
  • 1 leek, chopped
  • 4 tablespoon butter, divided in two
  • 1/2 tsp curry,
  • 1tsp paprika,
  • 1/2 tsp. Turmeric
  • 1/2 tsp. Cayenne
  • 4 tbsp flour,
  • 11/2 Liter  water, (4 1/2 cups water)
  • about 2 dcl. white wine vinegar or apple cider vinegar. ( I used 6 tablespoons of white wine vinegar)
  • 4 tomatoes, chopped
  •  400 grm. fish fillets (just under a pound)
  • 80-100 grm. shrimps, (fresh or frozen)(1/4-1/2 lb)
  • 1 small ds. mussels. ( I can smoked mussels)
  • chopped fennel or parsley ( I used Curry Leaf and Tarragon)

instructions:

How to cook Broget Fiskesuppe

  1. Chop the onion, leek and garlic and saute until the onion turns translucent in 2 tablespoons of butter.  Add the water, chopped tomatoes, curry, paprika, wine vinegar, cayenne and turmeric to the pan.  Bring to a boil, and simmer until the vegetables are done,  about 20 minutes.  Take an immersion blender to the soup, and blend.   Mix the remaining butter and flour together and whisk into the soup, bring to a boil, turn heat down and  then add the fish fillets and shrimp. Let cook for about 3-5 minutes or until the shrimp and fish are cooked.  Take off of the heat and add the drained can of mussels.  Sprinkle some chopped tarragon or parsley and fennel on top and serve. 
  2. I used some cooked fish and shrimp and basically just heated them in the broth. 
Created using The Recipes Generator

Continue Reading
6 comments
Share:

Wednesday, November 13, 2019

Community Potluck for November 2019

We had our Community Potluck the other day, and now I'm searching for new descriptive phrases and words to say about it.  

We had quite a turnout, and I neglected to get pictures of the containers, well, the Tagine tops, for the Moroccan dishes,  I thought I'd gotten them, but alas, I was too busy visiting with people. 
I did however get pictures of the contents, and as usual, I missed a couple of dishes, but hey, I do this for fun, and cause I like to do it.   
Without further ado, and no fanfare either, here are the dishes.
The two Moroccan dishes, one chicken and the other veggies. 

There was also this awesome Foccacia Bread topped with Pistachio's

a cornbread casserole
and Green Beans - the flat kind, so good
Deviled Eggs- always a hit
Two kinds of Mac n' Cheese- and you know me, when I see pasta I have to have some.
 Both were excellent - who doesn't like Mac n' Cheese?
I missed the shot of the Macaroni salad, sigh.
But there was an excellent Sausage and Chicken Gumbo- hmmm, this has given me an idea, I have some lovely Andouille sausage in the fridge that needs cooking.
As well as some Chili - it's getting cold out there, and I'm thinking it's time for me to make a pot of chile as well. 
I  made a couple of appetizer type dishes. 
A tomato tart - I'll be sharing the recipe soon
I also made the Butternut and Apple Galette, I think I'm in love with this.
There is nothing like fresh picked greens in a salad.  The marinated carrots were awesome in here.

Spanakopita - love these, so good.
and desserts
Cookies, cakes and pies.

If you go home hungry from one of our gatherings, that is your problem, cause there's usually something her for everyone. 


Continue Reading
No comments
Share:

Monday, November 11, 2019

Butternut and Apple Galette for Baking Bloggers

 I had high hopes for this, and I wasn't disappointed.  Look at those lovely layers
Butternut and Apple Galette
 

BTW, it's time for Baking Bloggers and the challenge this month was to make a Holiday Pie.

Sue of Palatable Pastime is our hostess here.

So I started thinking of what is usually served for the holidays, and it comes down to Pumpkin Pie, Pecan Pie, Sweet Potato Pie, and of course Apple Pie.

This is also the time of year when you get Butternut Squash and Acorn Squash and various other great squashes in the grocery stores, if you haven't grown them yourself.

Coincidentally, I love making Galettes as well,  which is basically a free form pie.   They're fun to make, have a lovely rustic feel to them and taste great.  

This time of the year, when you've got every single pie plate filled with other pies, this is also perfect to make, no pie plate required.

BTW,  I'm bringing one of these to Thanksgiving this year.  I think it fits perfectly with the holiday season. 
So I wondered, could I combine a squash and apples in a pie?  I went into my old cookbooks, but nada, no inspiration there, so I went googling.   I found this recipe, and this one and also this one.  All sounded great, and they were all very similar.
As much as I love, love, love onions, I didn't want to include onions in this.

I also had a pie crust in the freezer that needed to be used, and it was perfect for this. Every so often, I make a bunch of pie crusts up, and freeze them in a sheet to use for pies.  I make several at a time, because they're a little on the messy side to make but taste so good. 

I did have a bit of fun with this.  A few years ago I made this Kentish Pie, which is fabulous served warm or at room temperature and has a lovely flavor.

  
The reason for mentioning it?  Because as I was brushing egg on top of the pastry to get a lovely golden sheen to it, I hated the thought of wasting the rest of the egg.  So I added a few little chunks of the Havarti and poured it into the center of the Galette. 
You do have to be careful that there are no holes for the egg to run out of though, sigh.  This is why a commercial pie crust would be good here, no holes. 
Butternut and Apple Galette
Some of the egg escaped, but enough stayed behind and well, here's a look at some of the layers, before the folding over.  I like making it look pretty, especially since I'm  taking pictures.
I arranged the thin slices, alternating them in circle. 
I also used a pie crust that I'd been hoarding saving in the freezer.  
Butternut and Apple Galette

I forgot to add the cheese until after I'd folded the sides over, so I just tucked it in. Mise en place, anyone? 
Butternut and Apple Galette
But look at the beautiful thing.
Butternut and Apple Galette
Not too sure if I should admit it, but I had a hard time not eating the whole thing, one sliver slice at a time.  You can see the lovely layers in this piece.  And the taste is amazing. 
Butternut and Apple Galette

The Havarti is a nod to my Danish side, ;) (Wink). 

Hope you have a great Holiday Season. 


Butternut and Apple Galette

Yield: 8 servings for appetizer or 3 servings for a light lunch
Author:
prep time: 15 Mcook time: 40 Mtotal time: 55 M
This is a multi-purpose, easy to put together and delicious appetizer or light lunch. A little bit savory, a little slice goes so well with a glass of Rose or other light wine. Serve with a salad for lovely lunch as well. This tastes great either warm or at room temperature.

ingredients:

Butternut and Apple Galette
  • 1 round pie crust, purchased is fine for this
  • 1/2 butternut squash, sliced thin
  • 1 apple, cored and sliced thin
  • 2-4 slices cooked bacon - cut into eights
  • 2 ounces Aged Havarti, cut into slices
  • 1 egg- whisked with a fork
  • 1/2 teaspoon chopped fresh Rosemary

instructions:

How to cook Butternut and Apple Galette

  1. Preheat oven to 375 degrees.
  2. On a flat rimmed baking  sheet, place a sheet of parchment paper.
  3. Fry the bacon til crisp if you don't have any already cooked, drain and set aside.
  4. Peel and slice the butternut squash and set aside while coring and slicing the apple. 
  5. Place a sheet of pie dough on the parchment paper on the rimmed baking sheet.
  6. Place the squash and apple on the pie crust, in the center,  alternating them in circular fashion, two inches in from the edges.   Add the bacon and sliced Havarti cheese on top, evenly.  
  7. Fold the edges of the pie crust in towards the center leaving a hole in the middle.   
  8. Brush the edges of the crust with the egg, and then pour the remainder of the egg into the middle of the galette. 
  9. Place in the preheated oven and bake for 30-40 minutes or until crust is a golden brown. 
  10. Take out of oven and let rest for 10 minutes before cutting into wedges, or allow to cool to room temperature before serving.  Sprinkle with the chopped Rosemary before serving. 
Note:  You could sprinkle the chopped Rosemary on the inside before baking, but I like the little pop of Rosemary flavor on the top.  It doesn't hijack the entire dish either.  
Created using The Recipes Generator

Baking Bloggers

Holiday Pies

Continue Reading
12 comments
Share: