Tuesday, June 30, 2015

Boller i Selleri (Meatballs and Celeriac aka Celery Root)

You ever get a craving for a dish that your mom used to make, when you were a kid? 
I got that craving a couple of weeks ago when I saw some Celery Roots aka Celeriac at a grocery store in the big city.
Typically Celeriac is harvested in the fall, and this is usually a fall dish, not a summer one.
But when you see something out of season like this and your mouth starts to water at the thought of making a dish from childhood, you just gotta go for it.

I did, at any rate.
Boller i Selleri (Meatballs with Celery Root)

And it tasted so good.    And best of all, I made enough for a couple of meals.  I know from past experience that this freezes nicely.   Cause the last time I made this, it was in my pre-blog days, and I got to eat it for several meals.  (I found out the the fresh Tarragon Leaves I used to 'pretty' up the picture, tasted fantastic with the celery and meatballs, for lunch the next day. A friend gave me a Tarragon plant, and made me a very happy Dane.)

Let me tell you the process.

Celery Root
You take out your Celeriac (celery roots) , and rinse them off.  Then cut a small slice from the top, so you have a level place to rest the root on.
You then cut off the peel with a sharp knife.
Celery Root
Continuing all around the sides and then cut off the roots.  You'll end up with this.
Peeled Celery Root


Celery root cubed and cooking in pot


I served it with some fresh green beans a friend had given us from her garden, and some sauteed mushrooms.
Boller i Selleri (Meatballs and Celery Root)


yield: 4 servingsprint recipe

Boller i Selleri (Meatballs and Celeriac aka Celery Root)

prep time: 10 MINScook time: 15 MINStotal time: 25 mins
This is yet another taste from my childhood. We'd grow and  harvest the celery roots, wash them off really well, then peel and cut them.

INGREDIENTS:

  • 1 lb. unseasoned ground pork
  • 1 small minced or grated onion
  • 2 eggs
  • 1/2 teaspoon salt
  • 1/2 teaspoon black pepper
  • 1/2 cup flour
  • 1/4 cup milk
  • 2 celeriac roots, peeled and cut into dice
  • 2-3 cups water for cooking the celery
  • 2 tablespoons flour mixed with 2 tablespoons butter to make a roux

INSTRUCTIONS:

  1. Place the meat, onion, eggs, milk, flour, salt and pepper into the bowl of a stand mixer. Mix together for about 5 minutes. While the meat mixture is mixing, peel the Celeriac (celery root)  and cut into pieces.
  2.  Place in cold water, bring to a boil and cook for about 5 minutes. Then form the meatballs using either a spoon or a scoop and drop the meatballs in with the simmering celeriac root and water.
    Continue to simmer over low heat for an additional 5-10 minutes or until the meatballs are cooked. 
  3. Using a slotted spoon, remove the meatballs and celeriac to a separate bowl. Let sit while you thicken the liquid the meat and celery cooked in. Whisk in the butter and flour roux, let cook until thickened and then add the meat and celeriac root back in. Serve.
All recipes and their respective images are either original or adapted and credited, and are all the sole property of Sid's Sea Palm Cooking © 2011-2020, with all rights reserved thereof.

This recipe and many more Danish Recipes are in my cookbook Hygge- Danish Food and Recipes Dansk Mad og Opskrifter til et Hyggeligt Hjemme, available on Amazon. Also available as an ebook.
Created using The Recipes Generator
Continue Reading
1 comment
Share:

Saturday, June 27, 2015

Caprese Bites Appetizers

I have a problem.
Well, not so much of a problem but still...

When I go shopping in a grocery store and have time to look around a little, I'll pick up different foods, and then try to figure out what to make from them.

That was the case a couple of weeks ago.   I was just perusing the cheeses, and saw this package of Mozzarella Pearls by Belgioso.   I picked it up, put it in my cart with absolutely no idea as to what I was going to make with them.

I figured it out.
Caprese Bites

I made these little Caprese Bites and put them in little shot glasses.   Just before I served them, I drizzled them with some Quince Pomegranate White Balsamic Vinegar.
Caprese Bites
Caprese Bites
Just layer a Mozzarella Pearl on a toothpick with a cut or whole grape tomato and finish off with a fresh Basil Leaf.  Nestle them in a disposable shot glass, and VOILA!!!!
Caprese Bites on the Tapas Table

Simple, elegant and fun.

And they taste good too. 

Continue Reading
No comments
Share:

Thursday, June 25, 2015

Maple Glazed Chicken

I admit it, I need to wear my glasses when reading a recipe, sometimes the difference between an 1/2 and 1/4 cup can make a big difference in a recipe.

And it wouldn't hurt me to check the fridge to make sure I really do have that Dijon Mustard that I know I have, hidden away, right in the back, just to the right of the pickles.

So, now you've heard my tale of woe, let me share with you what I did do, and how fantastic the chicken tasted.

First off I got my ingredients out.  And that was when I discovered that the Dijon Mustard was missing.
However I persevered, and ummm, got all the amounts wrong, but that's OK. 
Here's my recipe, or how I done did it.

Recipe:
1/2 cup Maple Syrup
1/2 cup Yellow Mustard.
1 tablespoon Rice Wine Vinegar
1 tablespoon Emeril's Horseradish Mustard.

Whisked it all together and then poured it over the chicken.
I used my pastry brush to make sure I got some of the sauce on all of the chicken.
Put this in a 450 degree  oven for 45 minutes, turned the chicken, baked it for another 15 minutes and decided I wasn't getting the nice brown on the chicken I wanted, so...
I got out my reusable parchment sheet, the one I've told you about before.
Placed it on a rimmed baking sheet.  And then proceeded to put the semi-browned chicken on it.
As you can see, I got some lovely browning on the drumsticks there.  And the sauce cooked down nicely.  Although I did take most of the sauce out and boiled it on the top of the stove, trying to reduce it a little.  It didn't work all that well, but I'm freezing the rest to use later on.
At any rate, I boosted the oven temp up to 500 degrees and let the chicken cook for another 15 minutes.  The internal temp was about 200 deg. on the chicken and they were falling off the bone tender.
And very flavourful.  Not too sweet at all.
I'm going to use the leftover sauce on some wings a little later on.  I'll let you know how that goes.

There really wasn't much chicken left after Tapas and what was left, made for a couple of great lunches.
I also think it could have used a good sprinkling of some chopped herbs.

I wonder how some freshly chopped Tarragon would go on this?

And that leftover sauce, I'm thinking it might make the base for basting on some wings.  I'm still trying to perfect my perfect wings.  


Continue Reading
No comments
Share:

Tuesday, June 23, 2015

Soba Noodle Salad

I've had a package of Soba Noodles sitting in the pantry for a couple of months now.  I picked them up on a whim, thinking that because Soba Noodles are made with Buckwheat flour that they're Gluten Free.

Well, they're not.

But since I had them, I decided to make something with the noodles for Tapas this month.  I'd googled Soba Noodles and saw that you could eat them either hot or cold.   And since it's kinda warm outside I decided to make them into a cold salad.

Then I had fun.  I did have some carrots in the fridge, but I wanted to include more veggies in the salad.  I thought maybe some green onions, and maybe some snow peas and for additional color and crunch, some red pepper.

Actually I thought of all of those after going to the grocery store and seeing what was available.  I also picked up a package of mushrooms, but decided against using them in the salad.  I thought they might get a little slimy.

So...

Now the adventure begins.

Soba Noodle
Or rather it began.

I measured the package of noodles against a skillet and decided that they would fit nicely in the pan, so I got some water boiling, then I opened up the package of noodles and dumped them in.

That was when I found out that the noodles were nicely bundled together in three smaller bundles.

With little plastic wraps holding them in place.

Do you have any idea how hard it is to cut those little wraps, while trying to fish out and separate the noodles in boiling water?

Well I managed to get most of them, separated, and cooking.  There were however, some bundles of noodles which had fused together, they became an offering to the Kitchen Goddess.

I have been known to make offerings like that from time to time. 

After the noodles had  boiled for the requisite 4 minutes, I took them out, rinsed them in cold water and set them aside, while I prepared the vegetables.
I cut the green onions into strips, along with the carrots, snow peas and some red pepper.   I wanted them all to be strips to go with the noodles.     And I made a mess. 
But I cleaned it up later. 
I also used my new Miracle Blade chopper, and didn't cut myself, not once.
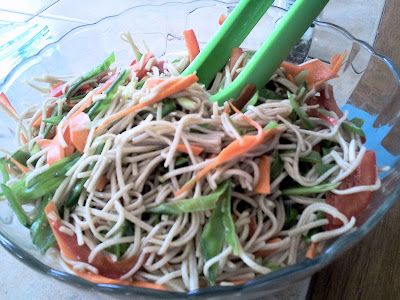
I tossed the vegetables into the cold noodles and then I dressed them.
I wanted them to be pretty.

They were going to a party after all.

I whisked together some rice wine vinegar, soy sauce and sesame seed oil, and then added a little hot sesame oil for kicks.

Recipe:  Soba Noodle Salad

1 package Soba Noodles, cooked and cooled
1 bunch green onions, sliced into strips
1 carrot cut into matchsticks
1/2 Red Pepper, cut into strips
4 oz. snow peas

Dressing:
1 Tablespoon Rice Wine Vinegar
1 Tablespoon Sesame Seed Oil
1-2 Tablespoons Soy Sauce
1/2 tsp. Hot Sesame Oil (or to taste)

Whisk together and pour over the noodles and vegetables, toss together and taste.  Then put them all into a sealed container and let them rest for a couple of hours in the fridge.
Soba Noodles
After one hour, toss again to make sure all the sesame goodness is distributed evenly.

I liked the 'kick' the Hot Sesame Oil gave the salad.  And after tasting, I didn't think that I needed to mess around with any other seasonings.
Soba Noodle

In fact, there was hardly any salad left after Tapas.

I will make this again, but the next time, I'll separate the noodles before dumping the whole package into the boiling water.  And I think that some Bok Choy might just find their way in as well as some Napa Cabbage?


Continue Reading
No comments
Share:

Sunday, June 21, 2015

Tapas Night for June


It was Tapas Night last night, and as usual, lots of great food and fun.

And since we got our A/C unit replaced, it was actually nice and cool inside.
Well, with one slight exception, I'd turned the temp down earlier in the day, but we have the thermostat programmed to lower the temp around dinner time, and it kicked in, which set the temperature higher than I wanted.   But it was all good, I turned it down again and lovely, lovely cool air wafted through the room, again.

But you probably want to know about the food. 
We had some fun stuff.  Let me show you.
Just one overview of the table.   We had a lighter than normal turnout last night, but that's OK, cause I don't think I could have eaten one more bite.
We have such phenomenal cooks here, who really step up to the plate and shine.  (Had to throw that in there since there's a baseball tournament being held this weekend, as well as a fishing tournament and a golf tournament).  There weren't any foul balls, everything was on par and every dish hooked us all.
There, did I hit every sport? 
Tough, I tried.
Here's the rundown.   Of the dishes brought that is.
 This was a yummy rice and squash dish, and had a lovely heat to it.  Susie used Rotel Tomatoes in here recipe and it was lovely.  And the pretty blue bowl made a nice contrast.
 Couscous, and it tasted so good.  I love Couscous anyway. 
And it's one of those versatile grains/pasta items you can do so much with.  
One of the things I like best about Tapas Night is seeing the incredible serving dishes that are used for the food.  This is a wooden bowl from Madagascar and I had to do a close up shot of the lid.   Is this not gorgeous?
 I love it when one of our guests gets inspired and brings something like this.  I never did find out if it actually has a real name, but it's Portuguese inspired and was so delicious.  There were clams and Chorizo, the Spanish kind, potatoes and the most wonderful broth.  I could have just drunk it by the glassful.  I did scoop up a bowlful and stuck it in the fridge for laters. 
 And then there were the beans, baked beans that is, with some lovely bacon strips on top.   Sigh.   I love beans.  And these tasted so good. 
 Here's another shot of the table. 
 Another popular item is always crudites.  We all love them, and nothing quite satisfies like a handful of fresh veggies.
 Unless of course it's fritters.   I apologize for the picture, the sun was coming in and part of the picture was in the dark, and part of it was light.  So I twiddled with it a little and I think it looks a little better.  However the Yellow Squash Bites and the Ham Bites were so good.   I noticed that they were very popular.
 I didn't get an up close shot of this dish, but luckily I got it in one of the overall shots of the table so I just edited it a little and made a close up. This was a  fresh corn, black bean salad.  Crisp and fresh and so good.


And I did make a few things along the way as well.

I made a Soba Noodle Salad, and I will share the recipe and my adventures with Soba Noodles later on. 
I made some Maple Glazed Chicken Drumsticks which I adapted from another recipe, and they were so good. 

I'll share my adventures with them later as well.

I had adventures in the kitchen, sigh.  But it's all good.  At least I didn't burn or cut myself and nothing ended up on the floor. 


I also made some Caprese Bites and placed them in shot glasses and poured a little Quince Pomegranite White Balsamic Vinegar over them.  And they were good.
I'll share the how-to's on that later on as well.


And now for the rest of the story.
In other words, we also had a nice selection of Desserts. 
 A little overview of the Dessert table.
 There was this fun cake, one of those cakes the the baker could probably never recreate but it had a little of this, a little of that added and I liked it, a lot.
There was fruit in here. And Pistachio's and coconut and ...


 There was a fruit bowl, in a real fruit bowl.  
I love it when someone does this.   And with the hot weather outside, fruit does go down well.


Another of our guests brought a fruit plate, and again it was very tasty and fresh.  And so pretty.  


I think it was a fruity night.  Cause there was also this Peach Layer cake which was eaten.  I think there was a slice or two left at the end of the night.


Well that's it for this month, time to go and wash the wine glasses and remember the conversations and the fun we had.   

Continue Reading
No comments
Share:

Friday, June 19, 2015

Baked Onion Blossoms

A few weeks ago the Senior Center was given a box of fresh Vidalia Onions.

I got so excited when I saw them, and I immediately started making plans for them, lots and lots of plans.

Vidalia Onions have got to be my favourite kind of onion.   But I won't turn down onions in any form actually.

I love onions, you can cook with them, caramelize them, eat them raw, and you can do this with them.
Baked Onion Blossoms
Bake them after cutting them into blossoms.  And they are so good.

To start with, you need onions.   I like Vidalia's but any onion will work, you do need not a round onion, but one that is a little flatter. 

Peel the onion carefully and cut the root off, leaving a level spot.
Then cut down from the stem end crosswise making at least four even cuts. 
Onions for Onion Blossoms
 But don't cut all the way through, just down to the root.
Onions for Onion Blossoms
Place on a greased pan and drizzle about a teaspoon of good olive oil over the top, then a bare sprinkle of salt.  Make sure you don't crowd them, they need room to 'blossom' out .

Yeah, I know I said to add salt.   And I usually don't, but the very slight hint of salt here helps the onions' natural sweetness come out.
Bake in a moderate oven, about 350 degrees for about 45 minutes.
They'll look like this.
Onion Blossoms
A little browned and almost cooked all the way through.
Take a spatula and very carefully slip underneath each 'blossom' and transfer them to a different pan,
like this.
Onion Blossoms
Add about 1/4-1/2 cup water, cover and let bake an additional 15 minutes.
Remove and serve.
We served them yesterday on top of the Mojo Pork,
and in the past served them as a side to the Chicken and Dumplings.
These are are so good.

I think you could also serve them with a dipping sauce, but really, I don't think you need anything other than the onions.

BTW, that lovely fond that's left in the bottom of the pan after baking, is wonderful added to homemade stock.  Any kind of stock. 


Continue Reading
No comments
Share: