I love Pâte à Choux, and all of its iterations. I love it filled with Creme Patisserie, gilded with some melted chocolate, I love it filled with whipped cream and dusted with confectioners sugar, I love it made the way my mom made it, when we had unexpected company for afternoon coffee. I love it made into dumplings for soup. I just plain love it. That being said, I'm going to introduce you to some of my favorite ways of preparing it, over the next few postings. For today, I'll go with the basics.
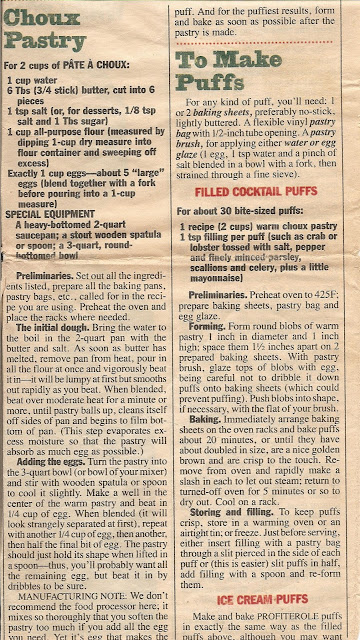 I actually got this recipe out of the Parade Magazine back in the 1980's when Julia Child was still pretty active. And I've been making it from her recipe ever since. My copy of the recipe is pretty dog eared now, and I finally figured out that I could scan it and save it on my computer. Can anyone say DUH!!!! At least now I don't have to worry so much about it suddenly falling apart on me, now I just have to worry about computer crashes. Sigh, as if there weren't enough stuff to worry about. There are other recipes out there, and sometimes I make this the way my mom made it as well. Depends upon how humid it is outside. Really! More humid, less eggs needed. But for starters, Julia's recipe is a good one, and a good starting point.
To start with, make sure you have all the items you need ready. The French call it Mise en Place, which means everything in place. It just makes sense, you don't want to be searching for anything once you get started. Have your oven preheated, get out the utensils you need, measure out the ingredients you'll be using, and get them ready. This also helps you to maybe not forget key ingredients like, oh say, salt, sugar or in my case, I once made carrot cake for a friend and put the cake in the oven and thought it looked a little skimpy and realized, I'd forgotten to put the carrots into the batter! You've never seen anyone get a cake out of the oven faster and fold in the carrots and back into the oven than me that day. By the way, the cake turned out great.
Without further ado... The full recipe follows at the end, but here are the steps you need to take first.
 I actually got this recipe out of the Parade Magazine back in the 1980's when Julia Child was still pretty active. And I've been making it from her recipe ever since. My copy of the recipe is pretty dog eared now, and I finally figured out that I could scan it and save it on my computer. Can anyone say DUH!!!! At least now I don't have to worry so much about it suddenly falling apart on me, now I just have to worry about computer crashes. Sigh, as if there weren't enough stuff to worry about. There are other recipes out there, and sometimes I make this the way my mom made it as well. Depends upon how humid it is outside. Really! More humid, less eggs needed. But for starters, Julia's recipe is a good one, and a good starting point.
 To start with, make sure you have all the items you need ready. The French call it Mise en Place, which means everything in place. It just makes sense, you don't want to be searching for anything once you get started. Have your oven preheated, get out the utensils you need, measure out the ingredients you'll be using, and get them ready. This also helps you to maybe not forget key ingredients like, oh say, salt, sugar or in my case, I once made carrot cake for a friend and put the cake in the oven and thought it looked a little skimpy and realized, I'd forgotten to put the carrots into the batter! You've never seen anyone get a cake out of the oven faster and fold in the carrots and back into the oven than me that day. By the way, the cake turned out great.
Without further ado... The full recipe follows at the end, but here are the steps you need to take first.
Heat water and butter together, bring to a boil.

Take off of heat and dump the flour in and begin to beat it together.

It will be rather lumpy at first but keep beating vigorously. It does come together. Keep beating it until it forms a large ball, then place back on medium heat and keep beating it, until it stays together and leaves a thin film of dough on the bottom of the pan.

This tells you that a lot of moisture has evaporated, and it will accept more of the egg. Take off of the heat now.
Add about 1/4 of the eggs to the dough and beat together. It will look very strange at this point, cause it separates and looks rather nasty, but keep beating

and as soon as the egg has incorporated into the dough, dribble a little more in, and work your arm vigorously again, beating the egg in. (at this point you can use a mixer bowl and beat it in with that, but I don't like the dough as well when it is done this way, I find it softens it too much, but then again, if you can't beat the egg in by hand, use your KitchenAid, but dribble the egg in a very little bit at a time). Add the egg, a dribble at a time, beating vigorously with each addition. If the humidity is high, you may not need all the eggs, but if it's dry you will. I've been making this for many years and can tell from the feel of the dough if I need all the eggs or not. The pastry should just hold its shape when lifted with a spoon.
Now, you're ready to bake your cream puffs. You can spoon them onto a lightly greased baking sheet or parchment covered baking sheet. My personal preference is for Parchment paper, but then again, it's up to you.
Form small balls, and space them about 1 inch apart on the baking sheet.

(Sometimes I pipe the pastry onto the sheet, filling a ziploc bag with the dough, and cutting a hole in one corner of the bag). Using a damp finger smooth out the tops of the puffs, and brush with an egg wash if desired. Sometimes I do this, and sometimes not.


Bake for about 20 minutes, or until golden and puffed. DO NOT OPEN OVEN TO CHECK THE PROGRESS, THEY WILL FALL! Check after 20 minutes, and if they are nice and golden brown, then you pierce the side of the puff with a knife and place back in the oven.

Oh yeah, turn off the oven, before you put them back in. This allows the steam to escape and helps them to dry out a little.

And there you have it, wonderful little puffs of golden deliciousness, ready to be filled with either savory or sweet fillings.
yield: 24-36 Cream Puffs or?
Choux Paste
prep time: 20 MINScook time: 25 MINStotal time: 45 mins
This is the best recipe for Cream Puffs. No added sugar means you can make these sweet or even fill with a savory chicken or shrimp filling.
INGREDIENTS:
- 1 cup water
- 6 tablespoons unsalted butter, cut into pieces
- 1/2 tsp. salt
- 1 cup flour, all purpose, scooped out and leveled.
- 1 cup eggs, (stirred together with a fork and measured into the cup, about 5 large eggs)
INSTRUCTIONS:
- Preheat oven 425 degrees. Heat water and butter together, bring to a boil. Take off of heat and dump the flour in and begin to beat it together. It will be rather lumpy at first but keep beating vigorously. It does come together. Keep beating it until it forms a large ball, then place back on medium heat and keep beating it, until it stays together and leaves a thin film of dough on the bottom of the pan. This tells you that a lot of moisture has evaporated, and it will accept more of the egg. Take off of the heat now. Add about 1/4 of the eggs to the dough and beat together. It will look very strange at this point, cause it separates and looks rather nasty, but keep beating and as soon as the egg has incorporated into the dough, dribble a little more in, and work your arm vigorously again, beating the egg in. (at this point you can use a mixer bowl and beat it in with that, but I don't like the dough as well when it is done this way, I find it softens it too much, but then again, if you can't beat the egg in by hand, use your KitchenAid, but dribble the egg in a very little bit at a time). Add the egg, a dribble at a time, beating vigorously with each addition. If the humidity is high, you may not need all the eggs, but if it's dry you will. I've been making this for many years and can tell from the feel of the dough if I need all the eggs or not. The pastry should just hold its shape when lifted with a spoon.
- Now,
you're ready to bake your cream puffs. You can spoon them onto a
lightly greased baking sheet or parchment covered baking sheet. My
personal preference is for Parchment paper, but then again, it's up to
you. Form small balls, and space them about 1 inch apart on the baking sheet.
(Sometimes I pipe the pastry onto the sheet, filling a ziploc bag with the dough, and cutting a hole in one corner of the bag). Using a damp finger smooth out the tops of the puffs, and brush with an egg wash if desired.
Bake for about 20 minutes, or until golden and puffed. DO NOT OPEN OVEN TO CHECK THE PROGRESS, THEY WILL FALL! Check after 20 minutes, and if they are nice and golden brown, then you pierce the side of the puff with a knife and place back in the oven which you just turned off.
Created using The Recipes Generator


No comments:
Post a Comment
I love to hear from my readers, so please feel free to drop me a note, let me know if you like something I made, it makes my day.